Contribute to the DSpace Development Fund
The newly established DSpace Development Fund supports the development of new features prioritized by DSpace Governance. For a list of planned features see the fund wiki page.
Contents
Theme Tutorial: Getting Started with Manakin Themes
This quick guide is intended to walk you through the process of setting up your first Manakin theme. The first part will take you from the process for creating a blank new theme, configuring that theme, and finally installing it to apply to specific DSpace pages in order to set the stage for further development. The second part will cover some useful debugging and development methods as well as some common "gotchas".
Part 1: Creating a new theme
Create a folder where the theme will be stored at in the themes directory.
Locate your local themes directory. In DSpace 1.5 it is located at dspace-source/dspace-xmlui/dspace-xmlui-webapp/src/main/webapp/themes/
If this is a fresh installation, you might have to create the themes directory inside webapp. Create a new directory inside themes and name it after your new theme. Remember the directory name; it will come in useful when configuring the pages that the theme will be applied to.
Create a sitemap file for the theme.
Once a directory is created to house the theme, the next step is to create the theme itself. The heart of a theme is a single Cocoon configuration filed called a sitemap that determines how the theme processes the DRI document passed to it from the aspect chain. Through the sitemap the theme can be configured to apply different transformations and add metadata to the DRI document, generate debug output and do various other things. Since creating a new sitemap from scratch requires good working knowledge of Cocoon and Manakin internals, a template sitemap is provided as a starting point.
The template is located in the dspace-source/dspace-xmlui/dspace-xmlui-webapp/src/main/webapp/themes/ template directory and includes a sitemap configured with the most common settings as well as the instructions on changing them. The template also comes with blank xsl and css files, referenced by the sitemap, to help you get started. Copy the contents of the template directory into your new theme.
Configure the sitemap
A theme's sitemap is responsible for performing the following tasks:
- Generate the DRI page. This step generates a DRI-encoded XML representation of the DSpace page currently being processed. This is done by requesting the said page from the Aspect Chain.
- Add page metadata. This step places a reference to the CSS files that the theme will use into the pageMeta section of the DRI document. This allows the XSL that will subsequently convert the DRI document into XHTML to find those references and place them into the head element of the XHTML output.
- Transform to XHTML. This step references the XSL to be used to convert DRI to XHTML. This could either link to the default library called dri2xhtml.xsl or to the theme's own XSL code (which may reference dri2xhtml itself).
- Localize the page, calling the Cocoon i18n transformer to resolve the <i18n:text> tags.
- Serialize result for display in the browser.
The sitemap that comes with the theme template is configured to place references to one or two CSS stylesheets (depending on the browser) into the pageMeta and to use the theme's local XSL to perform the conversion. Generation, localization and serialization are handled as well. In fact, at first, the only change you have to make to your new theme is to set its new location at the very top of the sitemap file:
<map:component-configurations>
        <global-variables>
            <theme-path>YourThemeDir</theme-path>
            <theme-name>The theme's name/description (not required)</theme-name>
        </global-variables>
    </map:component-configurations>
Your theme is now configured and you are almost ready to get started.
Installing the theme
Before you begin work on CSS or XSL changes, the newly created theme should also be installed. A theme is installed by adding an entry for it in the xmlui.xconf file, found in your DSpace config directory. Locate the <themes> block inside the xmlui.xconf and add an entry to your own theme there. The theme's location is specified by the path attribute while the set of DSpace pages it applies to can be specified in three different ways:
- With regex pattern:
<theme name=" Theme's name" regex="community-list" path=" YourThemeDir /"/> - Directly with a handle:
<theme name=" Theme's name" handle="123456789/42" path=" YourThemeDir /"/> - Or both:
<theme name=" Theme's name" regex="browse-title^" handle="123456789/42" path=" YourThemeDir /"/>
Do note that only the first theme rule that matches a page request is used. For example, if you place the most general rule (like regex=".*") at the top, it will always be used instead of all others. In addition, theme rules do cascade unless overridden by another theme rule further down. Thus, a theme rule applied to a community will also apply to all of its sub-communities, collections and items. In general, you should place the most specific rules at the top of the themes block and the most general ones on the bottom to take full advantage of the cascading effects. The comments above the themes block in the xmlui.xconf explain the cascading rules further. Finally, Tomcat must be always be restarted for changes in xmlui.xconf to take effect.
Part 2: Theme Development
Since several different tasks fall under the purview of modifying the look and feel of a DSpace page, so we have established the concept of Tiers of Development. Tier 1 involves mainly stylistic changes: CSS, JavaScript, and other client-side modifications. Tier 2 deals with all the activities of Tier 1 and also includes extending the base XSL library with your own templates. Tier 3 involves writing new Aspect code in order to add new functionality to DSpace. This guide will deal with Tiers 1 and 2.
Tier 1 development in Manakin, i.e. primarily editing the CSS, is much like any Web development project. You start out with XHTML, a blank CSS and possibly a design in mind, and work with the CSS until the results are satisfactory.
It is highly recommended that the user be familiar with CSS styling language prior to working with the styling aspects of theme creation and modification, and the basics of the XSL transformation language before working with the XSL stylesheets directly. A good starter set of tutorials on all things web related is available at the World Wide Web Consortium's site at:
- http://www.w3schools.com/
- http://www.w3schools.com/html/default.asp for HTML
- http://www.w3schools.com/css/default.asp for CSS
- http://www.w3schools.com/xml/default.asp for XML
- http://www.w3schools.com/xsl/default.asp for XSLT
Another resource for CSS work is also available from Zen Garden, a site containing an extensive list of stylesheet examples with complete access to the source code. It is located at: http://www.csszengarden.com/ . Although you will most likely want to create your own theme, Zen Garden provides a good set of examples of things that can be accomplished with CSS alone, and can serve as a starting point or inspiration for a theme.
If you used the theme template to get started, your sitemap should reference two CSS files: style.css and style-ie.css. The stylesheets are set up so that one extends the other. The first is the primary stylesheet that will be applied to all browsers and the second is a smaller stylesheet applied to pages rendered by the Internet Explorer family of browsers.
For Tier 2 development, editing XSL, the most common process is to create a blank XSL file in your theme folder, have it import the existing XSL library (dri2xhtml.xsl), and simply override templates as needed. Under the XSL import rules, when one XSL stylesheet imports another, the importing stylesheet gains use of all the imported stylesheet's templates as if they were its own. However, in case of conflict (for example a template in both stylesheets than matches the same element) templates from the importing stylesheet always takes precedence over those being imported.
This allows you to import the existing XSL from your theme's stylesheet, copy the templates you wish to override into your XSL and make your changes. The modified template will take precedence, overriding the existing XSL code. A good resource for XSL-related issues is the Mulberry Tech XSL Forum, located at: http://www.mulberrytech.com/xsl/xsl-list/ . The mailing list's archives are open and searchable, and it's very likely that any XSL problem your encounter has been brought up before and resolved in a discussion thread.
Development Tips
This section will most likely be expanded as time goes on.
Debugging at various stages of the theme application pipeline
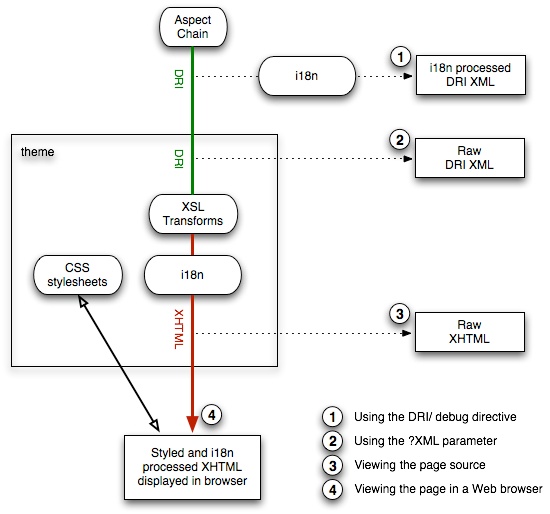
Theme development in Manakin does not explicitly require use any specific tools or IDEs. Both XSL and CSS can be read and edited through a plain-text editor like Notepad or vi. However, the use of a specialized editor can make development considerably easier, especially when trying to debug erroneous behavior. It is also useful to know the various stages that DSpace pages go through before they are rendered on screen and being able to look at the intermediate results of those stages. The Manakin theme application process can be illustrated with the following diagram:
Getting at the raw XML
At every point in the process you can look at the intermediate result to aid with development and debugging. The first thing you can look at is the raw DRI-encoded XML generated by the Aspect Chain. This is useful when writing XSL templates to match the target elements in the DRI source, and when trying to the debug the results of XSL transformations. There are two ways to get at the raw XML:
- prepending DRI/ to the beginning of the page url but after the context path, i.e.
http://<manakin-url>/DRI/search orhttp://<manakin-url>/DRI/handle/123456789/10 - appending the XML parameter to the end of the URL, i.e.
http://<manakin-url>/search?XMLorhttp://<manakin-url>/search?query=texas&page=2&XML
The only difference between these two methods is the whether the XML is passed through the Internationalization (i18n) transformer. The first one (using the DRI/debug directive) resolves them to their corresponding string values, while the second method (using the ?XML parameter) returns raw DRI XML with <i18n:text> tags still unprocessed. In general, using the DRI/ directive allows for easier navigation though the DRI document, although the ?XML is still useful when access to the raw DRI is needed.
Knowing the raw DRI code behind a DSpace page is essential for XSL (Tier 2) development. It can be useful in figuring out which XSL template in the base library was used to generate a specific block of html and thus which template should be overridden to achieve the desired output. Similarly, it can be used when designing new templates. In addition to its usefulness as a reference, DRI XML can also be used for debugging purposes. If you have an XSL IDE that comes with a debugger (we use oXygen, but there are other alternatives), saving a copy of the DRI page and processing it step by step in a debugger can aid in solving some of the more elusive bugs.
Getting at the raw XHTML
Moving further down the pipeline, once the XSL templates have been applied and DRI has been converted into XHTML, CSS rules can be applied to the result in order to impart a specific look and feel to the theme. This is the point where Tier 1 development usually begins. When editing the CSS, Manakin theme development is much like any Web development project. You start out with XHTML, a blank CSS and possibly a design in mind, and work with the CSS until the results are satisfactory.
Getting at the raw XHTML output of the XSL processor is easy: all browsers allow the user to look at the page source and save a copy. While the underlying HTML varies for any given DSpace page, the top-level structures like body and header remain consistent. One technique is to go through DSpace page by page, look at the HTML, and create CSS rules as necessary. Alternatively, you can extend the Reference theme that contains CSS selectors for nearly all elements encountered in the HTML structures of Manakin DSpace.
Analyzing the final outcome
As is frequently the case, CSS can be as finicky and prone to bugs as XSL, if not more so. Though you usually tell whether a given CSS selector is being applied directly by simply looking at the rendered page, a CSS debugger can indispensable in figuring out more gnarly problems. These usually take the shape of browser plug-ins, for example Firebug for Mozilla and the Internet Explorer Developer Toolbar. Both allow you to see the computed styles, trace their source to a specific line in a style sheet, and the former also allows tweaking with the values on the fly.
Browser-specific style sheets
As mentioned earlier, the theme template, as well as the Reference theme both use of more than one CSS stylesheet. One, conventionally named style.css, is the primary style sheet, while others are used for adding tweaks when rendering the page in specific browsers. This is accomplished by the use of the "browser" selector and the "IncludePageMeta" trandformer in the theme's sitemap. The browser selector tests the user's browsing agent against the following values:
- explorer: browsers in the Internet Explorer family (useragent="MSIE")
- explorer6: Internet Explorer v6 (useragent="MSIE 6")
- explorer7: Internet Explorer v7 (useragent="MSIE 7")
- safari2: Safari (useragent="(KHTML, like Gecko) Safari")
- safari3: Safari3 (useragent="(KHTML, like Gecko) Version/3")
- firefox: browsers in the Firefox family (useragent="Firefox")
- firefox1: Firefox v1.x (useragent="Firefox/1.")
- firefox2: Firefox v2.x (useragent="Firefox/2.")
Once an agent has been matched (or the default case selected), the IncludePageMeta transformer is called with one or more parameters:
<map:transform type="IncludePageMeta">
        <map:parameter name="stylesheet.screen#1" value="style.css"/>
        <map:parameter name="stylesheet.screen#3" value="style-ie6.css"/>
        <map:parameter name="stylesheet.screen#2" value="style-ie.css"/>
        ...
    </map:transform>
The syntax of the parameter statement is as follows. The format for a parameter name must follow the form:
<element>.<qualifier>.<language>#order
The qualifier, language, and order are all optional components. The order component is an integer and is needed to ensure that parameter names are unique. Since Cocoon's parameters are Hashes duplicate names are not allowed. The order syntax allows the sitemap programmer to specify an order in which these metadata values should appear in the output document. The example above will introduce the following metadata elements into the DRI document:
<pageMeta>
        <metadata element="stylesheet" qualifier="screen">style.css</metadata>
        <metadata element="stylesheet" qualifier="screen">style-ie.css</metadata>
        <metadata element="stylesheet" qualifier="screen">style-ie6.css</metadata>
        ...
    </pageMeta>
In the final DRI document these elements will be placed under pageMeta, which is where the default XSL library knows to look for them. If you follow the syntax and add more parameters to the IncludePageMeta transformer, the XSL will process the new values as well and add the appropriate lines to the HTML output. There is no limit to how complex or specific you want your browser matches to be, nor do they have to be limited to CSS stylesheet declarations. Furthermore, you can break up the declarations between several IncludePageMeta transformers for extra efficiency. The sitemap example below, taken from the Texas A&M Repository theme, demonstrates such a case.
<!-- Add general page metadata -->
<map:transform type="IncludePageMeta">
<map:parameter name="stylesheet.screen#1" value="lib/css/reset.css"/>
<map:parameter name="stylesheet.screen#2" value="lib/css/style.css"/>
<map:parameter name="javascript#1" value="lib/jquery-1.2.min.js"/>
<map:parameter name="javascript#2" value="lib/tamu-menus.js"/>
<map:parameter name="theme.path" value="{global:theme-path}"/>
<map:parameter name="theme.name" value="{global:theme-name}"/>
</map:transform>
<!-- Add browser-specific stuff -->
<map:select type="browser">
<map:when test="explorer6">
<map:transform type="IncludePageMeta">
<map:parameter name="stylesheet.screen#1" value="lib/css/style-ie6.css"/>
</map:transform>
</map:when>
<map:when test="explorer7">
<map:transform type="IncludePageMeta">
<map:parameter name="stylesheet.screen#1" value="lib/css/style-ie7.css"/>
</map:transform>
</map:when>
<map:when test="safari2">
<map:transform type="IncludePageMeta">
<map:parameter name="stylesheet.screen#1" value="lib/css/style-safari2.css"/>
</map:transform>
</map:when>
<map:when test="safari3">
<map:transform type="IncludePageMeta">
<map:parameter name="stylesheet.screen#1" value="lib/css/style-safari3.css"/>
</map:transform>
</map:when>
</map:select>
Here, the stylesheets that reset most elements to our own default values (reset.css) and apply the baseline styling (style.css) apply to all pages, regardless of browser used. Same principle applies to the JavaScript functions and theme path variables passed to the XSL. The browser selector then applies the appropriate set of CSS tweaks.
Multiple theme design paradigms
There is more than one way to design a theme. The most common (and most straightforward) technique is the one described in this tutorial: that is each theme is a standalone unit, contained in its own directory with its sitemap, xsl, css and supporting files. However, this does not have to be so. For example, in the case where a particular repository has several different themes applied to its communities and collections that vary in slight but significant ways, it is a good idea to have those themes reuse components between themselves.
In general, there is nothing preventing you from separating all the sub-themes into their own top-level directories, while still reusing components between them. Just as most themes import dri2xhtml.xsl, so can all themes use each other's XSL, CSS, images, and other supporting files. However, doing so creates strong coupling between themes that is not visible at a glance. If one of the themes is changed or removed, the effect will quietly propagate to other themes, potentially causing problems. Combining like themes together is a good alternative.
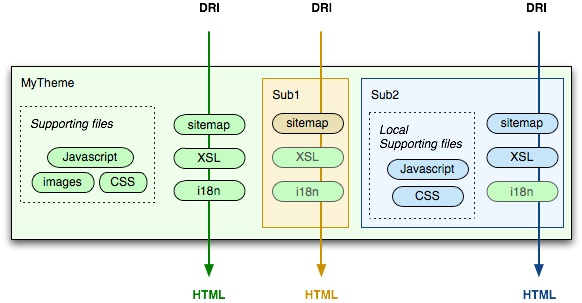
Compound themes consist of a primary theme that defines all the main features and behaviors and any number of sub-themes that live in the same directory, using the primary theme's resources and overriding them as needed. This allows for reuse of resources and also works to keep all related themes together in one place.
As always every theme should have a sitemap. A subtheme's sitemap is really no different from a stand-alone theme: it declares the theme path and name, points to the theme's resources (relative of the sitemap's location) and invokes various transformers like XSL and i18n to process the page. Unlike a stand-alone theme, a subtheme also has at its disposal all the resources of its parent theme that it can use. For example, a subtheme can add special-case rendering for some situations, while relying on the parent theme for all others.
<map:select type="browser">
        <map:when test="lynx">
            <map:transform type="IncludePageMeta">
                <map:parameter name="stylesheet.screen#1" value="../style.css"/>
                <map:parameter name="stylesheet.screen#2" value="style-lynx.css"/>
                <map:parameter name="theme.path" value="{global:theme-path}"/>
                <map:parameter name="theme.name" value="{global:theme-name}"/>
            </map:transform>
        </map:when>
        <map:otherwise>
            <map:transform type="IncludePageMeta">
                <map:parameter name="stylesheet.screen#1" value="../style.css"/>
                <map:parameter name="theme.path" value="{global:theme-path}"/>
                <map:parameter name="theme.name" value="{global:theme-name}"/>
            </map:transform>
        </map:otherwise>
    </map:select>
    <map:transform src="../main.xsl"/>
Dynamically switching out themes
A new feature in DSpace 1.5 is the ability to try out different themes on a particular page without having to mess with the xmlui.xconf file or needing to restart Tomcat. Two things need to be done in order to apply a theme to any page you are currently looking at.
- The following setting in dspace.cfg must be set to true: xmlui.theme.allowoverrides=true
- The "themepath" value should be appended to the end of the url, i.e.
http://<manakin-url>/search?themepath=Theme1/or
http://<manakin-url>/search?themepath=CompundTheme/SubTheme1/
Processing an external XML document
Sometimes you will find it necessary to use another XML document for input in addition to the DRI. For example you might have a static block of HTML you want to include in your header or a block of GIS data to be used for building an interactive map application. As long as the external input is XML-based, you can use the XSL document() function. This function allows you to open an external XML file and treat it like any other node-set, i.e. document('thefile.xml'),which can then be used in any select statement as desired:
<xsl:apply-templates select="document('thefile.xml')" /><xsl:for-each select="document('thefile.xml')/rootNode/subNode/etc/*" /><xsl:copy-of select="document('thefile.xml')" />
Then you just have to find the file on disk. If it's somewhere in the theme, you can use a path relative of the current xsl file, i.e. document('newsfeeds/thefile.xml'). If it's in a web-accessible location, you can use a url, i.e. document('http://www.place.org/thefile.xml').
Adding static pages
It is possible to add simple static pages to DSpace using Manakin. This is useful for adding "one-shot" pages like About and FAQs where creating a new aspect would be overkill. There are three ways to add a static page:
1. (broken in 1.8.0) XSL-based method. You can override the main body template and then add a check for the url of the page you want to add. The current page's url is always present in the DRI pageMeta section as request.URI. If the current page url is one you designated for your static page, then instead of rendering the body of the DRI page normally, you can have XSL insert different content. This content can either be placed in the code of the XSL template or imported from an external source using the document() function. This method is useful if the number of extra pages you want to include is relatively small and they are not edited frequently. You can access the page via www.example.com/xmlui/page/about
<!-- Overriding the main body template -->
    <xsl:template match="dri:body">
        <div id="ds-body">
            <!-- Check for the custom pages -->
            <xsl:choose>
                <xsl:when test="/dri:document/dri:meta/dri:pageMeta/dri:metadata[@element='request'][@qualifier='URI']='about'">
                    <div>
                        <h1>About us</h1>
                        <p>Lorem Ipsum dolor sit amet</p>
                    </div>
                </xsl:when>
                <xsl:when test="/dri:document/dri:meta/dri:pageMeta/dri:metadata[@element='request'][@qualifier='URI']='faq'">
                    <xsl:copy-of select="document('faq.xml')" />
                </xsl:when>
                <!-- Otherwise use default handling of body -->
                <xsl:otherwise>
                    <xsl:apply-templates />
                </xsl:otherwise>
            </xsl:choose>
        </div>
    </xsl:template>
2. Cocoon-based method. You could use cocoon to check the url right after the generation step, and then add in your own static DRI page. This method requires that all your static pages be expressed as DRI and then transformed into HTML by your standard theme templates. This method is useful if you will have lots of static pages that need to be managed, but requires modifying the cocoon sitemap.xmap.
This method also allows your page to have a defined Title and breadcrumbs added via DRI, which one doesn't get by simply adding information to the xsl template (but there probably are ways of doing it directly via xsl).
Create the java file which will add the DRI
[dspace-src]/dspace-xmlui/dspace-xmlui-api/src/main/java/org/dspace/app/xmlui/aspect/artifactbrowser/AboutPage.java
/**
 * AboutPage.java
 *
 * Basead on the code by Peter Dietz:
 * https://gist.github.com/842301#file_dspace_add_about.diff (acessed 11-05-23)
 *
 * Modified to work with internationalization (i18n locales) and breadcrumbs
 * by Andre Nito Assada e Josi Perez Alvarez on 11-05-23
 */

package org.dspace.app.xmlui.aspect.artifactbrowser;


import org.apache.log4j.Logger;
import org.dspace.app.xmlui.cocoon.AbstractDSpaceTransformer;
import org.dspace.app.xmlui.wing.WingException;
import org.dspace.app.xmlui.wing.element.Body;
import org.dspace.app.xmlui.wing.element.Division;
import org.dspace.app.xmlui.wing.element.PageMeta;
import org.xml.sax.SAXException;
import java.io.IOException;
import java.io.Serializable;
import java.sql.SQLException;
import org.apache.cocoon.caching.CacheableProcessingComponent;
import org.apache.excalibur.source.SourceValidity;
import org.apache.excalibur.source.impl.validity.NOPValidity;
import org.dspace.app.xmlui.utils.UIException;
import org.dspace.app.xmlui.wing.Message;
import org.dspace.authorize.AuthorizeException;


/**
 * Display about us page.
 *
 * @author Peter Dietz
 */
public class AboutPage extends AbstractDSpaceTransformer
{

/**
 * Internationalization
 * 110523
 */
    public static final Message T_dspace_home =
        message("xmlui.general.dspace_home");
    public static final Message T_title =
        message("xmlui.ArtifactBrowser.AboutPage.title");
    public static final Message T_trail =
        message("xmlui.ArtifactBrowser.AboutPage.trail");
    public static final Message T_head =
        message("xmlui.ArtifactBrowser.AboutPage.head");
    public static final Message T_para =
        message("xmlui.ArtifactBrowser.AboutPage.para");

    private static Logger log = Logger.getLogger(AboutPage.class);

        /**
        * Add a page title and trail links.
        */
        public void addPageMeta(PageMeta pageMeta) throws SAXException, WingException {
            // Set the page title

            // pageMeta.addMetadata("title").addContent("About Us");
            // 110523 modified page title with internationalization and added breadcrumbs
            pageMeta.addMetadata("title").addContent(T_title);
            // add trail
            pageMeta.addTrailLink(contextPath + "/",T_dspace_home);
            pageMeta.addTrail().addContent(T_trail);
        }

        /**
        * Add some basic contents
        */
        public void addBody(Body body) throws SAXException, WingException {
            //Division division = body.addDivision("about-page", "primary");
            //Division.setHead("About Us - Institutional Repository");
            //Division.addPara("We are an institutional repository that specializes in storing your digital artifacts.");

            //110523 modified with internationalization
            Division division = body.addDivision("about-page", "primary");
            division.setHead(T_head);
            division.addPara(T_para);
        }
}
Then map it on
[dspace-src]/dspace-xmlui/dspace-xmlui-api/src/main/resources/aspects/BrowseArtifacts/sitemap.xmap
under the tags:
<map:sitemap xmlns:map="http://apache.org/cocoon/sitemap/1.0">
    <map:components>
        <map:transformers>
we add:
<map:transformer name="AboutPage" src="org.dspace.app.xmlui.aspect.artifactbrowser.AboutPage" />
and under the tags:
<map:pipelines>
        <map:pipeline>
We add:
<map:match pattern="about">
<map:transform type="AboutPage"/>
<map:serialize type="xml" />
</map:match>
note: On Manakin 1.7, this mapping should be done on BrowseArtifacts sitemap, and not on ArtifactBrowser sitemap, as it's deprecated in this version. On older versions, one should check which aspect is valid (and therefore which sitemap should be eddited) on the [dspace-src]/config/xmlui.xconf
Now we override the <dri:body> of our theme to fit the calls for this aspect. On the Mirage theme one should edit [dspace-src]/dspace-xmlui/dspace-xmlui-webapp/src/main/webapp/themes/Mirage/Mirage.xsl
and on the standard theme, one should edit the dri2xhtml.xsl
<xsl:template match="dri:body">

<xsl:variable name="meta" select="/dri:document/dri:meta/dri:pageMeta/dri:metadata"/>
<xsl:variable name="pageName" select="$meta[@element='request'][@qualifier='URI']"/>
<xsl:variable name="doc" select="document(concat('pages/', $pageName, '.xhtml'))"/>

        <div id="ds-body">
            <!-- when conditional to handle the call for {dspace-webhost}/about -->
            <xsl:choose>
                <xsl:when test="/dri:document/dri:meta/dri:pageMeta/dri:metadata[@element='request'][@qualifier='URI']='about'">
                    <div>
                        <h1>This is a simple ABOUT page</h1>
                        <xsl:apply-templates />
                    </div>
                </xsl:when>
[ e t c . . . ]
Now one must create a link calling for this page, eg. on the side menus under <xsl:template match="dri:options">
<div id="ds-search-option" class="ds-option-set">
                    <a>
                      <xsl:attribute name="href">
                            <!-- 1) catch the application's web context, in this case http://[MY_HOST]:[MY_WEB_PORT]/xmlui/  -->
                            <xsl:value-of select="/dri:document/dri:meta/dri:pageMeta/dri:metadata[@element='contextPath'][not(@qualifier)]"/>
                            <!-- 2) concatenates the context path with "/about", resulting in: http://[MY_HOST]:[MY_WEB_PORT]/xmlui/about -->
                            <xsl:text>/about</xsl:text>
                        </xsl:attribute>
                        <!-- 3) the link's i18n label -->
                        <i18n:text>xmlui.dri2xhtml.structural.static.about</i18n:text>
                    </a><br/>
3. Tomcat/apache-based method. Outside of Manakin or DSpace you could reroute urls to static pages using Tomcat's web.xml or the Apache configuration. This method while easy doesn't allow you to have any of the dynamic content (such as who's loged in) available on the page.
4. (Dspace 1.8.1 and later). Use XSL overrides on top of StaticPage.java. In DSpace 1.8.1. a StaticPage transformer has been added and is mapped to /xmlui/page/*, which provides an easy end point to override in XSL, and not get blocked by PageNotFound. Additionally, points in the XSL have been added to allow for the XSL customizer to match against a page/something url, and then add customized XHTML directly to the page. To add a new static page, all you need to edit is dri2xhtml/structural.xsl, or Mirage/lib/xsl/core/page-structure.xsl. Below is some snippets of XSL that you need to edit that is for structural.xsl.
To customize the Page Title:
<title>
    <xsl:choose>
        <xsl:when test="starts-with($request-uri, 'page/about')">
            <xsl:text>About This Repository</xsl:text>
        </xsl:when>
        ...
</title>
To customize the breadcrumb / trail:
<ul id="ds-trail">
    <xsl:choose>
        <xsl:when test="starts-with($request-uri, 'page/about')">
            <xsl:text>About This Repository</xsl:text>
        </xsl:when>
        ...
    </xsl:choose>
</ul>
To customize the body:
<xsl:template match="dri:body">
    <div id="ds-body">
    ...
    <xsl:choose>
        <xsl:when test="starts-with($request-uri, 'page/about')">
            <div>
                <h1>About This Repository</h1>
                <p>To add your own content to this page, edit webapps/xmlui/themes/dri2xhtml/structural.xsl and add your own content to the title, trail, and body.
                   ....
                </p>
           </div>
        </xsl:when>
        <xsl:otherwise>
	   <xsl:apply-templates />
	</xsl:otherwise>
    </xsl:choose>
        ...
    </div>
</xsl:template>
See: https://jira.duraspace.org/browse/DS-1076
Common Gotchas
Empty self-closed elements in XHTML
By convention, an empty XML element, that is an element with no text value, can be represented in two ways in XML syntax:
- open/close pair:
<element></element> - self-closed element:
<element/>
Both are valid XML, although the latter is used more frequently for convenience. By extension this notation is also valid in XSL and XHTML, but problems do crop up in the latter. Some browsers will treat a self-closed div element as the div opening tag, for example, placing all the elements that follow it inside that div. This can cause a great deal of headache during CSS work as your page's body and footer might end up whole subsumed under the header. This can occur either accidentally (an element that usually holds a title, for example, can get collapsed into an empty tag if a title is missing) or intentionally (when using blank "spacer" divs to keep floated elements from collapsing their containing block). In either case, the problem can be solved by making sure that the element hold at least some text (like substituting "untitled" for an item with no title) or adding a non-breaking space to the element.
XSL comments
A very simple gotcha that is bound to get any developer working with XML at least once is the single restriction XML places on its comments. In XML (and therefore XSL) syntax, comments as designated by the pair <!-- comments -->. The character sequence – (dash dash) cannot appear inside the XML comment section and its inclusion will throw an error. Some processors do not explicitly report the exact line where the offending character sequence occurs, instead pointing the developer to the beginning or the end of the entire comment block. In general, if you are getting a malformed XML error somewhere in the comment block, a simple string search for a double dash should fix the problem.
HTML entities
One of the more common entities used in HTML is the non-breaking white space, used to offset text and pad empty elements. While it is defined in XHTML as (as are about 250 other entities like © ® → etc.), the XSL processor will throw an error if those entities are used in the XSL code. The reason for this is that only the following five entities are explicitly defined in XML, mostly because the symbols are part of the syntax structure:
Entity | Character |
|---|---|
| & |
| ' |
| " |
| > |
| < |
In order to insert other symbols into the HTML, use the ISO 8859-1 codes for those entities, i.e. U+00A0 instead of and U+00A9 instead of ©. A full list of entities and their corresponding codes can be found in section 24 of the W3C Recommendation for HTML4: http://www.w3.org/TR/html401/sgml/entities.html
Override rules for templates: priority, import precedence, and modes.
A word of caution in overriding templates. When an apply-template call is made for a particular element, the XSL processor looks for all the templates that could possibly match that element. If only a single template can match a particular element, then that template will be applied. As is frequently in the case, however, more than one template can match an element or a condition. For example the call <xsl:apply-template select="dri:list"/> can be matched by all of the following templates:
<xsl:template match="dri:list"><xsl:template match="dri:list[1]" priority="2"><xsl:template match="dri:list[count(child:.*)=0]" priority="3">
and so on to any level of complexity. Furthermore, this relationship is not necessarily symmetrical; in the example above a template that matches only empty lists will only trigger for empty lists, but a template that matches all lists can match all empty lists as well. This creates an ambiguity that must be resolved by the XSL processor. To that end templates are prioritized as follows:
simple matches < complex matches < explicit priority < importing templates
Since the question of what constitutes a complex vs. a simple match is processor-specific, the safest way to ensure desired behaviour is through explicit priorities. Thus, for empty lists in our example, all three templates might match a given element, but the one designed to match the specific case wins because it is explicitly given a higher priority. If you look through the templates in the dri2xhtml.xsl file itself, you will notice many templates bearing a priority attribute to disambiguate cases where their match sets intersect.
A problem may arise, however, when these templates are imported into another stylesheet, as is the case in all themes overriding templates from the dri2xhtml base library. Because templates belonging to the importing stylesheet have higher priority than those that are being imported (which is what allows the original templates to be overridden in the first place), this can produce unintended consequences when overriding only the simple and low-priority templates. Using our example above, we cannot just override the template than matches all lists if we also wish to preserve the original behaviour, because it will always override the more specific ones simply by the virtue of having higher import priority. For this reason, when overriding simple templates for a particular element, always make sure that the templates dealing with the more esoteric conditions for that element are imported as well, even if you do not intend to change them.
The last thing to point out here is the use of the "mode" attribute on templates. These are used to differentiate templates that apply to the exact same elements, usually to process the same element under different conditions. In order to match, a template's mode must correspond to the mode of the template call, so a call of the form <xsl:apply-template select="dri:list" mode="nested"/> will only match templates that have the same mode attribute, i.e. <xsl:template match="dri:list" mode="nested">. This pairing overrides all other templates, regardless of priority and import precedence, so it is generally advisable to preserve the modes in imported templates. If the modes are kept consistent, however, those templates are subject to the same disambiguation rules as templates with modes.
Positioning of theme declarations in the xmlui.xconf file
The order in which themes are listed in the xmlui.xconf file is important. When looking for a theme to apply to a DSpace page, the Theme Matcher will go through each theme declaration in order until it finds the first one that matches. If your theme is not getting applied to a specific community, collection or url, first make sure that the theme's declaration is not preceded by another, more general, one. It is generally a good idea to have the most specific matches come first (those for specific URLs or handles attached to items), followed by the more general ones attached to collections and communities, with the most general "default" theme coming last.
Trailing slashes on theme locations
A simple but common gotcha is forgetting to follow all theme paths with a trailing forward slash. This comes into play in two places: xmlui.xconf theme declarations and the use of the themepath parameter when dynamically switching out themes in a browser.
Overview
Content Tools
All content on the LYRASIS Wiki is licensed under the CC BY (Attribution) license![]() , unless otherwise noted.
, unless otherwise noted.
2 Comments
Mark H. Wood
In "HTML entities", could one not use numeric forms such as   (non-breaking space) instead of figuring out how to type oddball Unicode characters that aren't on the keyboard? Could one not pull in the character entity definitions (e.g. "ISO 8879:1986//ENTITIES Numeric and Special Graphic//EN//XML") and continue to write them symbolically?
Ivan Masár
"Common Gotchas" should be somehow connected/moved to the TechnicalFaq page