*Deprecated* This material is for historical purposes only See https://wiki.duraspace.org/display/VIVODOC/All+Documentation![]() for current documentation
for current documentation
*Deprecated* See https://wiki.duraspace.org/display/VIVODOC/All+Documentation![]() for current documentation
for current documentation
Introduction
This guide describes the site administration features of the vivo system. If you are looking for information about installing the system please refer to the install or upgrade guide . If you are looking for information on confirming that your system is working correctly please refer to Was the installation successful?.
VIVO is an open source, semantic web application that enables the discovery of research and scholarship across disciplines at an institution. VIVO brings together publicly available information on the people, departments, graduate fields, facilities, and other resources that collectively make up the research and scholarship environment at the institution. The data contained in a VIVO installation can be searched, browsed, or disseminated to applications and external websites that utilize semantic web-compliant data.
The data in VIVO is housed and maintained locally and can be input manually by self-editors or curators as well as from internal institutional sources and external sources. When ingested from authoritative sources it is often more accurate and current, and reduces the need for manual input of data. Examples of internal data include: faculty reporting tools, course listings, grants, and directory services. Publications from PubMed and grant information from NIH are examples of external sources.
This guide was created for release 1.5 and updated for 1.6. If you are running a newer release and find any inaccuracies please comment at the bottom of this page or post to one of VIVO's email listservs. For the topics discussed in this guide, the principal difference is that the deploy.properties file was split into build.properties and runtime.properties in release 1.6.
Navigating VIVO
VIVO is navigated and browsed using a primary menu located along the upper portion of the website. VIVO is currently shipped with five items in the primary menu; Home, People, Organizations, Research, and Events. Other menu items will need to be added manually after installation (see Site Configuration).
Beginning at the Home menu, notice the contents of each menu. Each menu contains a list of VIVO Individuals associated to particular classes. Each menu shows the count of individuals in parentheses next to the superclass and subclass names. In addition, the "Index" link on the upper right corner displays a list of “VIVO individuals” by class and the associated count in parentheses.

FIGURE 1- VIVO home page
Log into VIVO
To log into VIVO using the web browser, navigate to your institution’s instance of VIVO.
- Either point your browser to the Home menu, or click the "Log in" link near the upper right corner.
- Enter your username (usually email or external authentication ID) and your password (see note below)
- Click the “Log in” button and you will be redirected to the “Site Administration” page.
Note: If you have not yet created any user accounts in VIVO, you can log in as the root user that you set up in the configuration file (rootUser.emailAddress in runtime.properties). If this is your first time logging in, the password will be "rootPassword". You will be required to set a new password to complete the login process.
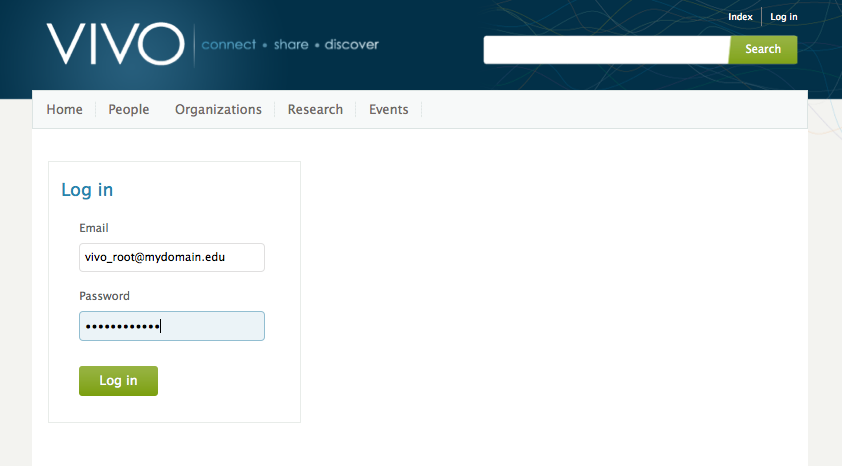
FIGURE 2 - VIVO site administration log in
Site Administration
Once you are logged into VIVO, you will notice in the upper right hand portion of the page links to "Index" and "Site Admin", alongside a drop-down menu with your name on it, and containing links to "My account" and "Log out".
Once you have logged into VIVO, clicking on the “Site Admin” link takes you to the “Site Administration” page. As an administrator, you will be able to access all five feature and content areas of VIVO: Data Input, Site Configuration, Ontology Editor, Advanced Data Tools, and Refresh Content.
Separate guides for ontology editing, data ingest, and manual data input are in development for individuals who will administer local ontologies and data sources. For additional guides please visit http://vivoweb.org/support .
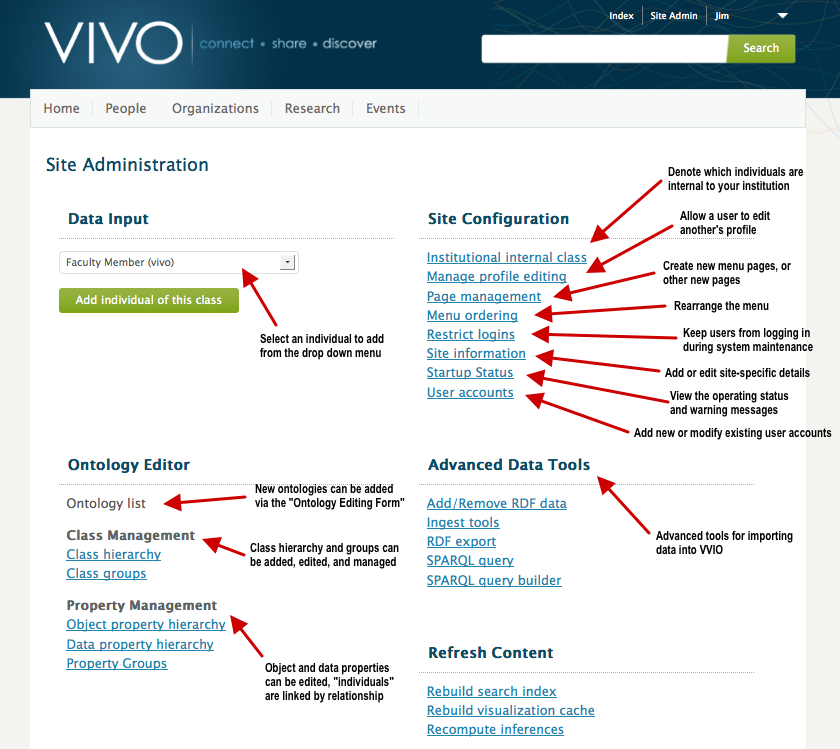
FIGURE 3 - VIVO Site Administration screen
Data Input
There are two ways to manually input data into VIVO. On the Site Administration Menu, a new individual of any type may be added directly through the Data Input menu. Once an individual has been created object and data properties may be added for that individual on the page displaying the individual’s profile. The object and data properties presented for editing will vary by the type of the individual, in accordance with the ontology.
Ontology Editor
In VIVO, information is identified by references to Unique Resource Identifiers (URIs). URIs can be used by other web pages and applications to locate and retrieve specific chunks of data. The detailed level to which VIVO captures information enables complex relationships among data to be represented.
The VIVO web application is built using RDF "triples" or statements consisting of a subject (known as an individual, item, or entity), a predicate (an object property or a data property) and an object (any individual in VIVO). Subject-predicate-object triples express the relationships among the individuals in VIVO via object properties and support attributes of individuals via data properties.
The first two parts (subject and predicate) of every triple are URIs. An object property triple has the URI of another individual in VIVO its object, while the third element of a data property triple is a data attribute – typically a text string, number, or date.
Ontology List - VIVO supports keeping an internal list of ontology namespaces and corresponding prefixes to facilitate using external ontologies as well as to help differentiate local ontology additions from VIVO core.
Class Management
Individuals in VIVO are typed as members of one or more classes organized and displayed as a hierarchy.
Class hierarchy - The class hierarchy provides a framework to help identify the different types of individuals modeled in a VIVO application. In the Class Hierarchy page, you can edit/add classes, add entities to a class, and add auto links.
Class groups - Class groups are a VIVO-specific extension to support using VIVO as a public website as well as an ontology and content editor. Class groups are a means to organize the classes in VIVO into groups. They represent the facets seen when VIVO is searched (people, activities, events, organizations, etc).
Property Management
If classes define what each individual in VIVO is, properties define how that individual relates to other individuals and allow an individual to have attributes of its own. VIVO has two property editors, one for object properties and another for data properties.
Object property hierarchy - Object properties represent the relationship between entities (also known as items or individuals) in VIVO. Object properties can be created and edited from the Object Property Hierarchy.
Data property hierarchy - A data property connects a single subject individual (e.g., a Person or Event) with some form of attribute data. Data properties can be created and edited from the Data property hierarchy link.
Property groups - Like class groups, property groups are a VIVO-specific extension to support using VIVO as a public website as well as an ontology and content editor.
Site Configuration
The site configuration aspects of VIVO enables administrators to add or adjust to their institution’s site specific details, as well as to manage menus, tabs, and user accounts. Please refer to the Site Configuration section below for detailed instructions.
Advanced Tools
The Advanced tools are VIVO’s built-in features for data management and export. Please refer to the Advanced Tools section below for detailed instructions.
In addition, many VIVO adopters may require additional information regarding the importing and exporting of RDF data and creating SPARQL queries.
There are several avenues available to acquire guidance with these advanced tools. Information sources such as the VIVO Data Ingest Guide, the W3C’s Resource Description Framework model, and the W3C’s SPARQL Query Language for RDF, to name a few. Please refer to Appendix A for links and additional resources.
Refreshing Content
V1.3 Specific: Site Administrators can rebuild their search, class group cache, visualizations, and inferencing in the Site Admin interface. It is important to build the visualization code after ingesting publication data or it will take a long time to display the visualization to the user.
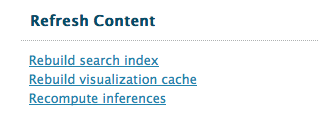
Rebuild visualization cache
Why
Large-scale visualizations like the Temporal Graph or the Map of Science involve calculating total counts of publications or of grants for some entity. Since this means checking also through all of its sub-entities, the underlying queries can be both memory-intensive and time-consuming. For a faster user experience, we wish to save the results of these queries for later re-use.
What
To this end we have devised a caching solution which will retain information about the hierarchy of organizations-namely, which publications are attributed to which organizations-by storing the RDF model. We're currently caching these models in memory. The cache is built (only once) on the first user request after a server restart. Because of this, the same model will be served until the next restart. This means that the data in these models may become stale depending upon when it was last created. To avoid restarting the server in order to refresh the cache, administrators can use the Rebuild visualization cache link.
This works well enough for now. In future releases we will improve this solution so that models are stored on disk and periodically updated.
Site Configuration
This section discusses the site configuration aspects of VIVO. It enables administrators to add or adjust to their institution’s site specific details, as well as to manage menus, tabs, and user accounts.
Site Information
The Site information link provides administrators with the capabilities of editing and adding site specific details for that institution’s instance of VIVO.
Site Name — Text entered here will be displayed in the browser title bar and bookmark label. It is set to “VIVO” by default.
Contact email address — This field is the email address or listserv that you want the Contact Us form to use. The SMTP host in your configuration file (runtime.properties) must be set for the Contact Us form to work as intended.
Theme — The default theme for version 1.2 is “wilma”. If you create a new theme (see Theme Modifications), then it should be available to choose in this drop-down pick list.
Copyright text — Text entered here for a label in the footer for the copyright URL.
Copyright URL — The URL you want the copyright to go to in the footer. It could be your institution’s copyright information or the actual institution.
User Accounts
In VIVO, the basic functions of browsing and searching are open to anyone. However, if a VIVO user wants to view restricted data, or to manage VIVO, he must log in to a User Account.
When a user logs in, he provides his credentials and is associated with a User Account. The credentials are often an Email address and password, but might be different information, depending on how VIVO is configured.
Each User Account has a Role assigned to it. The Role determines how much the user is authorized to do. The lowest Role will permit the user to edit his own profile page. Higher Roles permit editing additional data properties, modifying the ontologies, and administering the VIVO application.
Authentication
Internal Authentication
Every VIVO system allows users to log in to an existing User Account by supplying the Email Address and password to the account. Even in an installation that relies on external authentication, there are administrative pages that allow a user to login with Email Address and password.
External Authentication
VIVO can be configured to work with an External Authentication system like Shibboleth or CUWebAuth. In that case, the user provides whatever information the External Authentication system requires, and the External Authentication system passes an ID value to VIVO. VIVO recognizes that the user is logged in to the User Account whose "External Authentication ID" field matches that ID.
If a user passes External Authentication, but no User Account matches the ID, VIVO prompts the user to enter his Email Address, First Name, and Last Name, and creates a User Account with that information.
NOTE: To configure VIVO for an External Authentication system, please consult the Installation Guide, and refer to the section entitled ‘Using an External Authentication System with VIVO’. Note also that the value of the property (the designated External Authentication ID field) must be an exact match for the username/email of the user.
External-Only Accounts
When creating an account, an administrator may indicate that it is for external authentication only. In that case, no password is assigned to the account, since the External Authentication system manages its own passwords or other credentials.
What is a User Account?
Each User Account is identified by the user’s Email address. Each account will have the user’s first name and last name, and a role. The account will have additional information, depending on how it is used.
- External Authentication ID – permits logging in by the External Authentication system.
NOTE: Two User Accounts may not have the same External Authentication ID - Password – permits logging in by the Internal Authentication system.
- Matching ID – can be used to associate the User Account with a profile page.
NOTE: In VIVO release 1.3, the External Authentication ID and the Matching ID are the same field. This may be changed in a future release.
User Roles
In VIVO there are four user roles that can be assigned: administrator, curator, editor, and self-editor. Future releases will allow VIVO administrators to create additional roles. Permissions provided to roles will determine access options available to user accounts within VIVO. It is important to consider what a new user’s role may be, prior to setting up the new account.
Self-Editor -– The self-editor may create data properties, relationships and entities directly associated to his or her profile.
Editor -– The editor may add, delete and modify entities, object properties and data properties.
Curator -– In addition to performing the tasks of the Editor, the Curator may modify the ontologies, class groups, property groups, and edit site information, including the text displayed on the About page and contact email address.
System Administrator –- In addition to the abilities of the Curator, the Administrator may access the menu management, user accounts, and advanced data tools features. The advanced data tools section include the ingest menu, Add/Remove RDF data, RDF export, SPARQL query, and SPARQL query builder privileges.
Profile Pages
Each User Account may be matched with an Individual in the VIVO data model. The display page for that Individual is known as the “profile” for that User Account.
A common use of this feature is matching a profile to each member of the campus community. When a user logs in to VIVO, he is directed to his profile page, and is authorized to edit the information on that page.
It is typical for a university to ingest information into VIVO, including the “network ID” for each member of the campus community. When a user logs in to VIVO using the External Authentication system, the ID from the authenticating system is matched against the “network ID” on the individual, and VIVO matches the User Account to the profile.
It is also possible for an administrator to match a User Account with a profile by editing the User Account.
NOTE: To configure VIVO to match User Accounts with profiles, please consult the Installation Guide, and refer to the section entitled 'Specify Deployment Properties'.
The Root User Account
Each VIVO installation has a special User Account, called the root account. The root account has no Role. Nonetheless, the root account is authorized:
- to see all data elements
- to edit all data elements
- to view any page
- to modify the ontologies
Since the root account can do all of these things, it can be particularly useful and particularly dangerous. It can also give you a distorted view of what your VIVO site looks like. Use the root account to create other User Accounts or to access VIVO in emergencies, and use it with deliberation.
The email address for the root account is specified as part of the VIVO installation process.
NOTE: To configure the root account, please consult the Installation Guide, and refer to the section entitled 'Specify Runtime Properties'.
Managing User Accounts
Normal workflow
In normal operation, users will receive an Email message when a VIVO account is created for them, when their password is reset by an administrator, or when the Email address on their User Account is changed. One benefit of this is that the administrator does not need to know the user’s password, and does not need to tell the user his password.
As noted above, when a new account is created, or when an administrator resets the user’s password, the user receives an Email message. The message describes the action that has occurred, and includes a link for the user to click, to set the password on the account.
Note: User Accounts that are created for External Authentication do not require passwords, so no such link is sent.
Workflow without Email
Email notifications can be disabled by configuring VIVO without a “Reply-To” address. In that case, users are not notified when User Accounts are created or changed.
When creating a new User Account, the administrator must set a password, and must inform the user of the password (unless the account is to be used for External Authentication only). When the user first logs in to the account, he will be prompted to change the password. Resetting the password on an account involves a similar process.
Note: To disable Email notifications, please consult the Installation Guide, and refer to the section entitled 'Specify Deployment Properties'.
External Authentication
In many VIVO installations, the creation of most User Accounts is simple and routine. A user presents credentials to the External Authentication system, and VIVO creates an account with minimal privilege, prompting the user for name and Email Address. In this case, an administrator may edit such an account to assign a higher Role, if desired.
Alternatively, an administrator may create a User Account, add an External Authentication ID, and assign a high-level Role. When the user log in for the first time, they will already have an account with the desired level of privilege.
Advanced Tools
Many VIVO adopters may require additional information regarding the management of RDF data and use of SPARQL (SPARQL Protocol and RDF Query Language). Please refer to Appendix A for additional resources.
Advanced Data Tool Short Description
Ingest tools – A suite of data management tools. See below for a detail of each tool.
Add/Remove RDF data – This tool allows for the manipulation of RDF data in the main model through importing RDF documents for addition or removal.
RDF export - This tool allows for the export of ontology and data in a variety of RDF formats. Options include:
- Export all instance data(Abox)
- Export a specific ontology (Tbox) such as FOAF, VIVO core, SKOS, etc.
- Export the entire ontology (Tbox) for VIVO
Note: It is recommended to select the ‘Export only asserted statements’ sub option, as the inferred statements will be generated when the data is imported into another VIVO.
SPARQL query - This tool allows SPARQL select, construct, and describe statements against the main model to be saved in a variety of formats including: CSV, RDF/XML, N3 and more.
SPARQL query builder – A query generating interface with pre-populated drop down lists.
Ingest Menu Short Description
Connect DB – ![]() Removed in v1.7+. This tool allows for the VIVO application to interact with a variety of Jena RDB or SDB databases through a JDBC connection. Database connection types include: MySQL, D2B, H2, JavaDB, Oracle, and more.
Removed in v1.7+. This tool allows for the VIVO application to interact with a variety of Jena RDB or SDB databases through a JDBC connection. Database connection types include: MySQL, D2B, H2, JavaDB, Oracle, and more.
Manage Jena Models – This tool allows for the management of the main webapp, as well as separate data models and datasets. The ability to attach separate models to the webapp, load RDF data to a mode, clear statements, and output models as N3 RDF is performed here.
Subtract One Model from Another — This tool allows for the comparison of models for updating information that already exists in VIVO. By subtraction of a current model from a newly constructed model (from the same data source) and vice versa, the additions and subtractions for updating the data are generated.
Convert CSV to RDF — This tool allows for VIVO to read and convert CSV (comma-separated values) and Tab-delimited data into RDF
Load XML and convert to RDF — This tool allows for VIVO to read and convert well-formed XML into RDF
Name Blank Nodes — This action turns blank nodes, a node in an RDF graph which is not identified by a URI and is not a literal, into randomly generated or pattern based URIs.
Smush Resources — This tool allows for using a compression method to distinguish like entities and “Smush” them together based on the specified URI of a property.
Generate Tbox — Tbox statements describe the terms of controlled vocabularies, for example, a set of classes and properties that constitute the ontology. This tool allows for the creation of a Tbox from one or multiple source models.
Execute SPARQL CONSTRUCT — This tool allows for using SPARQL to produce desired RDF from one or multiple source models. This tool is commonly used to map classes and properties to VIVO namespace(s).
Process Property Value Strings — This tool allows for an arbitrary method on a Java class available on the application class path to transform string values of a given property. The method should take a single String as a parameter and return a String.
Split Property Value Strings into Multiple Property Values — This tool allows for parsing multiple property values from a single ingested string. This can be used to parse MeSH Terms, controlled vocabulary, and keywords associated with the ingested data.
Execute Workflow — This tool allows for a simple way of scripting actions (specified in RDF) that would otherwise require manual interaction with the ingest tools.
Merge Individuals — This tool allows two individuals with different URIs to be collapsed into a single URI. Any statements using the “duplicate individual URI” will be rewritten using the “primary individual URI.” If there are multiple statements for a property that can have only a single value, the extra statements will be retracted from the model and offered for download.
Change Namespace of Resources — This tool will change all resources in the supplied “old namespace” to be in the “new namespace.” Additionally, the local names will be updated to follow the established “n” + random integer naming convention.
Excluding Search Results
There may be certain classes in your system that you do not want to show up in the search results. For example: Unknown Person. To exclude them from the results, you will need to add a customSearchProhibited.n3 file specific to your implementation that adds to the default settings found in
- VITRO: SOURCE/webapp/ontologies/search/vitroSearchProhibited.n3
- VIVO: SOURCE/productMods/WEB-INF/ontologies/search/vivoSearchProhibited.n3
You can see what we did for VIVO Cornell here:
@prefix owl: <http://www.w3.org/2002/07/owl#> .
@prefix vitroDisplay: <http://vitro.mannlib.cornell.edu/ontologies/display/1.1#> .
@prefix rdf: <http://www.w3.org/1999/02/22-rdf-syntax-ns#> .
@prefix core: <http://vivoweb.org/ontology/core#> .
@prefix localNav: <http://vitro.mannlib.cornell.edu/ns/localnav#> .
@prefix bibo: <http://purl.org/ontology/bibo/> .
@prefix acti: <http://vivoweb.org/ontology/activity-insight#> .
@prefix vivolocal: <http://vivo.cornell.edu/ontology/local#> .
@prefix vivocornell: <http://vivo.library.cornell.edu/ns/0.1#> .

vitroDisplay:SearchIndex
    rdf:type owl:Thing ;

    vitroDisplay:excludeClass vivocornell:UnknownPerson ;
    vitroDisplay:excludeClass vivolocal:UnknownPerson ;

    vitroDisplay:excludeClass vivocornell:UnknownOrganization ;

    vitroDisplay:excludeClass acti:EditChair ;
    vitroDisplay:excludeClass acti:PartnerRole ;
    vitroDisplay:excludeClass acti:UnknownPerson ;
    vitroDisplay:excludeClass acti:UntitledPresentation ;

    vitroDisplay:excludeClass core:CoPrincipalInvestigatorRole ;
    vitroDisplay:excludeClass core:InvestigatorRole ;
    vitroDisplay:excludeClass core:PresenterRole ;
    vitroDisplay:excludeClass core:PrincipalInvestigatorRole ;
    vitroDisplay:excludeClass core:ResearcherRole ;
    vitroDisplay:excludeClass core:ServiceProviderRole ;
    vitroDisplay:excludeClass core:TeacherRole .
Deploying VIVO
VIVO is a Java application that runs in the Tomcat servlet container. VIVO is distributed as source files which must then be deployed to Tomcat so that it can be served as a webapp. In other words, if you follow the instructions in the Install Guide, *
http://vivo.mydomain.edu
* maps to <tomcatRootDirectory>/webapps/vivo, but the source of the files in this directory is not as straightforward as you might think.
VIVO actually is a specific extension of a generic semantic web application called Vitro. While it's unnecessary for a theme developer to become fully familiar with the details of the VIVO - Vitro relationship, it's important to understand the basic concept of how VIVO is built and deployed from source because of its implications on template selection. If you browse to the VIVO source folder, you will see a directory named "vitro-core". This is where the Vitro files are located. When you deploy VIVO from source, the Vitro files are copied to the build directory first, and then the VIVO files are copied afterwards, on top of that. If there are any identically named files in VIVO in the same relative directory as their counterpart in Vitro, the VIVO version of the file 'wins' and will overwrite the Vitro version. Once the build directory is set, its contents are deployed to tomcat/webapps as specified in build.properties.
So what ends up in the webapps directory is a mixture of Vitro and VIVO files. The general rule of thumb is that if 2 identically named files (with same relative paths) exist in both Vitro and VIVO, the VIVO version of the file is the one that will be deployed to the webapp.
What does this have to do with theming, you ask? Let's provide some context. We're interested in templates so we'll focus on the following 2 directories:
- <vivoReleaseDirectory>/vitro-core/webapp/web/templates/freemarker
- <vivoReleaseDirectory>/productMods/templates/freemarker
(note that vitro-core/webapp/web/templates and productMods/templates are equivalent relative paths, meaning both get copied to the same place when deployed: <tomcatRootDirectory>/webapps/vivo/templates)
If you browse through these 2 directories you will see some files with the same name. One example is individual.ftl, the default body template for individual pages (profile pages):
- <vivoReleaseDirectory>/vitro-core/webapp/web/template/freemarker/body/individual/individual.ftl
- <vivoReleaseDirectory>/productMods/templates/freemarker/body/individual/individual.ftl
So the question is which one of these ends up residing at <tomcatRootDirectory>/webapps/vivo/templates/individual/freemarker/body/individual.ftl? As described above, since the VIVO files are copied last, the Vitro individual.ftl will be overwritten by the VIVO individual.ftl during the deploy process. In other words, the VIVO level template will always trump its Vitro equivalent.
The deploy process (VIVO trumps Vitro) is just one method that contributes to template selection. An additional layer of selection is provided via themes. As mentioned earlier, VIVO utilizes a template loader when selecting the appropriate template to call in response to a page request. The template loader gives priority to the active theme, so if the choice comes down between using individual.ftl in <tomcatRootDirectory>/themes/<activeThemeDirectory>/templates/ and <tomcatRootDirectory>/webapps/vivo/templates/individual/freemarker/body/individual.ftl, the template provided by the theme will be used.
The takeaway message here is that any template change you need to make can and should be done within your theme. Avoid making changes to the core Vitro or VIVO level templates to help ensure compatibility with future VIVO releases.
Template variables and directives reference
Template variables are made available to render dynamic content within the application. To print a variable's value in FreeMarker, use the following syntax:
${variableName}
Some variables have methods which can be used to return a value or perform a task such as adding a stylesheet or script to the <head> element.
${stylesheets.add('<link rel="stylesheet" href="mystylesheet.css" />')}
${headScripts.add(<script type="text/javascript" src="myscript.js"></script>)}
Special template directives provide debugging features that assist in template development.
<@describe var="stylesheets" />
(describe the methods callable on a template variable)
<@dump var ="stylesheets" />
(dump the contents of a template variable)
<@dumpAll />
(dump the contents of the template data model)
A sample page at *
http://yourLocalInstance.com/freemarkersamples
* demonstrates most of the methods and directives available within a template. The template file responsible for this page is vitro-core/webapp/web/templates/freemarker/body/samples.ftl.
Template Variables Reference
coming soon
Troubleshooting Performance
For more information, see Troubleshooting VIVO's Performance.
Troubleshooting Tips
Warning screen at startup
As VIVO goes through its startup process, it executes a series of "smoke tests" to try to confirm that the configuration is correct. For example, it checks to see that the home directory exists, and that VIVO has permission to write to it. It checks that VIVO can connect to the database. It checks that Solr is running, and that VIVO can connect to it.
If any of these tests fail, you will see a warning or error message when you direct your browser to VIVO. If the message is a warning (yellow), you may click the "continue" link to ignore the warning. If the message is an error (red), it is considered fatal, and VIVO will not respond to any requests.
Some of the warnings or errors may be cryptic, but they are intended to offer clues as to why your VIVO installation will not work properly.
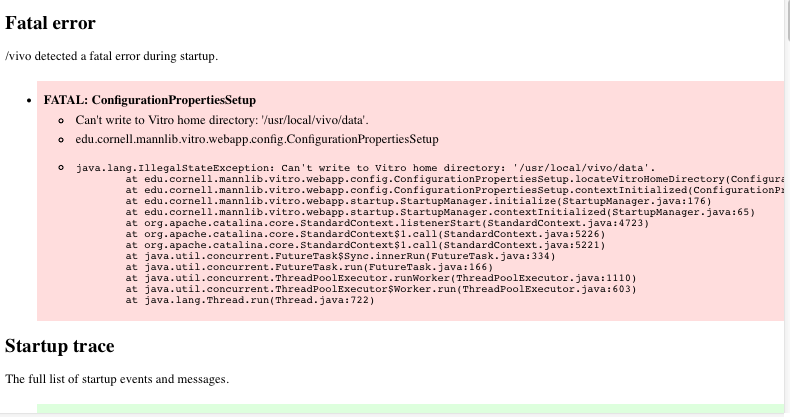
FIGURE 1 - A fatal error at startup
Rebuilding the Search Index
The search index of VIVO is used not just for full text search but also for the menu pages and index pages. If the system is not displaying the individuals that you would expect to see, the search index may need to be rebuilt. To rebuild the index log in as an administrative user and request *
http://vivo.example.edu/SearchIndex
*. This page will allow you to start a rebuild of the search index. A rebuild may take some time. The browser page will refresh every few seconds. Once the index rebuild is set up, the page will display how much time the rebuild has taken, and an estimate of how much additional time will be needed. When the indexing is completed, the page will return to its previous state.
How to Serve Linked Data
The default namespace value set during installation needs to match the domain name where you are serving your VIVO application from (VIVO web address).
Examples of VIVO web addresses and default namespace values:
VIVO web address (url) | Default namespace value |
*+ http://vivo.example.edu+*
| *+ http://vivo.example.edu/individual/+*
|
*+ http://vivo.example.edu/vivo/+*
| *+ http://vivo.example.edu/vivo/individual/+*
|
*+ http://vivoTEST.example.edu:8080/+*
| *+ http://vivoTEST.example.edu:8080/individual/+*
|
To check what your default namespace is currently set for:
- Log into VIVO as an administrator, go to Site Admin -> SPARQL query.
Clear all of the text from the text area, enter the following query in the text area:
SELECT str( ?a ) WHERE { ?_ <http://vitro.mannlib.cornell.edu/ns/vitro/0.7#rootTab> ?a }
- Scroll down and click “Run Query” and you should get a result like this:

To get the default namespace from the result, take everything in quotes up to and including the last forward slash. In this case the default namespace is *
http://usertesting.mannlib.cornell.edu/individual/
*
- If you do not have a default namespace that matches the domain name where your VIVO application is installed, you can use the “Change Namespace of Resources” option under Site Admin – Ingest Tools to correct it. If you just change your configuration in runtime.properties, VIVO will not run correctly. Once you’ve made the change in the SiteAdmin, you will need to change it in runtime.properties, re-deploy and restart tomcat.
Long URLS
If you checked your default namespace and ensured it matches the domain name where your VIVO application is installed, you may find that you still have long URLs on some people profiles.
In other words, you expect to have URLs like this: *
http://vivo.example.edu/individual/n5143
*
But instead, you have URLs like this:
*
http://example.edu/individual?uri=http%3A%2F%2Fvivo.example.edu%2Fsomethingl%2Fn5143
*
In this case, you have individuals with URIs that are not in your VIVO application’s default namespace. There are a couple of ways that this could have happened:
The individuals could have been created using a ingest process that did not create individuals in the default namespace.
The individuals could have been created when the system had a different default namespace.
The individuals could be from RDF data that was imported.
In general, once you have the default namespace set up correctly for your VIVO application, then all the individuals you create using the web interface will have the default namespace. You have to be careful to make sure that any individuals created by an ingest process use the default namespace. Please see the Data Ingest Guide located at http://vivoweb.org for instructions.
Some individuals that are shipped with the application are not in the default namespace. For example, the countries and geographical locations are in a different namespace. Do not attempt to change the namespace of these individuals.
Future Releases
If you are going to upgrade a current instance of VIVO, please consult the upgrade documentation at the support web located at http://vivoweb.org/support
Appendix A - Resources
The resources below should be helpful for anyone seeking additional information on topics covered throughout this guide.
National VIVO website | http://vivoweb.org/ |
| VIVO project Wiki | https://wiki.duraspace.org/display/VIVO |
VIVO project Facebook page | http://www.facebook.com/VIVOcollaboration |
VIVO project SourceForge page | http://sourceforge.net/p/vivo/home/VIVO/ |
Semantic Web technologies and Standards published by W3C | http://www.w3.org/2001/sw/wiki/Main_Page |
Resource Description Framework is a standard model for data interchange on the web, to learn more about RDF | http://www.w3.org/2001/sw/wiki/RDF |
More information on Web Ontology Language (OWL) | http://www.w3.org/2001/sw/wiki/OWL |
SPARQL Query Language for RDF | http://www.w3.org/2001/sw/wiki/SPARQL |
References to events, news, personal pages on the community | |
Semantic Web related conferences | |
Supporting the OWLED Workshop series and task forces | |
Semantic Web portal dedicated to ontology design patterns (ODPs) | |
Community based “Semantic Web Question-and-Answers” site | |
Books available on the Semantic web development | http://www.w3.org/2001/sw/wiki/Books#Books_on_Semantic_Web:_Intro |
Protégé is a lightweight web-based ontology editor supporting OWL | http://protege.stanford.edu/overview/protege-owl.html |
Overview
Content Tools
*Deprecated* See https://wiki.duraspace.org/display/VIVODOC/All+Documentation![]() for current documentation
for current documentation