
VIVO Documentation
...
| Note |
|---|
This page is intended to make access easier for VIVO developers and maintainers.An attacker cannot use these techniques to gain access to your VIVO installation. These techniques can only be used by someone who already has full access to your installation. |
To gain access to the database, simply create a new root account.
Modify the runtime.properties file to include a root account of your choosing, and restart VIVO
| Code Block |
|---|
rootUser.emailAddress = new_root@mydomain.edu |
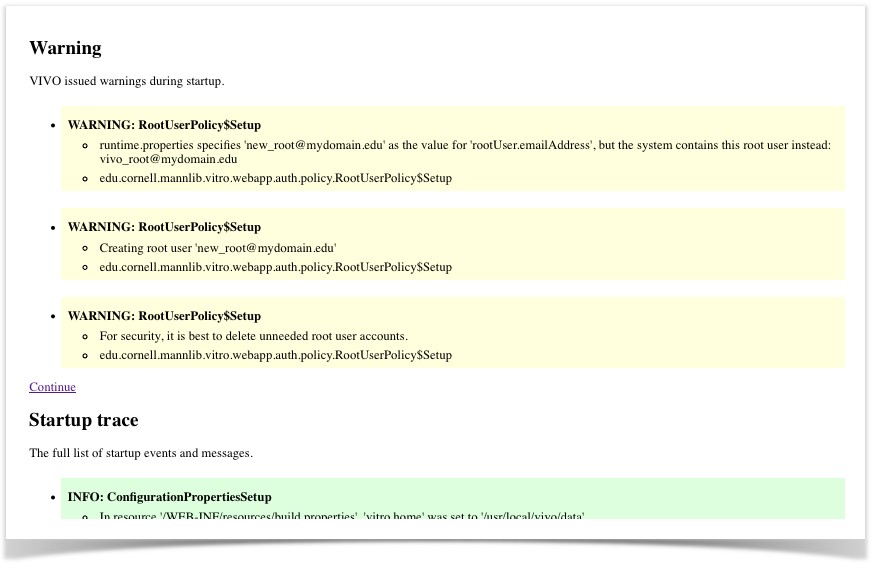
Continue to view the VIVO home page.rootPassword, and you will be asked to assign a new password.You now have two root accounts, and you know the password to the new one. Use the User Accounts pages to either
These releases of VIVO include a "back door" to permit this operation. A developer can add a special file to the VIVO code, which will enable a special URL that will give access.
In more detail:
Create a file called friend.xml, containing a line like this: <date value="2013-02-18"/>, and put it in the [tomcat]/webapps/<vivocontext>/WEB-INF/classes directory. The date in the file must not be more than 1 week old. If you need to use this mechanism for more than 1 week, you will need to update the file. For example:
| Code Block |
|---|
cd /usr/local/tomcat/webapps/vivo/WEB-INF/classes
echo '<date value="2013-02-18"/>' > friend.xml |
This back door will offer no diagnostics if it is attempted incorrectly. The /admin/friend URL will return a simple 404 status
friend.xml does not existfriend.xml is in the wrong directoryfriend.xml is not in the correct formatfriend.xml contains a stale dateOlder VIVO instances did not have a "root" account, per se. Instead, they had "default_admin" accounts.
...
Find out the name of the default_admin account (in this example, the name is admin):
| Code Block |
|---|
mysql> select obj from jena_g3t1_stmt
    ->    where subj = 'Uv::http://vitro.mannlib.cornell.edu/ns/vitro/default#defaultAdminUser:'
    ->      and prop = 'Uv::http://vitro.mannlib.cornell.edu/ns/vitro/0.7#username:';
+-------------------------------------------------------+
| Obj                                                   |
+-------------------------------------------------------+
| Lv:0:39:http://www.w3.org/2001/XMLSchema#stringadmin: |
+-------------------------------------------------------+
1 row in set (0.00 sec) |
Set the password to rootPassword
| Code Block |
|---|
mysql> update jena_g3t1_stmt
    ->    set obj = 'Lv:0:39:http://www.w3.org/2001/XMLSchema#string4BBA69E66998C59F03530EE02C406CB0:'
    ->    where subj = 'Uv::http://vitro.mannlib.cornell.edu/ns/vitro/default#defaultAdminUser:'
    ->      and prop = 'Uv::http://vitro.mannlib.cornell.edu/ns/vitro/0.7#md5password:';
Query OK, 1 row affected (0.01 sec)
Rows matched: 1 Changed: 1 Warnings: 0 |
Log in with the name that you found in the first step, and the password of rootPassword.
These releases of VIVO include a "back door" to permit this operation. A developer can add a special file to the VIVO code, which will enable a special URL that will give access.
In more detail:
Create a file called friend.xml, containing a line like this: <date value="2013-02-18"/>, and put it in the [tomcat]/webapps/<vivocontext>/WEB-INF/classes directory. The date in the file must not be more than 1 week old. If you need to use this mechanism for more than 1 week, you will need to update the file. For example:
| Code Block |
|---|
cd /usr/local/tomcat/webapps/vivo/WEB-INF/classes
echo '<date value="2013-02-18"/>' > friend.xml |
This back door will offer no diagnostics if it is attempted incorrectly. The /admin/friend URL will return a simple 404 status
friend.xml does not existfriend.xml is in the wrong directoryfriend.xml is not in the correct formatfriend.xml contains a stale dateTo gain access to the database, simply create a new root account.
Modify the runtime.properties file to include a root account of your choosing, and restart VIVO
| Code Block |
|---|
rootUser.emailAddress = new_root@mydomain.edu |
Continue to view the VIVO home page.rootPassword, and you will be asked to assign a new password.You now have two root accounts, and you know the password to the new one. Use the User Accounts pages to either
...