Creating Custom Collection Objects
In certain cases, you may wish to change the nature or behaviour of Collection Objects in Islandora. By creating a custom collection object, you can override the default behaviour of Islandora. A simplified overview of Collection Objects is provided in the introduction of this guide. For example, you can return objects that have a different relationship to the collection object, you can present objects in your collection in a custom way to your viewer, and you can create security policies that will restrict access to the items in your collection (overriding Fedora’s default behaviour). The following chapter provides more information about the default behavior of Islandora, how Collection Objects can be constructed, and how they can be extended and customized.
Overview:
Collection Objects have one mandatory Datastream (COLLECTION_POLICY) and several optional Datastreams. The optional Datastreams override the default behaviour of the Islandora Module. You may add Datastreams by navigating to the collection object you wish to modify, and then adding Datastreams via the interface. You may also add these Datastreams using any Fedora tools that you are familiar with.
- COLLECTION_POLICY*
- QUERY
- COLLECTION_VIEW
- CHILD_SECURITY: gives a POLICY Datastream to child objects
*Mandatory
COLLECTION_POLICY
A Collection Object can have four Datastreams, although the COLLECTION_POLICY is the only mandatory stream. If you do not have a COLLECTION_POLICY Datastream, additional objects cannot be ingested as members of that collection object. In other words, in order to add items to a collection or sub-collection, the collection object (or “parent-type” object) must have a COLLECTION_POLICY stream. Here is an example of a COLLECTION_POLICY Datastream (as viewed using the Islandora interface to view in a browser)
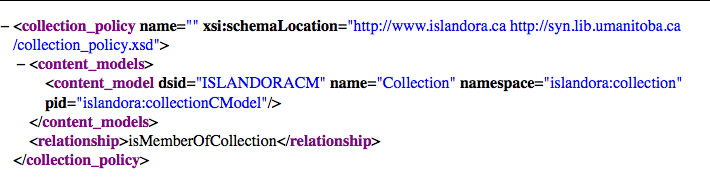
The COLLECTION_POLICY Datastream must have a isMemberOfCollection relationship declared, and must be affiliated with the islandora:collectionCModel.
The relationship statement tells Islandora that this Fedora object is a collection object. Islandora can then query the resource index for objects that have a relationship of isMemberOfCollection to this collection object.
The isMemberOfCollection is the default relationship used by Islandora, but other relationships can be used by declaring that relationship in the COLLECTION_POLICY Datastream. If you use another relationship other than this relationship, you will have to use a QUERY Datastream as well. (In other words, any new relationship declared in the COLLECTION_POLICY Datastream will make the QUERY Datastream mandatory.)
If you wish to create a new COLLECTION_POLICY stream, you will be writing XML. One way to do this is to start with an example collection policy (there is one available in....) and edit it. The DSID of this datastream must be COLLECTION_POLICY.
QUERY
A QUERY Datastream is an ITQL query that overrides the Islandora’s default ITQL query. If you have declared different relationships (not a hasModel relationship) in your COLLECTION_POLICY Datastream, you will have to write a custom QUERY stream to return these relationships. In order to do this, you will have to have an understanding of ITQL. Resources for learning ITQL are offered in the Bibliography for this guide. Your ITQL query must return SPARQL XML to be parsed by the default collection view xslt file, or by a custom COLLECTION_VIEW xslt that you have written yourself.
When you write a QUERY Datastream, you ask ask the Islandora module to retrieve items that have a different set of objects related to your collection object from those in the default ITQL query. The default ITQL query is located in the islandora module in the collection_class.inc file. This is the query:
| Code Block |
|---|
$query_string = 'select $object $title $content from <#ri> where ($object <dc:title> $title and $object <fedora-model:hasModel>
$content and ($object <fedora-rels-ext:isMemberOfCollection> <info:fedora/' . $pid . '>

or $object <fedora-rels-ext:isMemberOf> <info:fedora/' . $pid . '>)and $object <fedora-model:state>
<info:fedora/fedora-system:def/model#Active>)minus $content <mulgara:is> <info:fedora/fedora-system:FedoraObject-3.0>order by $title'; |
Note that if you write a QUERY Datastream, you may also have to write a COLLECTION_VIEW Datastream to parse and display your results. Sample QUERY Datastreams are provided in the Resources section of this guide.
COLLECTION_VIEW
A COLLECTION_VIEW Datastream contains an XSLT that will define how objects in a collection are displayed. You may wish to write a custom COLLECTION_VIEW stream to change the look and feel of your collection for visitors. For a custom XLSTs used for a COLLECTION_VIEW Datastream, please refer to the resources section. The XSLT in your COLLECTION_VIEW Datastream has to be matched to either the default ITQL query used by Islandora (and found in the Islandora module under sparql_2_html.xsl) or the custom QUERY Datastream that you have written. Your XSLT will parse the SPARQL XML returned by either the default query, or the query you have written. This is the default xslt, called from the islandora module at object_helper.inc.
CHILD_SECURITY
The optional CHILD_SECURITY Datastream is a hand-written eXtensible Access Control Markup Language (XACML) policy that provides security at the collection level. To learn more about XACML, visit our resources section. The CHILD_SECURITY Datastream interacts with the default set-up of your Fedora repository. In order to use the CHILD_SECURITY stream effectively, you may wish to review the Islandora and Security section of this guide.
The CHILD_SECURITY Datastream overrides whatever default security you have configured as part of your Fedora and Drupal installations (see the Fedora installation section of this document, particularly information about global XACML policies). For example, if objects in your Fedora repository are, by default, available to the public, you may wish to write a CHILD_SECURITY stream for a collection to restrict access to that collection to specific users, or specific Drupal Roles.
All of the objects that are ingested as members of a collection object that has a CHILD_SECURITY stream will have a POLICY stream. Without the POLICY Datastream, the objects default to your base security configuration. This means that if you add a CHILD_SECURITY stream to an object after items are already affiliated with the collection, these objects will not adopt the CHILD_SECURITY policies (and they will have no POLICY Datastreams).
Note that Islandora does not change the UI in the case where a POLICY Datastream exists. This means that the icons for managing objects (such as the purge option) will still be available to users. However, if users attempt to perform the action and they do not have permissions corresponding to that action, they will receive an error. We are hoping that future versions of Islandora will not have this limitation.
Writing XACML that Islandora can use
If you want people who do not have the administrative role in Drupal to be able to ingest objects, you will have to add a XACML policy file to the $FEDORA_HOME/data/ fedora-xacml-policies/repository-policies. You can retrieve an example XACML policy file from the Resources section of the guide. However, this example opens API-M to all of the users in your Drupal instance that are authenticated users.
When you write a CHILD_SECURITY stream you are writing a XACML policy. That XACML policy must be parseable (usable) by Islandora’s simple parser. Islandora’s simple parser expects the CHILD_SECURITY Datastream to contain a XACML policy that denies access to all users, and then provides exceptions for users with certain Drupal Roles, or User IDs. If users have IDs or roles that are permitted access in the XACML policy, they will be allowed to ingest, view, or modify elements in that collection. You can visit an annotated sample XACML policy in the Resources section of this document. This document can act as a starting point for a collection-object CHILD_SECURITY Datastream.
| Info |
|---|
In order for Islandora to be able to browse collections, your collection object must also have a hasModel entry in the RELS-EXT Datastream that points to islandora:collectionCModel. This lets the module know that the object represents a collection and it will then query for objects that are members of this collection. |
Creating Custom Islandora Content Models
Islandora makes available a number of Content Model Objects in Islandora Solution Packs. However, you may wish to modify these Content Models, or create your own in order to address particular types of content, or to create custom transformations of your data on ingest. Most of the time, you will customize or write a content model to modify behaviour when users view content, or to mofiy what happens to an object when it is ingested into the repository. Islandora Content Models extend Fedora’s Content Model Architecture (CMA), by adding an ISLANDORACM stream.
When you write a Custom Islandora Content Model Object, you are writing an ISLANDORACM stream that calls PHP code that you have written and placed in the plugins directory within the Islandora module. Then, from the ISLANDORACM stream, you call the code to be executed when a user ingests a new object into a collection. This is possible because, in the Islandora module, there are methods that will parse the XML of your ISLANDORACM stream looking for the following elements:
- The <display_in_fieldset> element determines how objects are displayed when a user accesses the object view.
- The <ingest_rules> element defines how objects identified by specific DSID's are managed. For instance, a PDF content model may tell the module to create a thumbnail and ingest that thumbnail as an additional Datastream along with the actual PDF Datastream.
For example:
| Code Block |
|---|
|
<display_in_fieldset>

<datastream id="OBJ">
<method>
<file>plugins/qt_viewer.inc</file>
<class_name>ShowQtStreamsInFieldSets</class_name>
<method_name>showQt</method_name>
</method>
</datastream>

<datastream id="QDC">
<method>
<file>plugins/ShowStreamsInFieldSets.inc</file>
<class_name>ShowStreamsInFieldSets</class_name>
<method_name>showQdc</method_name>
</method>
</datastream>

</display_in_fieldset> |
| Info |
|---|
Remember: Once you have created a new Islandora Content Model, the COLLECTION_POLICY Datastream of a Collection Object must be modified to reference your new Content Model Object. |
Customizing GSearch/Solr
The out-of-the box functions will allow you to support all of our current solution packs, and the MODS and DC metadata streams associated with them. Once you have GSearch installed and running there is very little you need to do. However, you may wish to customize Solr to index a new metadata schema (if you are creating a custom content model) or if you want to modify existing fields. To do this, you would modify the foxmlToSolr.xslt located in the GSearch webapps directory. If you followed the instructions for installing GSearch in Chapter 9 - Enabling Indexing & Searching with Solr, the file would be located here:
| Code Block |
|---|
/usr/local/fedora/tomcat/webapps/fedoragsearch/WEB-INF/classes/config/index/gsearch_solr |
For example, to add the Darwin Core to the index you can add the following lines to the xslt:
| Code Block |
|---|
|
<xsl:for-each select="foxml:datastream/foxml:datastreamVersion\[last()\]/foxml:xmlContent/dwc:SimpleDarwinRecordSet/dwc:SimpleDarwinRecord/*">
<xsl:if test="text() \[normalize-space(.) \]"><\!\--don't bother with empty space-\->

<field >
<xsl:attribute name="name">
<xsl:value-of select="concat('dwc.', substring-after(name(),':'))"/>
</xsl:attribute>
<xsl:value-of select="normalize-space(text())"/>
</field>

</xsl:if>
</xsl:for-each> |
The xsl above will index most Darwin Core fields. Once GSearch is aware of the new schema, you can make Solr aware of it by modifying the schema.xml. Quite often, it makes sense to assign the same content to two fields:
- one analyzed (tokenized, lower cased etc.) for searching
- one unanalyzed (stored exactly as is) for displaying in facets, etc.
The xsl above will create many fields one of which would be dwc.language. In the Solr Schema we would add a declaration for this field:
| Code Block |
|---|
|
<field name="dwc.language" type="text" indexed="true" stored="true" multiValued="true"/> |
Here, we have given it a type = “text”, which in the default schema is analyzed.
| Code Block |
|---|
|
<fieldType name="text" class="solr.TextField" positionIncrementGap="100"><analyzer type="index"><tokenizer class="solr.WhitespaceTokenizerFactory"/><!-- in this example, we will only use synonyms at query time
        <filter class="solr.SynonymFilterFactory" synonyms="index_synonyms.txt" ignoreCase="true" expand="false"/>
--><filter class="solr.StopFilterFactory" ignoreCase="true" words="stopwords.txt"/><filter class="solr.WordDelimiterFilterFactory" generateWordParts="1" generateNumberParts="1" catenateWords="1" catenateNumbers="1" catenateAll="0"/><filter class="solr.LowerCaseFilterFactory"/><filter class="solr.EnglishPorterFilterFactory" protected="protwords.txt"/><filter class="solr.RemoveDuplicatesTokenFilterFactory"/></analyzer><analyzer type="query"><tokenizer class="solr.WhitespaceTokenizerFactory"/><filter class="solr.SynonymFilterFactory" synonyms="synonyms.txt" ignoreCase="true" expand="true"/><filter class="solr.StopFilterFactory" ignoreCase="true" words="stopwords.txt"/><filter class="solr.WordDelimiterFilterFactory" generateWordParts="1" generateNumberParts="1" catenateWords="0" catenateNumbers="0" catenateAll="0"/><filter class="solr.LowerCaseFilterFactory"/><filter class="solr.EnglishPorterFilterFactory" protected="protwords.txt"/><filter class="solr.RemoveDuplicatesTokenFilterFactory"/></analyzer></fieldType>> |
The types are also defined in the schema.xml. If we want to use this in a filter, it makes sense to also store it unanalyzed under a different name. This requires two more entries in the schema.xml:
| Code Block |
|---|
|
<field name="language" type="string" maxChars="300" indexed="true" stored="true" multiValued="true"/>
<copyField source="dwc.language" dest="language"/> |
Once we have created a field named language to store the unanalyzed data in, we’ll use copyField to copy the dwc.language field into the language field which will happen during indexing before it is analyzed. Notice the type is now defined as a string. We can now use these fields in solr request handlers. Request handlers determine what fields to search and what to return, and you can assign certain fields more weight than others.
A request handler may look like this:
| Code Block |
|---|
|
<requestHandler name="herbarium" class="solr.SearchHandler" default="true">

<\!-\- default values for query parameters -->

<lst name="defaults">

<str name="echoParams">explicit</str>

<str name="qf">dwc.type^2.0 dwc.language^2.0 dwc.rightsHolder^2.0 dwc.accessRights^2.0 dwc.rights^2.0 dwc.basisOfRecord^2.0 dwc.scientificName^2.0 dwc.vernacularName^2.0 dwc.kingdom^2.0 dwc.phylum^2.0 dwc.class^2.0 dwc.order^2.0 dwc.family^2.0 dwc.genus^2.0dwc.specificEpithet^2.0 dwc.continent^2.0 dwc.country^2.0 dwc.countryCode^2.0 dwc.stateProvince^2.0 dwc.county^2.0 dwc.municipality^2.0 dwc.verbatimLocality^2.0 dwc.decimalLatitude^2.0 dwc.decimalLongitude^2.0 dwc.occurrenceID^2.0 dwc.institutionCode^2.0 dwc.collectionCode^2.0 dwc.catalogNumber^2.0 dwc.recordedBy^2.0 dwc.eventDate^2.0 PID^0.5</str>

<str name="fl">rightsHolder, accessRights, rights,basisOfRecord, scientificName, vernacularName, kingdom, phylum, class, order, family, genus, specificEpithet, continent, country,countryCode,stateProvince, county, municipality, verbatimLocality, decimalLatitude, decimalLongitude, occurrenceID, institutionCode, collectionCode, catalogNumber, recordedByeventDate, PID</str>

<str name="q.alt">*:*</str>
</lst>

<lst name="appends">
<str name="fq">PID:herbarium*</str>
</lst>

</requestHandler> |
Some interesting things to take note of:
The request handler example shown above limits the results to objects that have the herbarium namespace.
In the qf , we are searching fields like dwc.type and dwc.language and they are all weighted the same. We can tweak the weights later if we wish to customize the results. Solr returns are the fields in <str name=”fl”> element. This gives us nice values to use when displaying the results and when listing facets.
The following section presumes that you are using the Virtual Machine Image or are visiting http://sandbox.islandora.ca OR that you have installed and configured the XML Forms module. For an overview of how Islandora handles descriptive metadata, read Chapter 14 - Descriptive Metadata and Islandora. This section will discuss how to create a new form using the Islandora Form Builder
Introduction
The XML Forms Builder allows you to create and manipulate xml form templates and affiliate them with content models. This means you can create custom forms for users to ingest items into collection by affiliating the content model with a form. You may want to create a custom metadata form to address the needs of your particular collection, or to pre-populate repeating fields. For example, if a collection of PDFs was all written by the same author, you may wish to create a custom form for this collection that has the author’s name pre-populated, so that users ingesting into this collection will not need to re-enter this information. Using custom forms you can also specify which metadata elements you wish to use to describe your object, and create validation rules for particular fields, among other features.
- If you are a developer, or somebody looking to install the XML form builder, you will want to review Chapter 10: Enabling Form Creation with the XML Forms Modules, which discusses the installation and configuration of the module.
- If you are a user, then the following documentation assumes that you have some understanding of metadata schemas and XML, as well as Islandora specific concepts such as Content Models, and Collection Objects. The greater grounding you have in *XPath, XML Form Templates, and XML Schemas* (.xsds), the greater use you will be able to make of the form builder.
- Solution Packs are designed to come pre-packaged with suitable forms written in MODS. These forms can be copied, and edited or modified to suit your needs.
- Forms can be created based on any schema.
Before You Begin
Required Modules
Ensure that you have downloaded and enabled the following Drupal modules which are available from the Islandora.ca Download page:
When developing an XML form in the XML Form Builder you’ll need to reference the schema of the metadata format you are working with. Throughout this document we’ll be using the OAI DC metadata schema as an example. The OAI DC XML format is the serialization of Simple Dublin Core metadata descriptions and we’ll be using Dublin Core elements in this example . You can view/retrieve the schema from here
Sample XML Record
It is incredibly helpful to have an example record on hand while developing the form. Ensure that it matches the version of the XML schema you are working with.
Sample OAI DC Record from a Fedora Repository
| Code Block |
|---|
|
<oai_dc:dc xmlns:oai_dc="http://www.openarchives.org/OAI/2.0/oai_dc/" xmlns:dc="http://purl.org/dc/elements/1.1/"
xmlns:xsi="http://www.w3.org/2001/XMLSchema-instance" xsi:schemaLocation="http://www.openarchives.org/OAI/2.0/oai_dc/
[http://www.openarchives.org/OAI/2.0/oai_dc.xsd]">

<dc:title>Pioneer days & shanty ways</dc:title>
<dc:creator>Eldershaw, Edith V.</dc:creator>
<dc:subject>History</dc:subject>
<dc:subject>Social life and customs</dc:subject>
<dc:description>Edith V. Eldershaw.</dc:description>
<dc:description>Printed by Williams & Crue Ltd.; Summerside, P.E.I.</dc:description>
<dc:description>Contains "stories", poems, and photographs,</dc:description>
<dc:publisher>Eldershaw</dc:publisher>
\\

<dc:type>collection</dc:type>
<dc:type>ingested</dc:type>
<dc:format>electronic</dc:format>
<dc:identifier>ilives:257167</dc:identifier>
<dc:language>eng</dc:language>
<dc:coverage>Prince County (P.E.I.)</dc:coverage>
\\

<dc:coverage>Tignish (P.E.I.)</dc:coverage>
<dc:coverage>Prince Edward Island</dc:coverage>

</oai_dc:dc> |
XML Editors
When developing a form it can be useful to have an XML editor to test code in. Typically these editors can help you determine the xpath of an element, whether the output you are producing is valid, etc. XML Editors would include Oxygen (commerical), XPontus (opensource), and there are many others.
XML Form Builder is a Drupal module that integrates the creation of XML based forms into Islandora. Once a form has be built, it is associated with a content model. This tutorial will take you through the process of creating a form, associating it with a content model, and implementing it with a collection. Once created you will be able to create and edit your metadata.
To use the XML Form Builder navigate to the module in your Islandora site:
Administer > Content Management > XML Form Builder
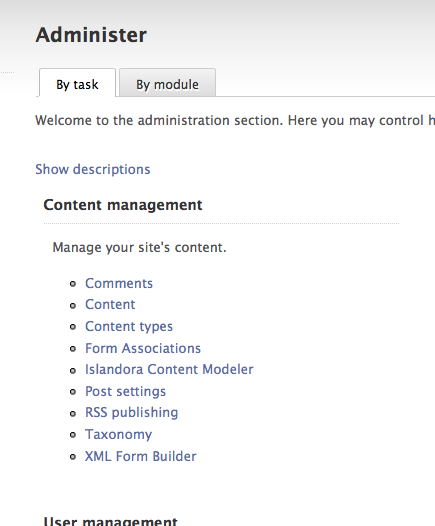
When you start the module you are presented with an option to select a form from a list (those are the forms that come bundled with your Islandora install) and a series of buttons.
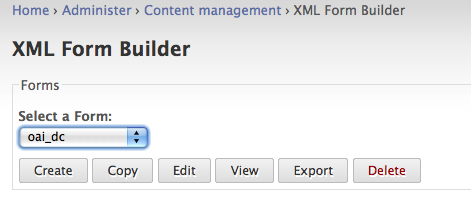
- Create
- Select Create to begin the process of creating a metadata form from scratch or from an existing form definition file (an XML Form Builder form).
- Copy
- Copies an existing form (from the dropdown), that you can then modify. This is probably be one of the most common methods you will use to create new forms.
- Edit
- View
- View an existing form. This option is useful when testing input. You can submit a form and see its XML output.
- Export
- Exports an existing form and allows you to save the form XML to your local computer.
To start creating a form select Create.
In the Create Form dialogue enter a form name - for example we are creating a basic OAI DC form so a name like oai_dc_basic would be appropriate. If you have an existing XML Form Builder form you could upload the form definition. We’ll be creating this OAI DC XML form from scratch, so we can click on Create.

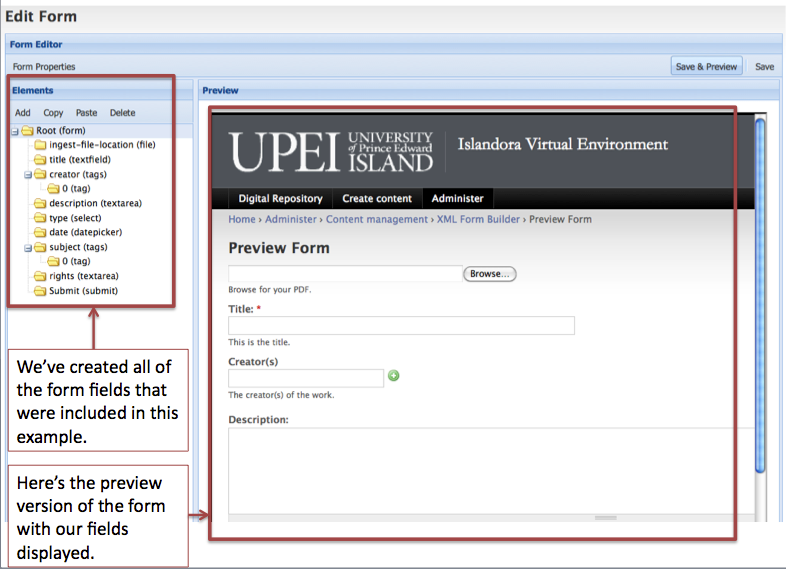
The module should report that it successfully created a new form called oai_dc_basic.
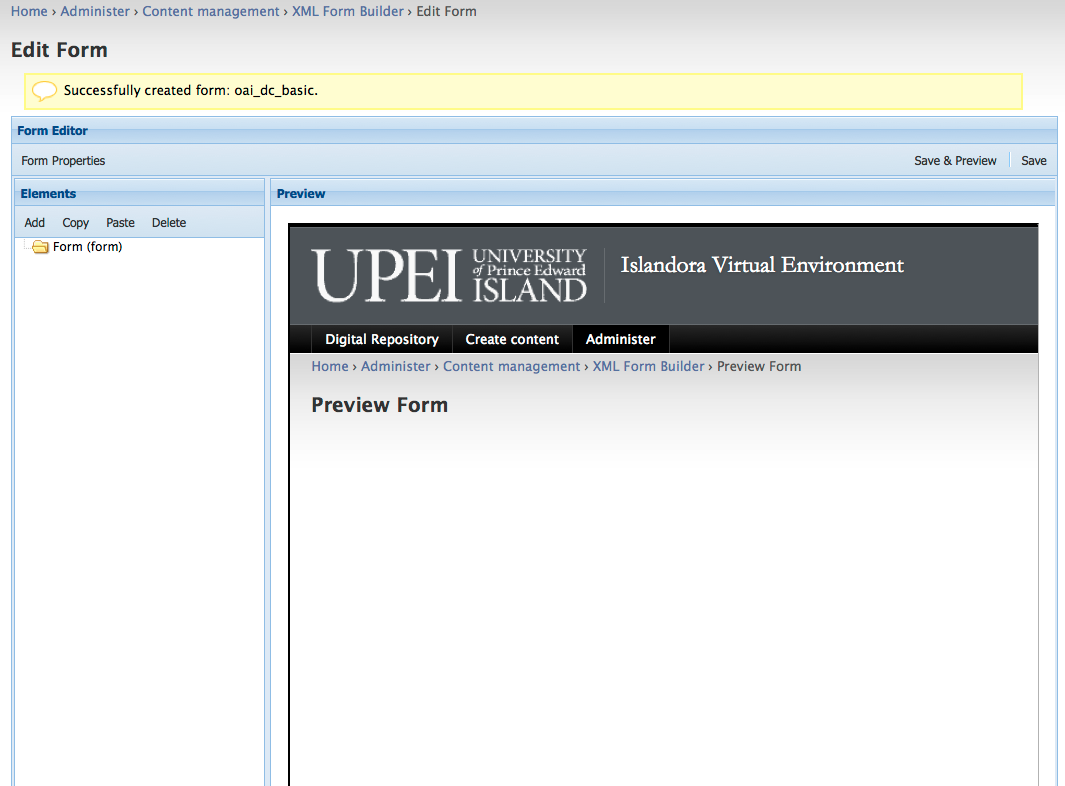
This is the main form building/editing interface for creating XML forms and it provides methods for adding form properties, form fields and a preview pane.
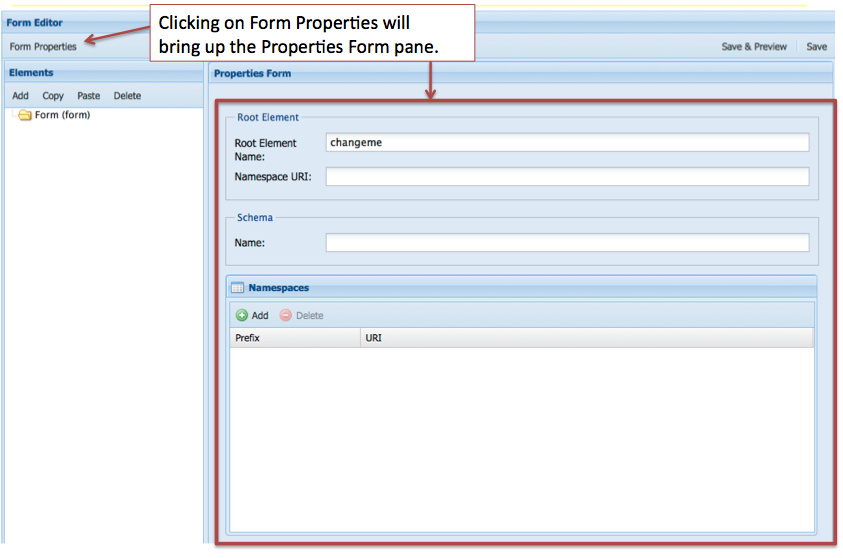
When creating an XML form the first thing you need to set in the Form Editor is the Form Properties. This is where having an example of an OAI DC record would come in handy and would provide the information you need to fill in the Form Properties. Here is the part of the record that you’ll use:
| Code Block |
|---|
|
<oai_dc:dc xmlns:oai_dc="http://www.openarchives.org/OAI/2.0/oai_dc/" xmlns:dc="http://purl.org/dc/elements/1.1/"
xmlns:xsi="http://www.w3.org/2001/XMLSchema-instance" xsi:schemaLocation="http://www.openarchives.org/OAI/2.0/oai_dc/
http://www.openarchives.org/OAI/2.0/oai_dc.xsd"> |
It provides information about the Root Element Name, the Namespace URI, the location of the Schema, as well as the various namespaces needed.
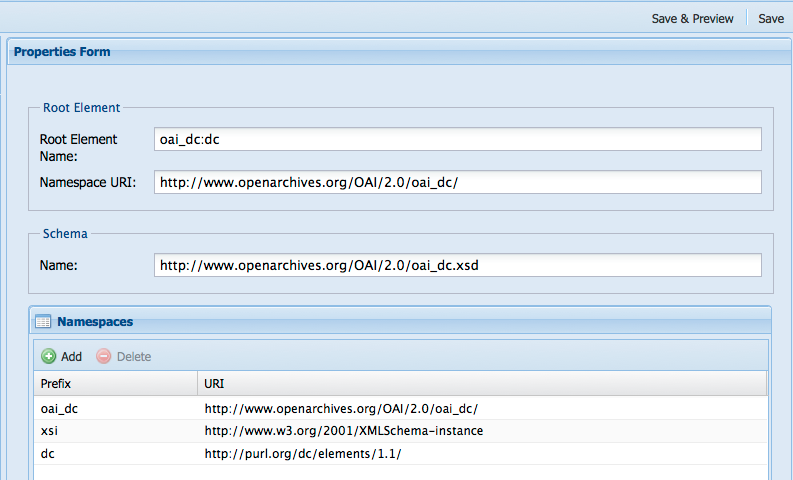
Select Save once you have the properties entered. Once the form properties have been entered you are ready to add elements to your form.
Some schema require elements appear in a certain order (an order based schema), that certain elements be required or not, that some elements are repeatable and others not, or that elements can be nested. Refer to your schema documentation and to the guidance in creation of records based on the schema. For the schema we are using in this tutorial, Simple Dublin Core, each of the fifteen elements is optional and may be repeated. We will create a simple form for this exercise that utilizes several Dublin Core elements. Let’s create a table listing the elements, the element labels, the type of element, the content of the element, and whether they are repeatable. We’ll use this information when adding elements to our form.
Element | Label | Type | Content | Repeatable |
title | Title | textfield | The title of the work. | no |
creator | Creator(s) | tags/tag | The creator(s) of the work. | yes |
description | Description | textarea | A description of the work. | no |
type | Type | select | A controlled list of terms | no |
date | Date | datepicker | The date the work was issued or published. | no |
subject | Subject(s) | tags/tag | The topic of the work. | yes |
rights | Rights | textarea | Information about rights held in and over the resource. | no |
Adding a textfield type form field - the dc:title element
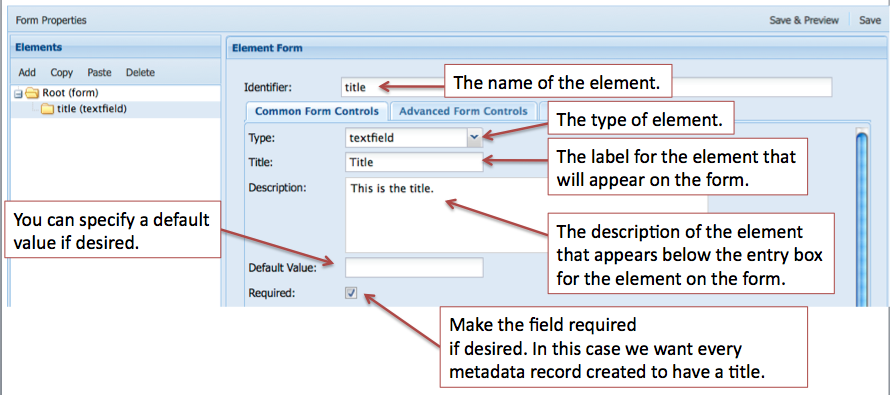
We can start adding elements to the form starting with the title element. We can use the information in our table to fill out the first part of Element Form.
In this part of the form you can enter values for Identifier, Type, Title, Description, Default Value, and Required. These can be defined as follows:
Identifier: Identifies this form field. It ishe Drupal form array key for this element.
Type: Used to determine the type of form field.
used as Title: The label of the form field as it appears on your form.
Description: The description of the form field.
Default Value: The value of the form field that will be displayed or selected initially if the form has not been submitted yet.
Required: Indicates whether or not the element is required. This automatically validates for empty fields, and flags inputs as required. Fields with a type of file are not allowed to be required.
The rest of the form deals with where each element is created, read, updated, and deleted in the XML tree. This is where it would be useful to understand how XML works and to have a basic understanding of XPATH.
Reviewing our OAI DC XML sample record we can determine the location/context of the title element.
| Code Block |
|---|
|
<oai_dc:dc xmlns:oai_dc="http://www.openarchives.org/OAI/2.0/oai_dc/" xmlns:dc="http://purl.org/dc/elements/1.1/"
xmlns:xsi="http://www.w3.org/2001/XMLSchema-instance" xsi:schemaLocation="http://www.openarchives.org/OAI/2.0/oai_dc/
[http://www.openarchives.org/OAI/2.0/oai_dc.xsd]">
<dc:title>Pioneer days & shanty ways</dc:title> |
The full XPATH in this XML document for the dc:title element would be:
| Code Block |
|---|
/oai_dc:dc/dc:title |
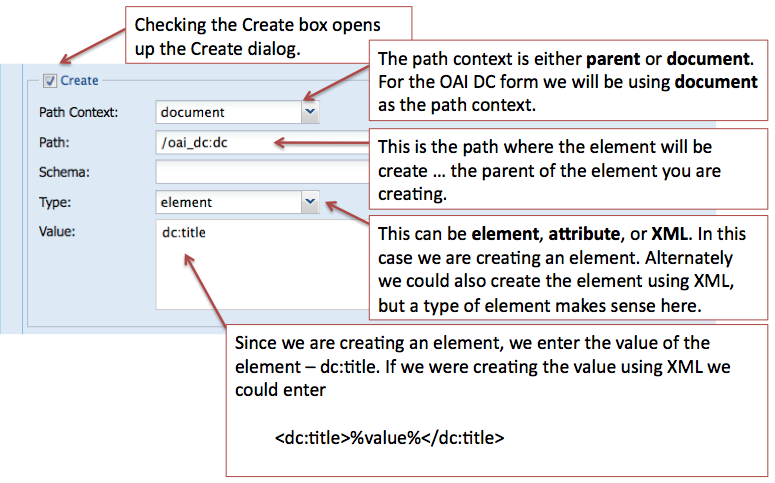
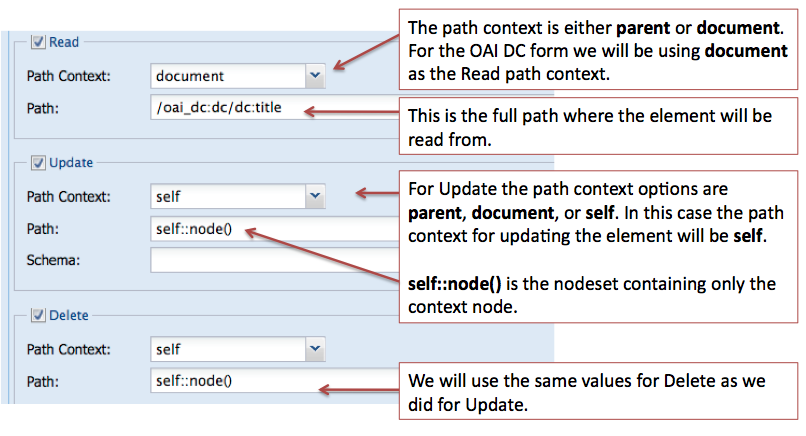
where /oai_dc:dc is the parent element and dc:title is the child element. The Create dialogue is where we enter the information needed for creating an element in our form. We’ll be entering information into the Path Context, Path, Type, and Value properties in our example. If you had an order based schema, you would also fill in the Schema field. Here are some definitions for each of those properties:
Path Context: the context in which the path with be executed in.
document - xpath query is run from the root element of the document
parent - xpath query is run from the node created/read by its parent’s form field
self - only applies Delete and Update actions and applies to the node selected by the Read action.
Path: An XPATH to this element’s parent object. This is used to determine whether this element is inserted.
Schema: An XPATH to the definition of this element's parent. The xpath is executed in the schema defined in this form's properties. This is used to determine the insert order for this element.
Type: The type of node that will be created. If XML is specified, an XML snipped is expected in the value field.
Value: If the type is either Element or Attribute, the name of the element or attribute is expected. If the type is XML, an XML snippet is expected where the value of the form field will be inserted where ever the string %value% is used in the XML snippet.
Review the image below and think about how your other OAI DC elements will be created based on this pattern.
- *Create action is about selecting the parent node where the new node will be created.*
The rest of the form deals with where the element will be read, updated, and/or deleted from.
- *Read action is about selecting the node that will be used to populate the form field.*
- *Update action is about updating the node that was used to populated the form field.*
- *Delete action is about deleting the node that the Read action selected.*
Note: you can Update or Delete nodes other than the node which is Read. (for example with mods:name … where sub-elements are created with a form field and additional nodes are automatically created with XML code. We may want to delete/update the entire mods:name and its sub-elements.)
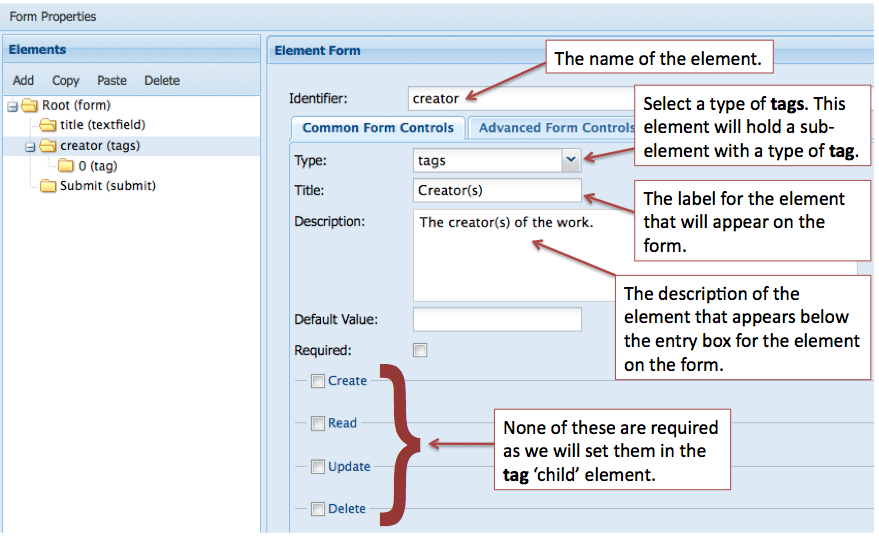
Adding the creator element - an element that may have multiple values
In some cases you will have multiple occurrences of an element, for example a digital object may have more than one creator (multiple authors) or may have many subjects that describe it. The Form Builder has several methods dealing with this use case. In our example OAI DC form we have decided that there could be multiple creators and the schema allows that. It is a two step process:
- create an element with a type of tags,
- nest another element in the tags type element that has a type of tag.
This image displays the first step of the creation of the creator element.
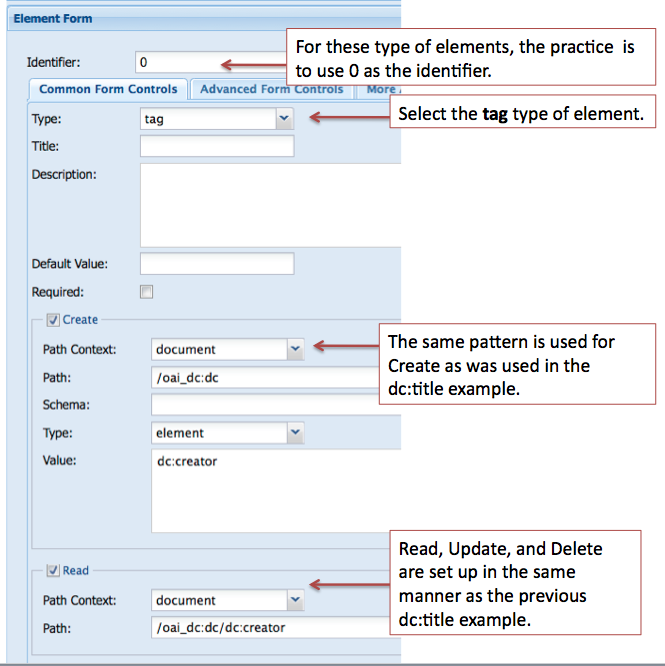
The second step is to create a nested tag type element. The image below displays the values for the properties used for this element.
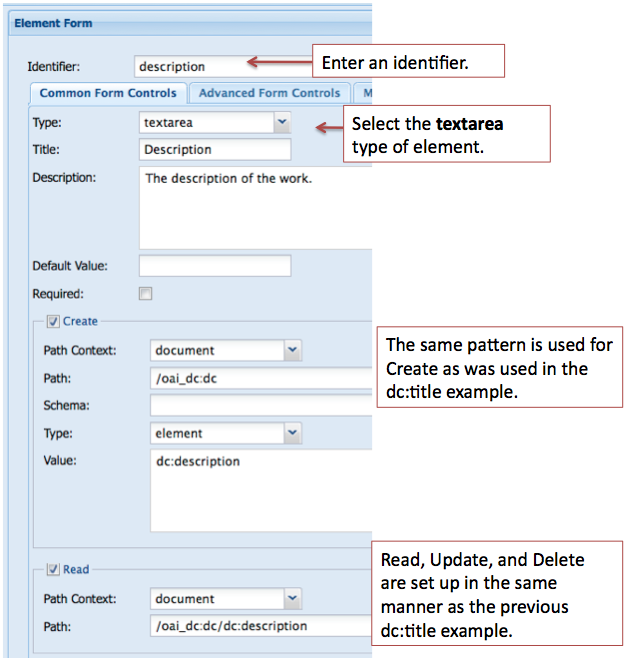
Adding a textarea type form field - the dc:description element
For element that require a description or that contain a large amount of text, the textarea type form field is used.
In many cases you will want to provide the user with a list of controlled terms and the select form field type is used. For the type element our controlled list of terms is based on the DCMI Type Vocabulary. The Vocabulary “provides a general, cross-domain list of approved terms that may be used as values for the Resource Type element to identify the genre of a resource”.#
DCMI Type Vocabulary
Term | Description |
Collection | An aggregation of resources. |
Dataset | Data encoded in a defined structure. Examples include lists, tables, and databases. A dataset may be useful for direct machine processing. |
Event | A non-persistent, time-based occurrence. Examples include an exhibition, webcast, conference, workshop, open day, performance, battle, trial, wedding, tea party, conflagration. |
Image | A visual representation other than text. Examples include images and photographs of physical objects, paintings, prints, drawings, other images and graphics, animations and moving pictures, film, diagrams, maps, musical notation. |
InteractiveResource | A resource requiring interaction from the user to be understood, executed, or experienced. Examples include forms on Web pages, applets, multimedia learning objects, chat services, or virtual reality environments. |
MovingImage | A series of visual representations imparting an impression of motion when shown in succession. Examples include animations, movies, television programs, videos, zoetropes, or visual output from a simulation. |
PhysicalObject | An inanimate, three-dimensional object or substance. Note that digital representations of, or surrogates for, these objects should use Image, Text or one of the other types. |
Service | A system that provides one or more functions. Examples include a photocopying service, a banking service, an authentication service, interlibrary loans, a Z39.50 or Web server. |
Software | A computer program in source or compiled form. |
Sound | A resource primarily intended to be heard. Examples include a music playback file format, an audio compact disc, and recorded speech or sounds. |
StillImage | A static visual representation. Examples include paintings, drawings, graphic designs, plans and maps. Recommended best practice is to assign the type Text to images of textual materials. |
Text | A resource consisting primarily of words for reading. Examples include books, letters, dissertations, poems, newspapers, articles, archives of mailing lists. Note that facsimiles or images of texts are still of the genre Text. |
Source
When adding a select form field in the Form Builder there are two steps:
- Add the information about the element you are creating
- Add the terms that will display in the select list for users
1. When adding information about the element we will use the same method that we have used previously.
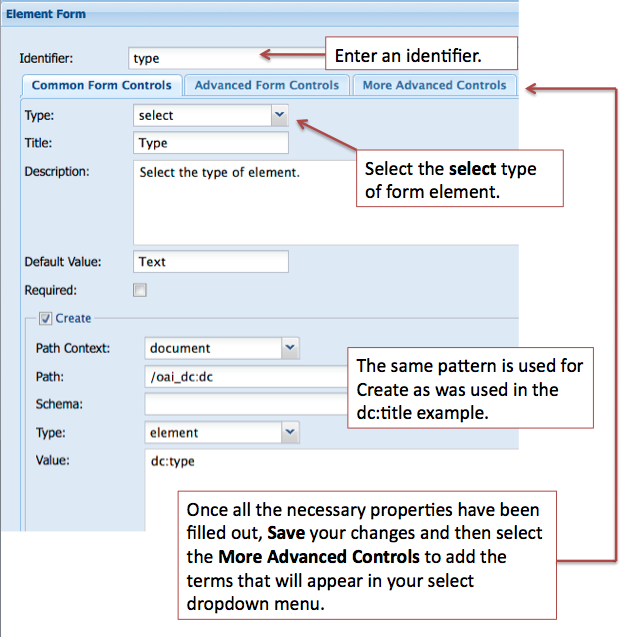
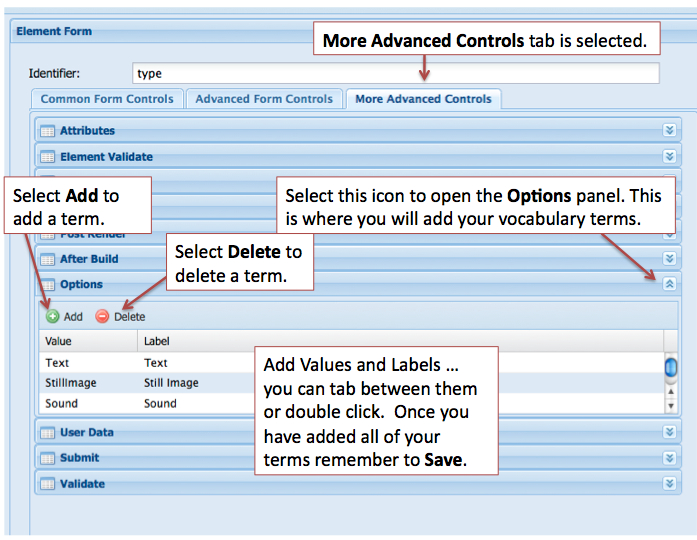
2. To add terms to your select form field you need to click on the More Advanced Controls tab in the Element Form pane. Review the image below and enter your terms in the Options panel.
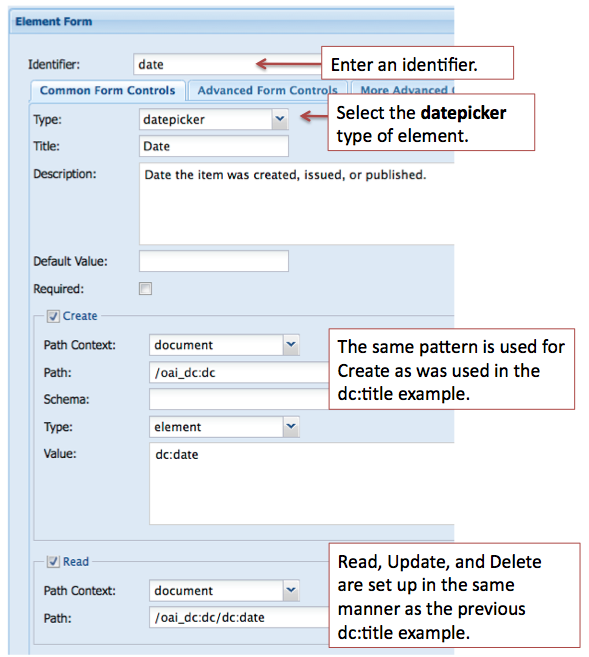
For this example we are using the datepicker type of form field. You will want to review your existing metadata as another type of form field may be more appropriate.
The remaining two elements for our sample OAI DC XML form, dc:subject (tags, tag) and dc:rights (textarea), can be built in the same manner as fields of a similar type that we have already created.
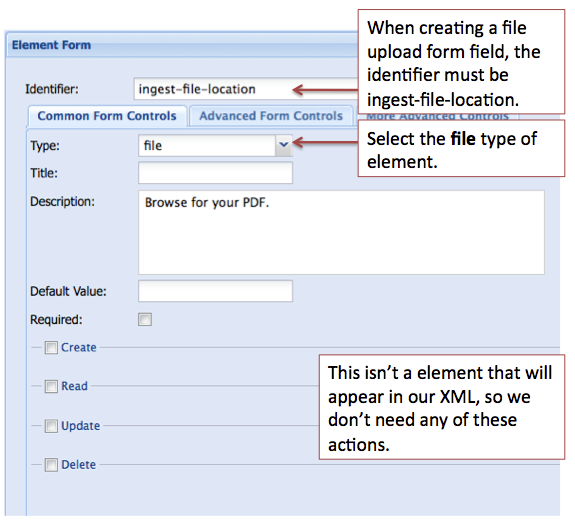
One additional element that can be added for convenience is a file upload type form field. This will allow you to browse for a PDF document on your local machine as part of the Islandora ingest process. The image below illustrates what properties need to be filled in. Note: the Indentifier for this form field type must be ingest-file-location.
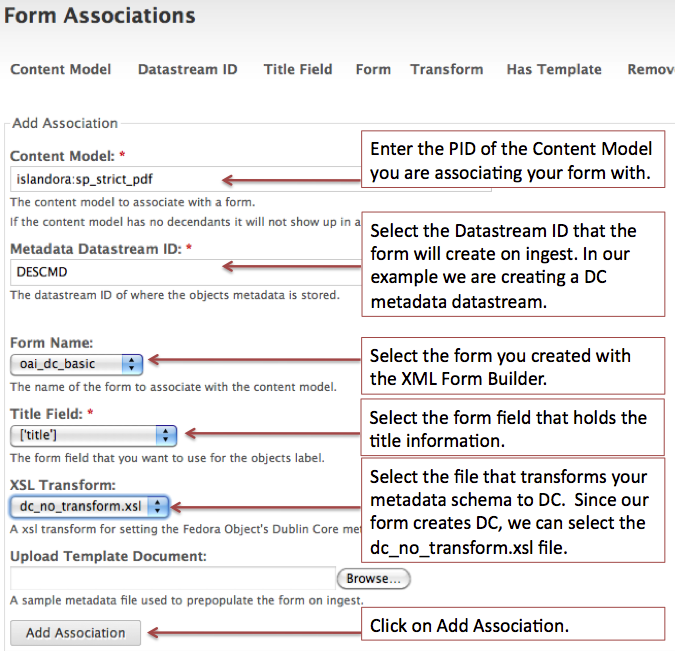
Connecting the Form to a Content Model
Once you’ve completed and tested the form you’ve created in the XML Form Builder module, you can connect that form to an existing content model using the Form Associations module. You can navigate to the module using this path:
Administer > Content management > Form Associations

In this example we will associate the form we created - oai_dc_basic - with the islandora:sp_strict_pdf content model. Review the image below to fill out the Form Associations dialog.
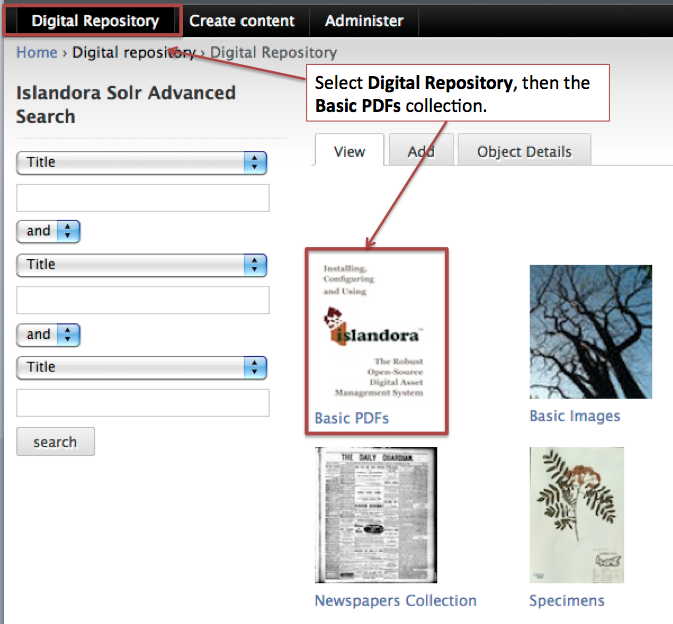
Navigating to a Collection
Once the association has been successfully created, you can try ingesting new objects into a collection that has the islandora:sp_strict_pdf content model associated with it. In this case, the Islandora demo VM has a PDF collection associated with the islandora:sp_strict_pdf content model. Navigate to the PDF collection using the image as a guide.
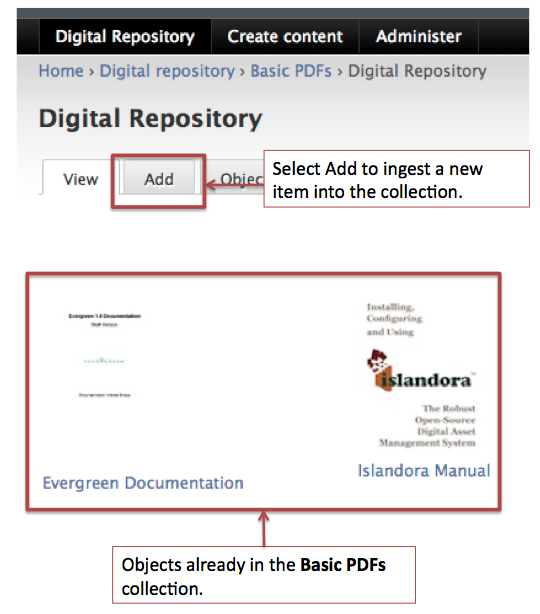
Once in the collection (you can tell where you are by the breadcrumb), select the Add tab to add a new PDF to the collection.
Adding a PDF to the Collection
You will be presented with a dialog requesting two pieces of information: the content model and the form to use for ingest.
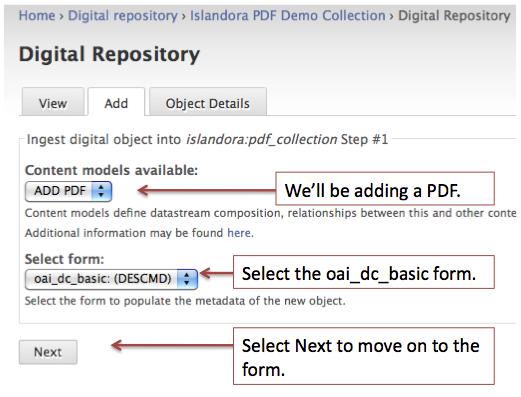
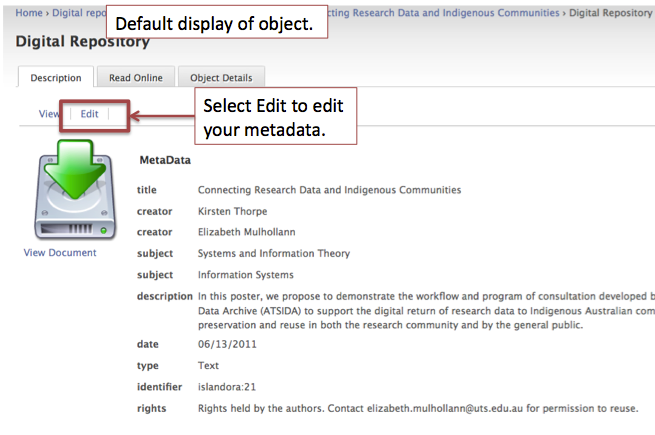
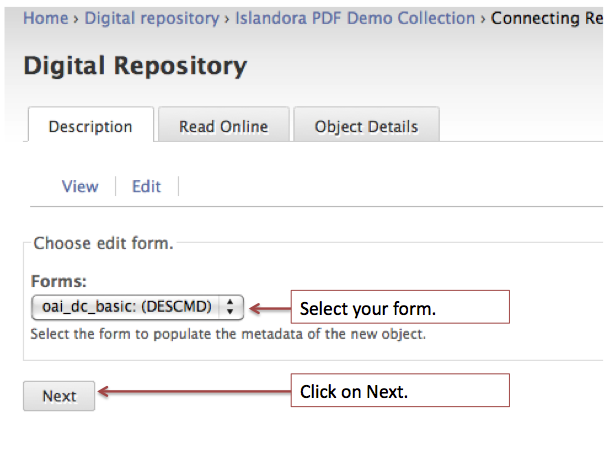
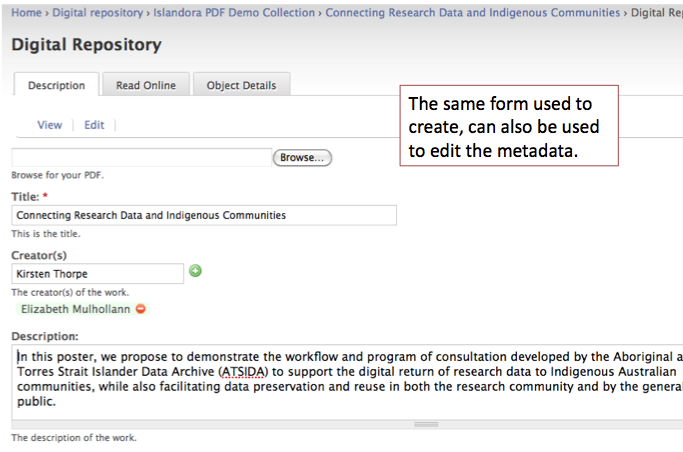
You will be presented with the form that we created during this tutorial. You’ll need to fill it in. Once you’ve completed your data entry, submit the form.
Case Study: Thinking Through a Data Problem
Developing a Content Model for a collection of typewritten letters
Our starting point is a scanned version of a typewritten letter, which has been saved as a TIFF.
Questions to Ask
- What kind of metadata do you want to gather? Metadata that describes the object, the administrative data related to the object, the technical metadata of the object you digitized, and/or metadata that relates to the longterm preservation of the object.
- What kind of metadata schema will I use to describe each letter?
- If you are concerned with descriptive metadata is Dublin Core sufficient or would MODS be more appropriate (or EAD, etc.)?
- You'll need to review your content and select a schema that best matches your needs. Avoid creating your own schema.
- You need to use the FormBuilder to create your metadata form.
- If the letters are more than a single page, how will you deal with that?
- There a few options here:
- Each letter is its own digital object and is related (using RELS-EXT or embedded in the metadata) to a 'collection object' that gathers the pages of the letter together.
- A single letter object could have several several page datastreams.
- Our preference would be to take an 'atomistic' approach: each page of a letter would be created as a digital object.
- How will your users view/search your collection of letters?
- Will you have a grid display of your letter images? Or a list view? Or both?
- Will you need a thumbnail for each of your letter images?
- If so you'll need to create a thumbnail datastream that is part of your letter object. What happens if you have many pages in the letter? Just a thumbnail for the first page? What if in a search a user gets a list of letters/pages?
- What will the view a single letter look like?
- Will you display the metadata of the letter and web based image of the letter (you may want to use some wireframing tools to sketch out your views, eg. try the Pencil Project, a plugin for Firefox)?
- What derivatives will you need to provide the various views to your users?
- Thumbnail.
- Web based image of the letter.
- You could add tremendous value to your collection by extracting the text from the page image using an OCR program and including the resulting text in your index for search/discovery.
Based on the outline above we can start to determine the datastreams that will make up a typical letter digital object, which will then help us define the content model for this type of digital object.
Letter Digital Object

Here is a table of Datastreams, including the Datastream IDs that we've assigned, and the expected mimetype of the Datastreams.
{*}Datastream Label{*} | {*}Datastream ID{*} | Mimetype |
Archival TIFF | TIF | image/tif, image/tiff |
JPG Image | JPG | image/jpg, image/jpeg |
Letter Thumbnail | TN | image/jpg |
Descriptive Metadata | MODS | text/xml |
Extracted Text | OCR | text/plain |
Letter Content Model
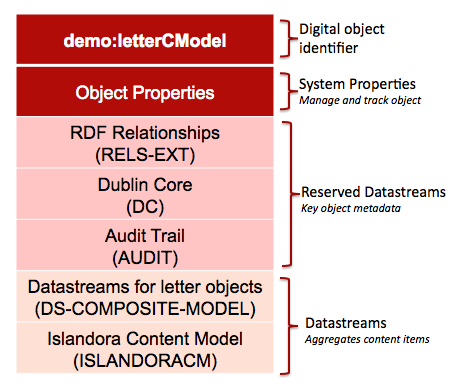
When compared to the Letter Digital Object, the content model seems a bit thin. Much of the work of the content model is contained within the ISLANDORACM Datastream. Below you will find a commented FOXML version of the demo:LetterCModel content model. The bulk of the work of the ISLANDORACM is performed by a variety of functions which are contained within .inc files (PHP files) in the islandora/plugins directory.
Sample Content Model
| Code Block |
|---|
|
<?xml version="1.0" encoding="UTF-8"?>
<foxml:digitalObject VERSION="1.1" PID="demo:LetterCModel" xmlns:foxml="info:fedora/fedora-system:def/foxml#"
xmlns:xsi="http://www.w3.org/2001/XMLSchema-instance" xsi:schemaLocation="info:fedora/fedora-system:def/foxml#
[http://www.fedora.info/definitions/1/0/foxml1-1.xsd]">

<\!-\- Object Properties -->

<foxml:objectProperties>
<foxml:property NAME="info:fedora/fedora-system:def/model#state" VALUE="Active"/>
<foxml:property NAME="info:fedora/fedora-system:def/model#label" VALUE="Large Content Model"/>
<foxml:property NAME="info:fedora/fedora-system:def/model#ownerId" VALUE="fedoraAdmin"/>
<foxml:property NAME="info:fedora/fedora-system:def/model#createdDate" VALUE="2011-07-21T11:40:51.192Z"/>
<foxml:property NAME="info:fedora/fedora-system:def/view#lastModifiedDate" VALUE="2011-07-21T13:23:53.225Z"/>
</foxml:objectProperties>

<\!-\- Datastream Composite Model -->

<foxml:datastream ID="DS-COMPOSITE-MODEL" STATE="A" CONTROL_GROUP="X" VERSIONABLE="true">
<foxml:datastreamVersion ID="DS-COMPOSITE-MODEL.0" LABEL="Datastreams for this object" MIMETYPE="text/xml">

<foxml:xmlContent>
<dsCompositeModel xmlns="info:fedora/fedora-system:def/dsCompositeModel#">

<dsTypeModel ID="DC">
<form FORMAT_URI="http://www.openarchives.org/OAI/2.0/oai_dc/" MIME="text/xml"></form>
</dsTypeModel>

<dsTypeModel ID="RELS-EXT">
<form FORMAT_URI="info:fedora/fedora-system:FedoraRELSExt-1.0" MIME="application/rdf+xml"></form>
</dsTypeModel>

<dsTypeModel ID="TIFF">
<form MIME="image/tiff"></form>
</dsTypeModel>

<dsTypeModel ID="JPG">
<form MIME="image/jpeg"></form>
</dsTypeModel>

<dsTypeModel ID="TN">
<form MIME="image/jpeg"></form>
</dsTypeModel>

<dsTypeModel ID="MODS">
<form MIME="text/xml"></form>
</dsTypeModel>

<dsTypeModel ID="OCR">
<form MIME="text/plain"></form>
</dsTypeModel>

</dsCompositeModel>
</foxml:xmlContent>
</foxml:datastreamVersion>
</foxml:datastream>

<\!-\- Dublin Core Datastream -->

<foxml:datastream ID="DC" STATE="A" CONTROL_GROUP="X" VERSIONABLE="true">
<foxml:datastreamVersion ID="DC1.0" LABEL="Dublin Core Record for this object" CREATED="2011-07-21T11:40:51.192Z" MIMETYPE="text/xml"
FORMAT_URI="http://www.openarchives.org/OAI/2.0/oai_dc/" SIZE="393">
<foxml:xmlContent>

<oai_dc:dc xmlns:oai_dc="http://www.openarchives.org/OAI/2.0/oai_dc/" xmlns:dc="http://purl.org/dc/elements/1.1/"
xmlns:xsi="http://www.w3.org/2001/XMLSchema-instance" xsi:schemaLocation="http://www.openarchives.org/OAI/2.0/oai_dc/
[http://www.openarchives.org/OAI/2.0/oai_dc.xsd]">

<dc:title>Large Content Model</dc:title>
<dc:identifier>demo:LetterCModel</dc:identifier>

</oai_dc:dc>
</foxml:xmlContent>
</foxml:datastreamVersion>
</foxml:datastream>

<\!-\- Relationship / RDF datastream ... in this case the relationship hasModel -->

<foxml:datastream ID="RELS-EXT" STATE="A" CONTROL_GROUP="X" VERSIONABLE="true">
<foxml:datastreamVersion ID="RELS-EXT.0" LABEL="Fedora Object-to-Object Relationship Metadata" CREATED="2011-07-21T11:40:52.105Z"
MIMETYPE="text/xml" SIZE="327">

<foxml:xmlContent>
<rdf:RDF xmlns:rdf="http://www.w3.org/1999/02/22-rdf-syntax-ns#">
<rdf:Description rdf:about="info:fedora/demo:LetterCModel">
<fedora-model:hasModel xmlns:fedora-model="info:fedora/fedora-system:def/model#" rdf:resource="info:fedora/fedora-system:ContentModel-3.0">
</fedora-model:hasModel>
</rdf:Description>
</rdf:RDF>
</foxml:xmlContent>
</foxml:datastreamVersion>
</foxml:datastream>

<\!-\- Islandora Content Model Datastream for this Content Model ... it is where the ingest rules, display methods, mimetypes, and datastream IDs related to the object to be created -->

<foxml:datastream ID="ISLANDORACM" STATE="A" CONTROL_GROUP="X" VERSIONABLE="true">
<foxml:datastreamVersion ID="ISLANDORACM.0" LABEL="Islandora Large Content Model" CREATED="2011-07-21T13:23:53.225Z" MIMETYPE="application/xml"
SIZE="2175">

<foxml:xmlContent>
<content_model xmlns="http://www.islandora.ca" xmlns:xsi="http://www.w3.org/2001/XMLSchema-instance" name="Large Content Model"
xsi:schemaLocation="http://www.islandora.ca [http://localhost/islandoracm.xsd]">

<\!-\- the mimetype for uploading defined -->

<mimetypes>
<type>image/tiff</type>
<type>image/tif</type>
</mimetypes>

<\!-\- the actions (embedded in .inc files which are php files) that happen to tif images when they are ingested -->

<ingest_rules>
<rule>
<applies_to>image/tif</applies_to>
<applies_to>image/tiff</applies_to>

<\!-\- this ingest method calls the ImageManipulation.inc file in the islandora/plugins directory and calls the doOCR function in that .inc file.

doOCR runs the tif image through tesseract and pushes the output into the OCR datastream of the Letter Digital Object that gets created \-->

<ingest_methods>
<ingest_method class="ImageManipulation" dsid="OCR" file="plugins/ImageManipulation.inc" method="doOCR" modified_files_ext="txt"
module="fedora_repository"></ingest_method>
</ingest_methods>
</rule>

<rule>
<applies_to>image/tif</applies_to>
<applies_to>image/tiff</applies_to>
<\!-\- this ingest method calls the ImageManipulation.inc file in the islandora/plugins directory and calls the createThumbnail
function and passes the width/height parameters to imagemagick which converts the tif image into a jpg thumbnail and pushes that
result into the TN datastream -->

<ingest_methods>
<ingest_method dsid="TN" file="plugins/ImageManipulation.inc" method="createThumbnail" modified_files_ext="jpg" module="fedora_repository">

<parameters>
<parameter name="width">120</parameter>
<parameter name="height">120</parameter>
</parameters>

</ingest_method>
</ingest_methods>
</rule>
</ingest_rules>

<\!-\- a default DC ingest form for the object ... ideally we will build a MODS based form to hold the metadata and it will get
automatically transformed to DC on ingest/creation ... this is just a placeholder -->

<ingest_form dsid="DC" page="2">
<form_builder_method class="buildQDCForm" file="FormBuilder" handler="" method="handleQDCForm" module="plugins/DemoFormBuilder.inc">
</form_builder_method>

<form_elements>
<element label="Title" name="dc:title" required="false" type="textfield">
<description>Title of the letter</description>
</element>
</form_elements>
</ingest_form>

<\!-\- the list of datastreams that are included in the Letter Digital Object. By listing the datastreams here, we will see them
in the dropdown list when we administer the object -->

<datastreams>
<datastream dsid="TIFF"></datastream>
<datastream dsid="JPG">

<\!-\- Display methods are similar to ingest rules in that they call php functions that are embedded in .inc files. In this case
we call the ShowDemoStreams.inc in the islandora/plugins/ directory. There are some default display methods embedded in the
islandora module ... eg. for the TN datastream -->

<display_method class="ShowSlideStreamsInFieldSets" default="true" file="plugins/ShowDemoStreams.inc" method="showJPG" module="
fedora_repository"></display_method>
</datastream>

<datastream dsid="OCR">
<display_method class="ShowTIFFStreamsInFieldSets" file="plugins/ShowTIFFStreams.inc" method="showOCR" module="fedora_repository">
</display_method>
</datastream>

<datastream dsid="TN"></datastream>
<datastream dsid="MODS"></datastream>
</datastreams>
</content_model>
</foxml:xmlContent>
</foxml:datastreamVersion>
</foxml:datastream>
</foxml:digitalObject> |