...
| Note |
|---|
For more information about using the WinIBW client, please see the WinIBW documentation posted under ISNI documentationPilot 2017-18 documentation and training |
Database access
We have access to two databases via the WinIBW client:
- ACCEPT is the test database. Training and experimenting should be done here.
- PRODUCTION is the live ISNI database. Work performed here affects real records.
Logging in to ISNI using the WinIBW client
Getting to the ISNI login page
In the WinIBW client, there are different ways to get to the ISNI login page, depending how you launch the software.
- Windows command line
- You can get directly to the ISNI login page if you launch the WinIBW client from the Windows command line
"C:\Program Files (x86)\OCLC\WinIBW3\WinIBW30.exe" -u:pica3://isni.oclc.org:16035 - You can create a desktop shortcut for this and launch the WinIBW client from that shortcut.
- You can get directly to the ISNI login page if you launch the WinIBW client from the Windows command line
- From the WinIBW shortcut that was added to your desktop when you installed it
- If you launch the WinIBW client from its own shortcut, it will be quicker to get to the ISNI login page if the WinIBW settings on your computer have the ISNI URL:
pica3://isni.oclc.org:16035
in this file:
C:\Program Files (x86)\OCLC\WinIBW3\chrome\ibw\content\start.htm
- If you launch the WinIBW client from its own shortcut, it will be quicker to get to the ISNI login page if the WinIBW settings on your computer have the ISNI URL:
- From the WinIBW client's command line
- If you have any other URL in the start.htm, you will have to enter the ISNI URL on the client's command line to get to the ISNI login page, as shown below.
- This is useful if you need to switch between Accept and Production.
| Note | ||
|---|---|---|
| ||
|
Logging in to ISNI from the WinIBW command line
Do not click on the link Start sessie (it will lead you to the cataloguing system of the Dutch libraries).
Press Alt-cor mouse-click to get the cursor on the WinIBW command line at the bottom of the screen
ISNI ACCEPT (test)
- Paste the following appropriate address into the command line to go to the ISNI ACCEPT system: see ISNI web links (restricted access)
- Press Enter
- Wait for Login screen
- Enter login and password
- It may take a few moments to connect; you may even see "Not Responding" but it will go away once connected
- The window background turns green when connected to the Accept database, and the top left corner shows you are logged into Accept:
ISNI PRODUCTION (live)
- Paste the following appropriate address into the command line to go to the ISNI PRODUCTION system: see ISNI web links (restricted access)
- Press Enter
- Wait for Login screen
- Enter login and password
- The window background turns light grey when connected to the Production database; the top left corner shows the following:
You can switch from ISNI ACCEPT to ISNI PRODUCTION and vice versa any time.
...
See the sections below, and ISNI documentation Pilot 2017-18 documentation and training, particularly these chapters from the British Library:
Creating a new ISNI record in WinIBW
...
- It doesn't matter which record gets the 77A field. The system will merge the records according to criteria outlined in the WinIBW manual. The cataloger cannot determine which record is retained.
- For more details, see section 4.1 of the WinIBW manual.
- Don't change the status of any of the records before merging.
- Merges are processed twice a day by the system.
- It is possible to have more than one 77A in a record to merge multiple records.
- When a merge is initiated in the client, the system adds field 006 with the logon ID of the individual in subfield $b
- Add linking fields, such as related person or organization, only after the merge has completed. Otherwise, the links (which rely on the PPN) may be broken.
...
1. CTRL+D – Selecting CTRL+D on WinIBW brings up a list of diacritics at the top of the screen:
Just put the cursor in the appropriate place on the record and select the relevant diacritic to be inserted. The unicode Unicode character/name can also be viewed by hovering over each diacritic. Note that for diacritics to be inserted into a record you will need to select UPDATE and be in the editing screen.
To remove the list of diacritics from the top of the screen just select CTRL+D again.
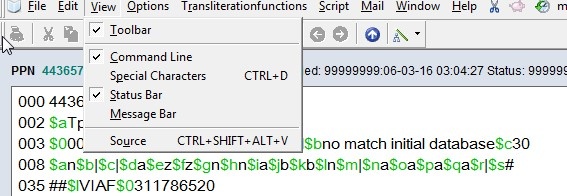
2. VIEW -> SPECIAL CHARACTERS – Alternatively, select VIEW and SPECIAL CHARACTERS to display the list of diacritics:
Selecting SPECIAL CHARACTERS will display the list of diacritics at the top of the screen. Follow the same procedure as above to insert diacritics into the record. To remove the list of diacritics, go to VIEW and de-select SPECIAL CHARACTERS from the list.
...
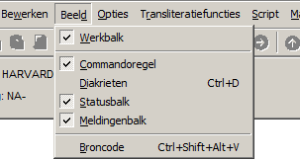
- Click on "Beeld" (view)
- Click on "Werkbalk" (toolbar)
This displays a set of icons that can be useful for working in a list. The tool tips are in English.
This setting does not seem to be persistent from one session to the next.
...
- Manual parts relevant to the sessions.docx
- PCC training: 1st session queries:this is a short summary of searching on WinIBW along with further information about the 77A field, put together by Michael Docherty of the BL/ISNIQT.
- Browse and Scan produce the same search results so you would only need to use one search. Fin Find can be used for names and we have provided some examples in the attached document.
- The direct/indirect order of names does not matter with a bro/sca search so we have added some examples in the document.
- We are currently revising the documentation which should be ready to send through in March, 2018. We did send an appendix containing all the ISNI data elements in advance of yesterday’s session so let us know if you did not receive this. However, it does not state which subfields are mandatory so we will add this and send a copy to everyone after the training.
...


