Much of the functionality that is exposed through the RESTful HTTP API is also available using an HTML user interface interpreted by your favorite web browser. Whether your request for particular API HTTP endpoints results in an HTML UI or more machine-readable formats is based on content negotiation headers. This tour walks you through the major user interface components when accessing the HTTP API through a web browser.
Home Page / Node View
When you access the root path of the RESTful HTTP API you are presented with a rendering of the root level node of your Fedora repository.
From here you can:
- Ingest new Objects and Datastreams.
- Inspect the properties of Objects and Datastreams.
- Update the properties of Objects and Datastreams.
- Navigate the Repository Hierarchy of Objects and Datastreams.
- Import/Export Objects and Datastreams.
- Start Transactions.
- Change Access Restrictions.
![]()
The user interface is divided into regions.
- Navigation bar (at the top)
- Resource information and navigation (left center)
- Optional resource actions
Navigation Bar
The navigation bar, which appears at the top of each page includes links to the following:
Resource Information
Information about the resource requested is displayed below the navigation bar, filling the left two thirds of interface.
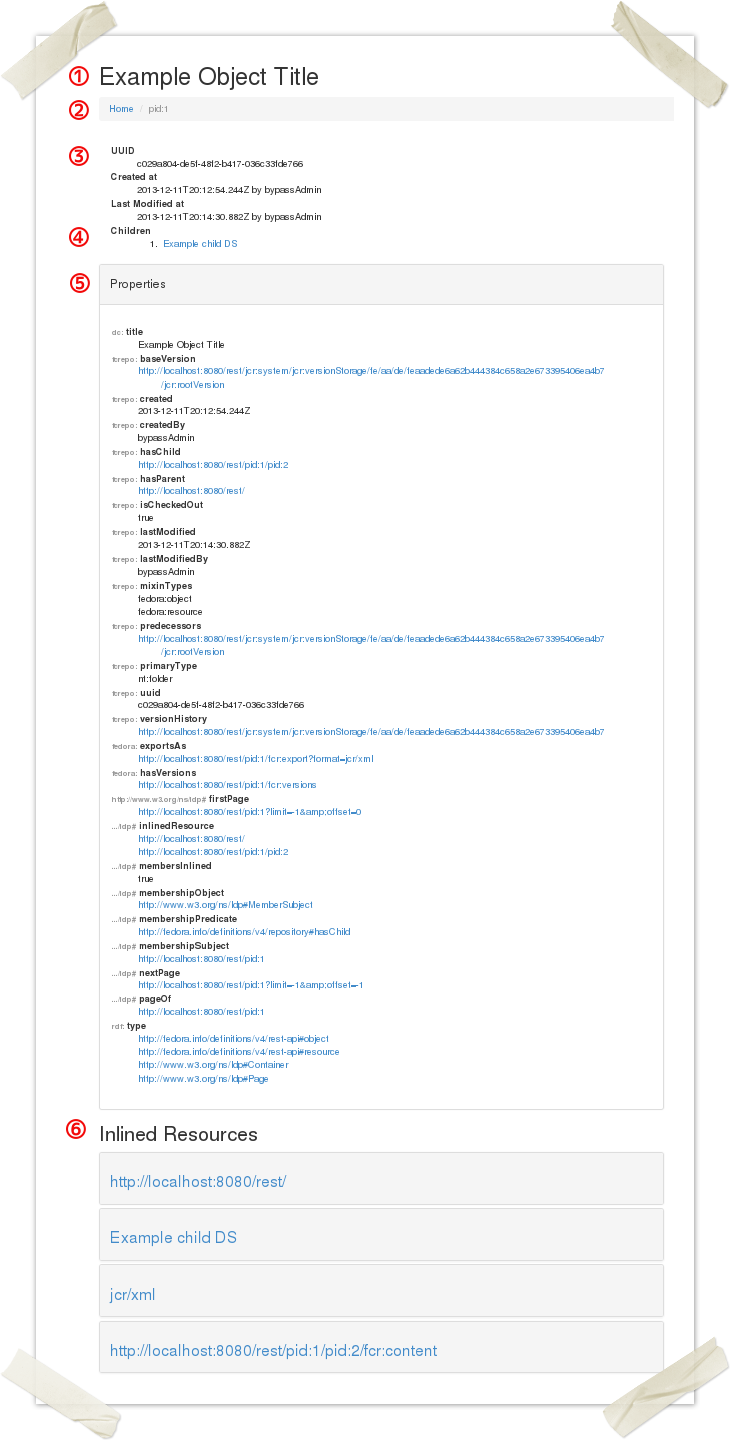
1 Object Title
If a title (either http://www.w3.org/2000/01/rdf-schema#label or http://purl.org/dc/elements/1.1/title) is available, it is displayed here. If no title has been assigned, the resource URI is displayed in this location.
2 Object Path
Fedora 4 is different from Fedora 3 in that there is an innate tree hierarchy to the repository rather than a flat hierarchy. The path (list of ancestors) for the viewed node is presented below the object title. Performance is expected to be better with a deeper hierarchy with fewer items per level as opposed to a shallower where each level has a larger number of siblings. The automatic ID (and path) generated is meant to optimize performance but you may use your own organizational strategy when creating objects and datastreams.
In this particular example, the object was created with a fully qualified name including a namespace and local name (separated by a colon). Fedora 4 does not require that identifeirs have namespaces, but if you wish to use them
3 Featured Properties
Very basic metadata such as the UUID and modification/creation times and users are presented below the object path
4 Children
Any children that the node has will be listed and linked here. Like the subject node, if these children have recognized title metadata, that title will be presented here rather than their URI.
5 All Node Properties
All properties of the node are presented here. Hover your mouse over the namespace prefix to see the full namespace.
6 Inlined Resources
A subset of properties from the parent node, children nodes are presented below the properties for the subject node. Click on the grayed box to expand the list of properties or the label text to view that resource directly.
Actions
These may include:
Create New Child Resource
From the homepage or any container page a form exists that lets you create a new container or binary that will be the child of the current container.
Download/Update Content
When viewing a NonRdfSourceDescription with binary content, click the large green button to download that content. You can also update the description of the binary using the form.
Update Properties
When viewing a resource, you can add or delete properties using the "Update Properties" form.
Delete Resource
You can delete the resource you are currently viewing by clicking the red "Delete" button.
Import/Export
When viewing a resource, you can export it using the "Export as..." button. In the case of containers, you can also import a resource using the "Import" form.