The following section will show you where to access forms in your Islandora installation, and how to clone and edit a form, and associate it with a content model. This section is for people who do not have knowledge of XPath, and covers only minimal configuration options. If you are more familiar with XPath, and XML, then we suggest that you go straight to the section on creating custom ingest forms, which provides a more technical overview of the interface, as well as information for creating elements.
To access the XML form builder, log into your Islandora site as an administrator, and navigate to Islandora > Form Builder (admin/islandora/xmlform). You should see the screen below:
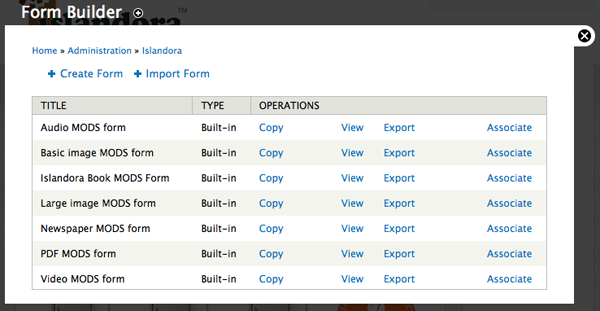
Here you will see all of the forms currently available. From this point you can create, copy, edit, view, export, or associate forms. When creating a new form, it is best to start by cloning the existing form associated with the content model your collection is utilizing.
In the list of available forms, find the form you want to clone and click “Copy.” On the next screen you will be prompted to give your new form a name:
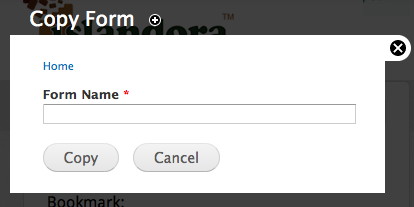
Make sure your name is something that you will remember.
Once you have named your form, click “Copy.”
You will be redirected to the Form editing interface, and receive a message at the top that your form has been successfully created:
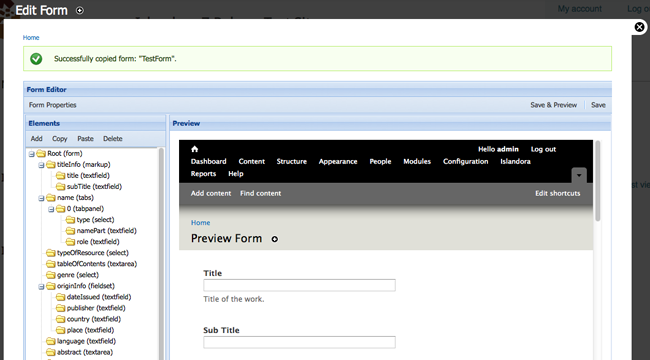
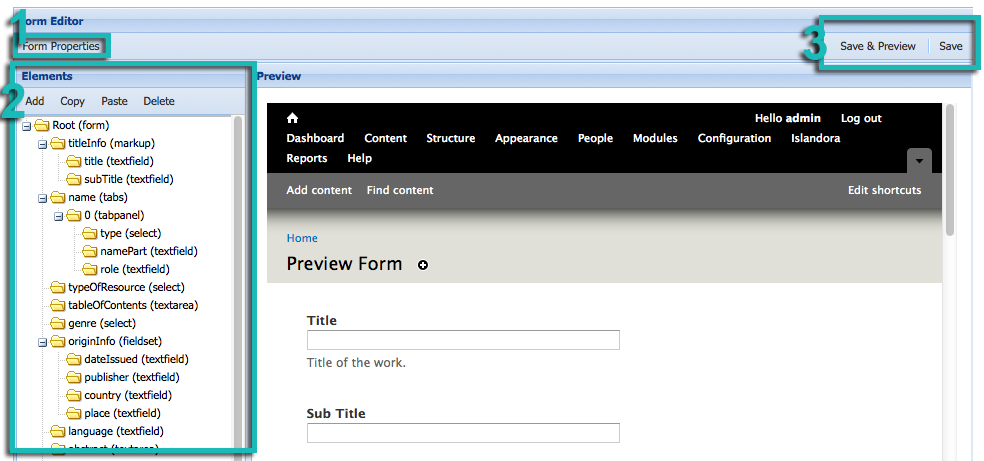
- Under “Form Properties” you can view the properties of your form.
- Under “Elements” you can view the fields you have created for your form, as well as make changes to those fields. Clicking on an element name will allow you to view the way that element will be created, read, updated, and deleted when you interact with the form, and the resulting metadata that the form will write.
- Click “Save” to save changes, and “Save and Preview” to save the changes and render the form in the preview screen.
To create a form using a new schema, you will have to create a new form from scratch, or clone a form of the appropriate schema. This requires knowledge of both XPath and the .xsd affiliated with that schema. To create a new element, you will also have to be familiar with XPath.
However, there are several simple “tweaking” functions you can perform that do not require in-depth knowledge of XPath and your schema’s .xsd. For example, you can delete an element (one that is deemed unnecessary for a user to fill out on ingest) by selecting the element with your cursor and clicking “Delete.”
Also, you can change the label of a field, or populate the field with a default value (for example, to pre-populate an author field for a author-specific collection) by selecting the element and editing the element's configuration properties.
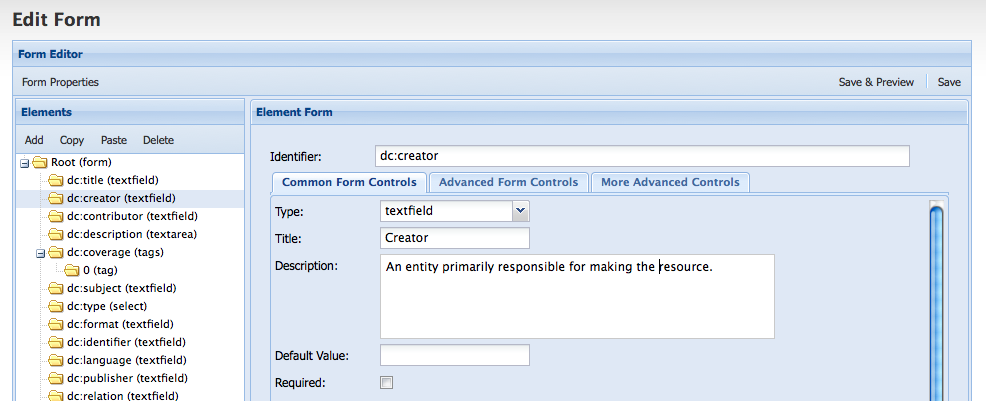
Here, you can change the label users see when interacting with this form field by changing the value for the “Title” of the element. You can change the description that appears underneath the entry box by changing the text in the “Description” field. If you want the field to be pre-populated with the creator’s name, enter the name in the “Default Value" field. In addition, if you want to make this field mandatory for you form, select the “Required” checkbox, and this field will appear with an asterisk, and the users will not be able to submit this form without filling in this field. Once you have made these changes, click “Save and Preview.” You will be able to view the form as it will appear to its users.
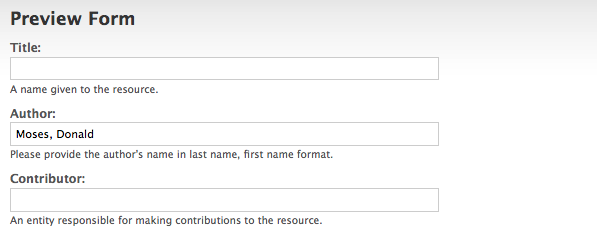
Here the default “Creator” label has been changed to “Author” and customized instructions for users appear below this field. The Author field has been pre-populated with a name to prevent unnecessary repetition for users ingesting items into this collection. However, the user can still edit this field on ingest if there is a case where the author’s name is different.
Once you have tweaked this form, you will have to associate it with the appropriate content model in order for this form to appear as an option for users on ingest. To create an association between your new form and a content model, navigate back to Islandora > Form Builder (admin/islandora/xmlform) and select "Associate" on the form you wish to associate with a content model. You will see the following page:
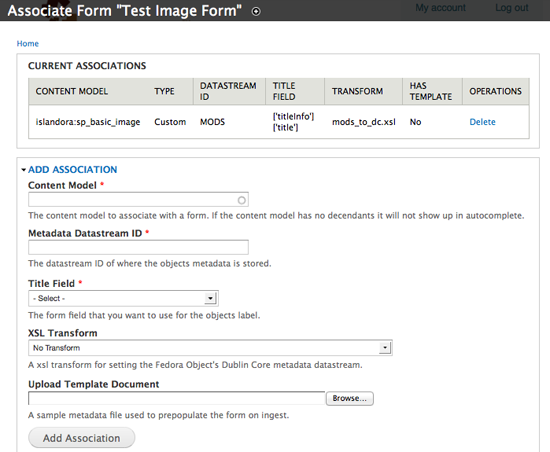
In order to fill out this form appropriately, ensure that you are familiar with the details of your solution pack - particularly the name of the content model, and the name of the metadata stream it prescribes. If you are not sure, please review the Solution Pack documentation for your installed solution packs.
At the top of the screen, you can see that all existing form associations are listed.
Under "Content Model" begin typing the PID of the content model you wish to associate a form with, and the name will auto-complete:

Under “Metadata Datastream ID” put in the DSID of the Datastream where your content model stores its rich metadata (not the DC Datastream). You must use the existing DSID prescribed in your content model (e.g., MODS, MARCXML, etc.), or this metadata will not appear in your collection objects. If you do not know what the correct DSID is for rich metadata in your content model, please review the documentation for the relevant content model. When you have entered the DSID for the Datastream, click "select" in the “Title Field.”
When you do this, you will notice that there is a change in the “Title Field” drop-down menu. Islandora populates this drop-down field with the elements in your form, so that you can choose which element will serve as the source for the object’s label. Most of the time, you will likely want the object's label to come from the “Title” element. This label can be manually edited after ingest if ever necessary.
Select which field you would like to use for the object’s label.

The next two options require a little bit more explanation:
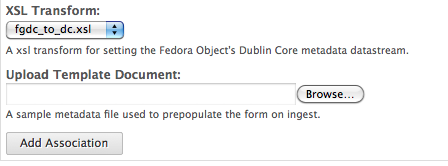
The "XSL Transform" file you choose is used by lslandora to crosswalk the schema of your rich metadata XML to Islandora’s default DC stream. In this case, where you are cloning a form, you will want to select the default xsl for your content model. This information is provided in the Solution Pack section of your document. (For more information about Islandora’s use of .xslts, please review the “Islandora and Metadata” section of the guide. XSLT are called from a folder within islandora_content_model_forms (in the XML Forms modules).
The “Template Document” is a feature that allows you to submit a form with fields already completed. Usually, this will be a form that you have created by hand in an XML editor. It is not obligatory.
Click “Add Association.” Now, whenever you create an object in a collection that is associated with the content model you have used here, you will see your new form as an option to select in the drop down menu.
The following section presumes that you are using the Virtual Machine Image or are visiting http://sandbox.islandora.ca OR that you have installed and configured the XML Forms module, and that you have a basic knowledge of XPath and understand metadata schemas. For an overview of how Islandora handles descriptive metadata, read Chapter 13 - Descriptive Metadata and Islandora. This section will discuss how to create a new form using the Islandora Form Builder.
The XML Forms Builder allows you to create and manipulate XML form templates and associate them with content models. This allows you to create custom forms to address the needs of your particular collection, or to pre-populate repeating fields. For example, if a collection of PDFs was all written by the same author, you may wish to create a custom form for this collection that has the author’s name pre-populated, so that users ingesting into this collection will not need to re-enter this information. Using custom forms you can also specify which metadata elements you wish to use to describe your object, and create validation rules for particular fields, among other features.
- If you are a developer, or somebody looking to install the XML form builder, you will want to review the section on the XML Form Builder module, which discusses the installation and configuration of the module.
- If you are a user, then the following documentation assumes that you have some understanding of metadata schemas and XML, as well as Islandora specific concepts such as Content Models, and Collection Objects. The greater grounding you have in XPath, XML Form Templates, and XML Schemas (.xsds), the greater use you will be able to make of the form builder.
- Solution Packs are designed to come pre-packaged with suitable forms written in MODS. These forms can be copied, and edited or modified to suit your needs.
- Forms can be created based on any schema.
Review and install the XML Form Builder module and its dependencies.
Metadata schemas specify the names and properties of elements that can be used in an XML file that is based on that schema.
When developing an XML form in the XML Form Builder you’ll need to reference the schema of the metadata format you are working with. Throughout this document we’ll be using the OAI DC metadata schema as an example. The OAI DC XML format is the serialization of Simple Dublin Core metadata descriptions and we’ll be using Dublin Core elements in this example. You can view/retrieve the schema from http://www.openarchives.org/OAI/2.0/oai_dc.xsd
It is helpful to have an example record on hand while developing the form. Ensure that it matches the version of the XML schema you are working with.
Sample OAI DC Record from a Fedora Repository
<oai_dc:dc xmlns:oai_dc="http://www.openarchives.org/OAI/2.0/oai_dc/" xmlns:dc="http://purl.org/dc/elements/1.1/"
xmlns:xsi="http://www.w3.org/2001/XMLSchema-instance" xsi:schemaLocation="http://www.openarchives.org/OAI/2.0/oai_dc/
[http://www.openarchives.org/OAI/2.0/oai_dc.xsd]">

<dc:title>Pioneer days & shanty ways</dc:title>
<dc:creator>Eldershaw, Edith V.</dc:creator>
<dc:subject>History</dc:subject>
<dc:subject>Social life and customs</dc:subject>
<dc:description>Edith V. Eldershaw.</dc:description>
<dc:description>Printed by Williams & Crue Ltd.; Summerside, P.E.I.</dc:description>
<dc:description>Contains "stories", poems, and photographs,</dc:description>
<dc:publisher>Eldershaw</dc:publisher>
\\

<dc:type>collection</dc:type>
<dc:type>ingested</dc:type>
<dc:format>electronic</dc:format>
<dc:identifier>ilives:257167</dc:identifier>
<dc:language>eng</dc:language>
<dc:coverage>Prince County (P.E.I.)</dc:coverage>
\\

<dc:coverage>Tignish (P.E.I.)</dc:coverage>
<dc:coverage>Prince Edward Island</dc:coverage>

</oai_dc:dc>
When developing a metadata form it can be useful to have an XML editor to test code in. Typically these editors can help you determine the XPath of an element, whether the output you are producing is valid, etc. XML editors would include oXygen (commerical), XPontus (opensource), and there are many others.
XML Form Builder is a Drupal module that integrates the creation of XML based forms into Islandora. Once a form has been built, it is associated with a content model. This tutorial will take you through the process of creating a form, associating it with a content model, and implementing it with a collection. Once it has been created you will be able to create and edit your metadata.
To use the XML Form Builder navigate to the module in your Islandora site: Islandora > Form Builder (admin/islandora/xmlform)
When you start the module you are presented with a list of forms (those are the forms that come bundled with your Islandora install) and a series of options to perform.
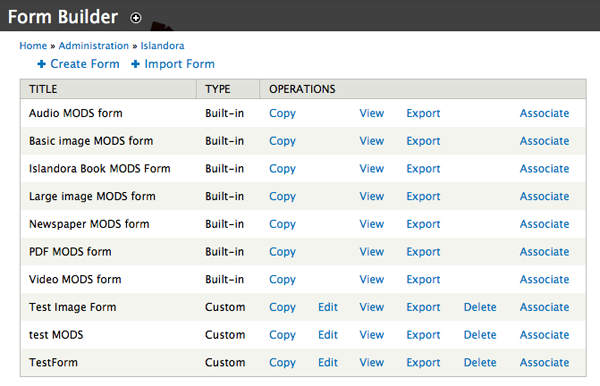
Create Form: Select to begin the process of creating a metadata form from scratch or from an existing form definition file (an XML Form Builder form).
Copy: Copies an existing form, that you can then modify. This is probably be one of the most common methods you will use to create new forms.
Edit: Edits an existing form.
View: View an existing form. This option is useful when testing input. You can submit a form and see its XML output.
Export: Exports an existing form and allows you to save the form XML to your local computer.
Delete: Removes a custom form.
Associate: Links a form with a content model.
To start creating a form click "Create Form."
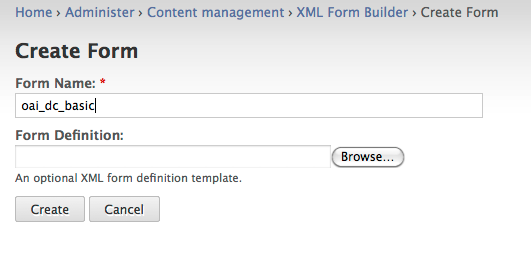
In the Create Form dialogue enter a form name - for example we are creating a basic OAI DC form so a name like oai_dc_basic would be appropriate. If you have an existing XML Form Builder form you could upload the form definition. We’ll be creating this OAI DC XML form from scratch, so we can click on "Create" without uploading a form definition.
The module should report that it successfully created a new form called oai_dc_basic.
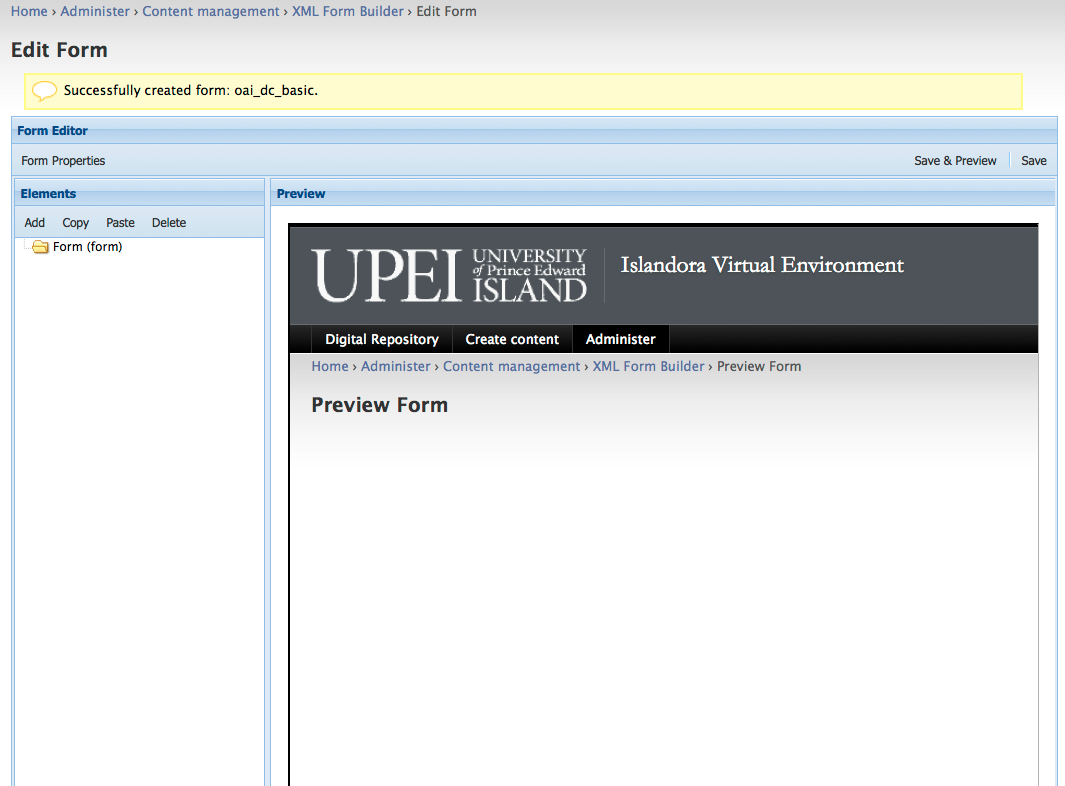
This is the main form building/editing interface for creating XML forms and it provides methods for adding form properties, form fields and a preview pane.
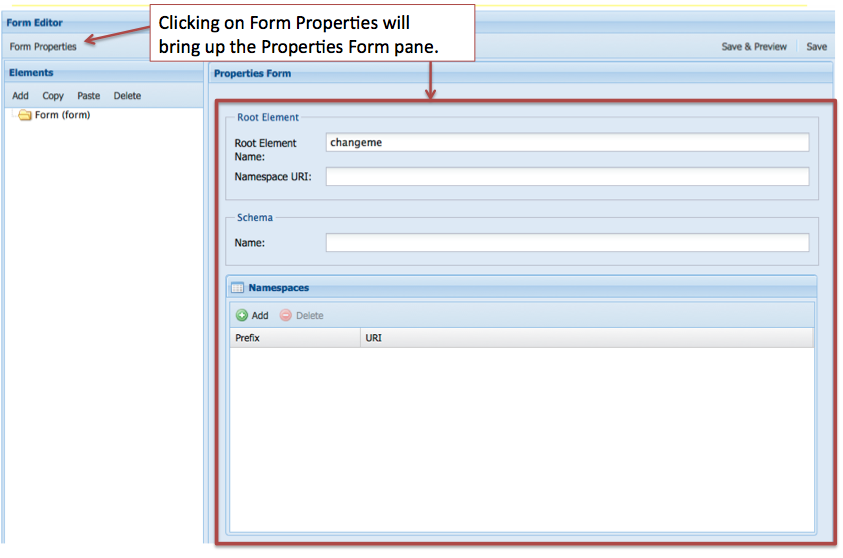
When creating an XML form the first thing you need to set in the Form Editor is the Form Properties. This is where having an example of an OAI DC record would come in handy and would provide the information you need to fill in the Form Properties. Here is the part of the record that you’ll use:
<oai_dc:dc xmlns:oai_dc="http://www.openarchives.org/OAI/2.0/oai_dc/" xmlns:dc="http://purl.org/dc/elements/1.1/"
xmlns:xsi="http://www.w3.org/2001/XMLSchema-instance" xsi:schemaLocation="http://www.openarchives.org/OAI/2.0/oai_dc/
http://www.openarchives.org/OAI/2.0/oai_dc.xsd">
It provides information about the Root Element Name, the Namespace URI, the location of the Schema, as well as the various namespaces needed.
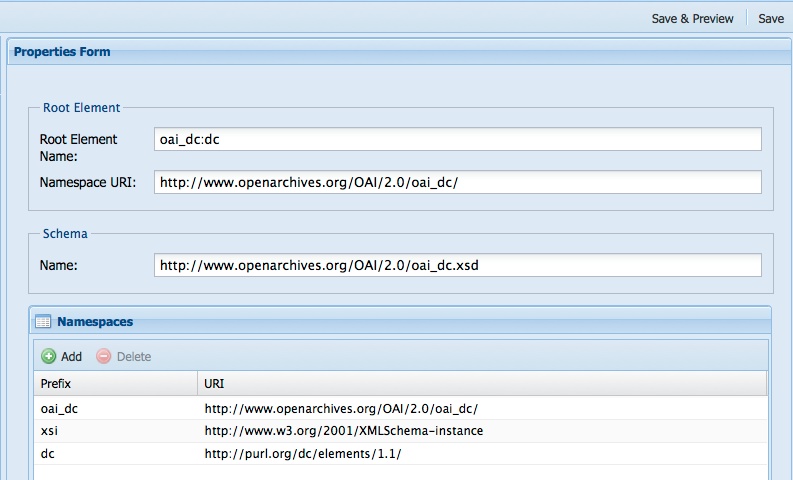
Click "Save" once you have the properties entered. Once the form properties have been saved you are ready to add fields to your form.
Some schema specify that elements appear in a certain order (an order-based schema), that certain elements are required, that only certain elements are repeatable, or whether and how elements can be nested. Refer to your schema documentation and to any guidance it offers in the creation of records based on the schema. In the schema we are using in this tutorial, Simple Dublin Core, each of the fifteen elements is optional and may be repeated, but no nesting is allowed. We will create a simple form for this exercise that utilizes several Dublin Core elements. Let’s create a table listing the element names, the form field labels, the types of form fields, the content of the elements, and whether they are repeatable. We’ll use this information when adding fields to our form.
Element | Label | Type | Content | Repeatable |
title | Title | textfield | The title of the work. | no |
creator | Creator(s) | tags/tag | The creator(s) of the work. | yes |
description | Description | textarea | A description of the work. | no |
type | Type | select | A controlled list of terms | no |
date | Date | datepicker | The date the work was issued or published. | no |
subject | Subject(s) | tags/tag | The topic of the work. | yes |
rights | Rights | textarea | Information about rights held in and over the resource. | no |
Adding a textfield type form field - the dc:title element
We can use the information in our table to fill out the "Element Form" pane. We can start with the title element.
In this part of the form you can enter values for Identifier, Type, Title, Description, Default Value, and Required. These can be defined as follows:
Identifier: An ID for this form field. It is the Drupal form array key for this element. Typically you would just enter the name of the element you are describing.
Type: The form field type for this field (textfield, textarea, select, etc.)
Title: The label of the form field as it appears on your form. Typically you would just enter the name of the element you are describing.
Description: The description of the element that this Element Form is about.
Default Value: The value to be display or selected initially for this element if the form has not been submitted yet.
Required: Indicates whether or not the element is required. This automatically validates for empty fields, and flags inputs as required. Fields with a Type of "file" are not allowed to be required.
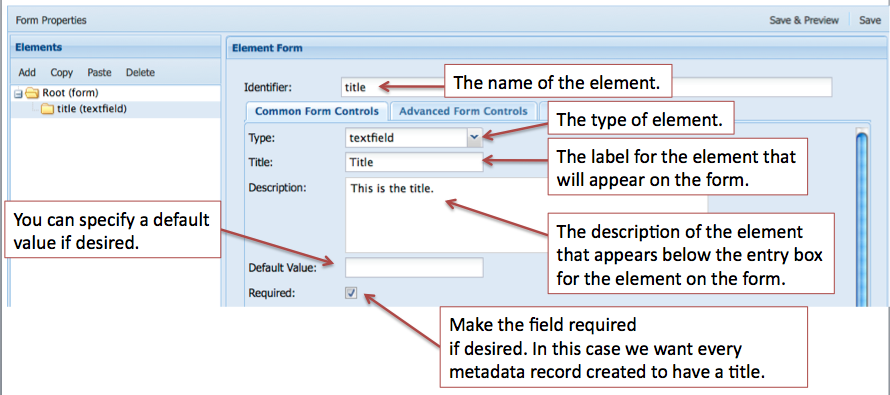
The rest of the form deals with where each element is created, read, updated, and deleted in the XML tree. This is where it would be useful to understand how XML works and to have a basic understanding of XPath.
Reviewing our OAI DC XML sample record we can determine the location/context of the title element.
<oai_dc:dc xmlns:oai_dc="http://www.openarchives.org/OAI/2.0/oai_dc/"
xmlns:dc="http://purl.org/dc/elements/1.1/"
xmlns:xsi="http://www.w3.org/2001/XMLSchema-instance"
xsi:schemaLocation="http://www.openarchives.org/OAI/2.0/oai_dc/
[http://www.openarchives.org/OAI/2.0/oai_dc.xsd]">
<dc:title>Pioneer days & shanty ways</dc:title>
The full XPath in this XML document for the dc:title element would be:
where /oai_dc:dc is the parent element and dc:title is the child element. The Create dialogue is where we enter the information needed for creating an element in our form. We’ll be entering information into the Path Context, Path, Type, and Value properties in our example. If you had an order-based schema, you would also fill in the Schema field. Here are some definitions for each of those properties:
Path Context: the context at which the XPath action with be executed.
- document - the XPath query is run from the root element of the document
- parent - the XPath query is run from the node created/read by its parent’s form field
- self - only applies to Delete and Update actions and applies to the node selected by the Read action.
Path: An XPath to this element’s parent object. This is used to determine where this element is inserted.
Schema: An XPath to the definition of this element's parent. The XPath is executed in the schema defined in this form's properties. This is used to determine the insert order for this element.
Type: The type of node that will be created. If XML is specified, an XML snippet is expected in the Value field.
Value: If the Type is either "element" or "attribute," the name of the element or attribute is expected here. If the Type is "XML," an XML snippet is expected in which %value% indicates where the value of the form field will be inserted.
Review the image below and think about how your other OAI DC elements will be created based on this pattern.
- Create action is about selecting the parent node where the new node will be created.
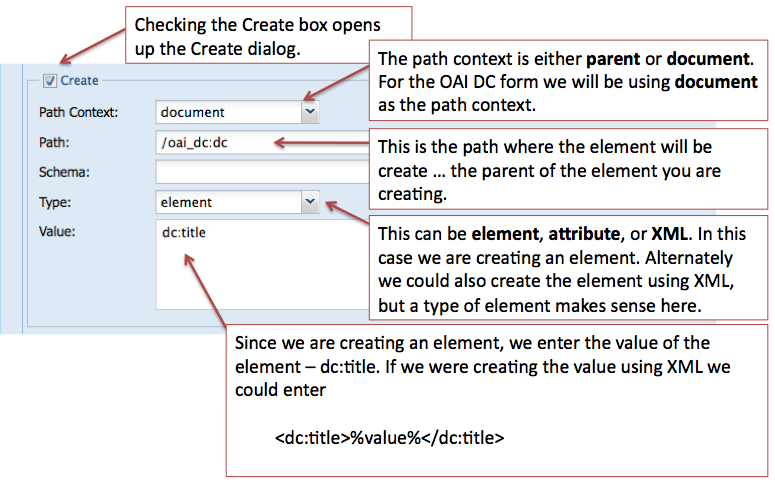
The rest of the form deals with where the element will be read, updated, and/or deleted from.
- Read action is about selecting the node that will be used to populate the form field.
- Update action is about updating the node that was used to populated the form field.
- Delete action is about deleting the node that the Read action selected.
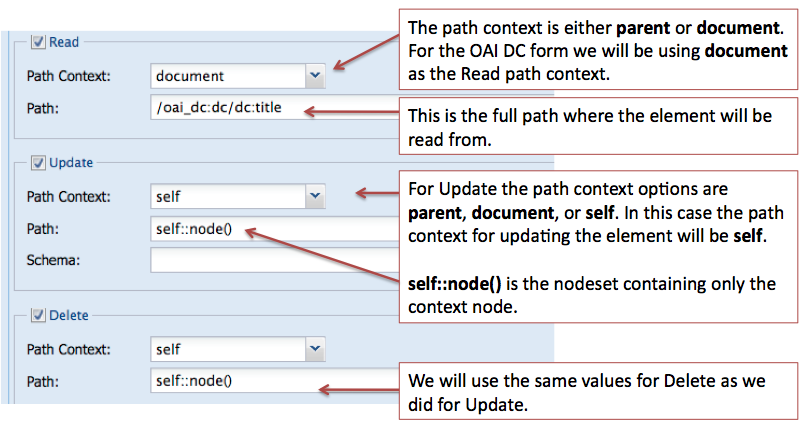
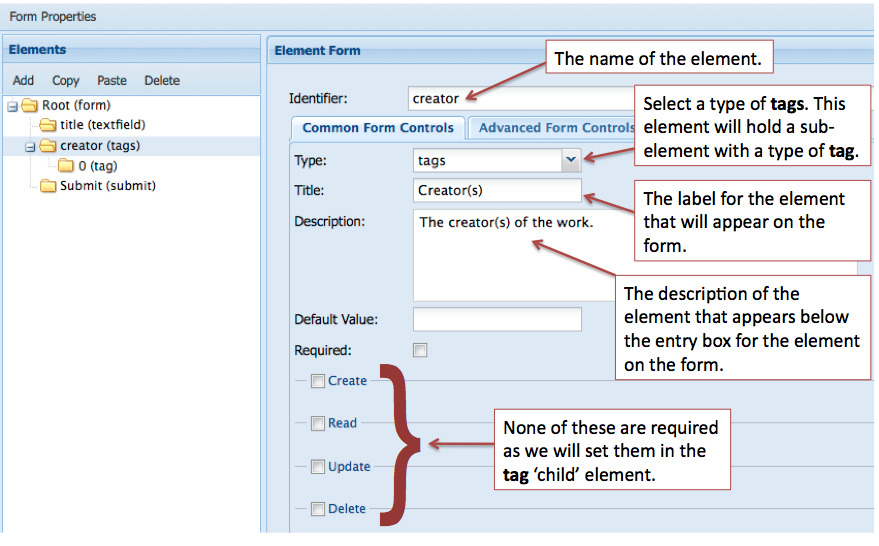
In some cases you will have multiple occurrences of an element, for example a digital object may have more than one creator (multiple authors) or may have many subjects that describe it. The Form Builder has several methods dealing with this use case. In our example OAI DC form we have decided that there could be multiple creators and the schema allows that. It is a two step process:
- create an element with a type of tags,
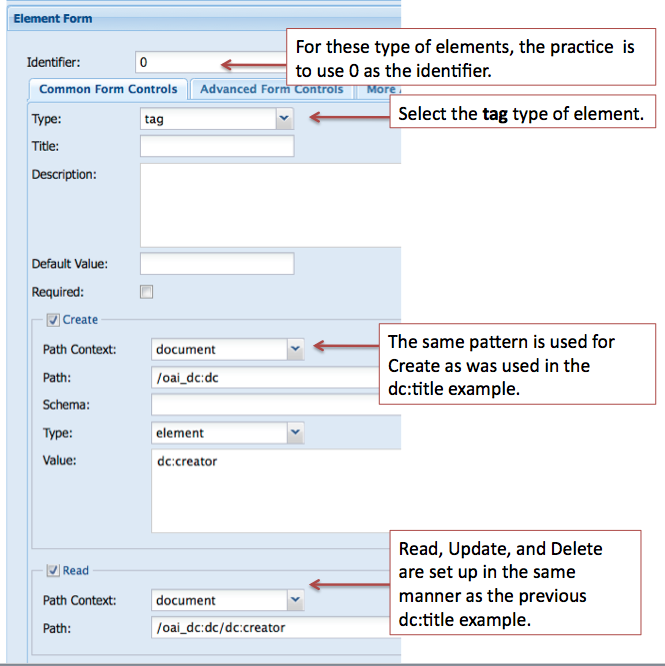
- nest another element in the tags type element that has a type of tag.
This image displays the first step of the creation of the creator element.
The second step is to create a nested tag type element. The image below displays the values for the properties used for this element.
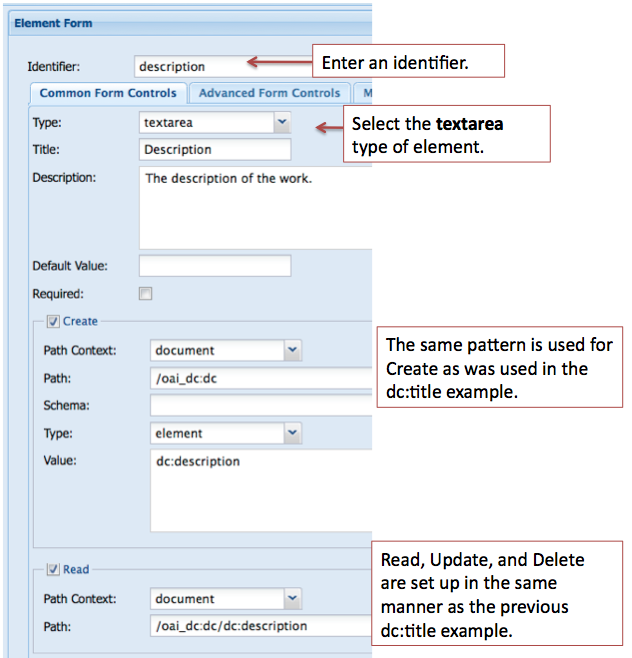
Adding a textarea type form field - the dc:description element
The "textarea type" of form field should be used for elements that require a description or that contain a large amount of text.
In many cases you will want to provide the user with a list of controlled terms and the select form field type is used. For the type element our controlled list of terms is based on the DCMI Type Vocabulary. The Vocabulary provides a general, cross-domain list of approved terms that may be used as values for the Resource Type element to identify the genre of a resource.
DCMI Type Vocabulary
Term | Description |
Collection | An aggregation of resources. |
Dataset | Data encoded in a defined structure. Examples include lists, tables, and databases. A dataset may be useful for direct machine processing. |
Event | A non-persistent, time-based occurrence. Examples include an exhibition, webcast, conference, workshop, open day, performance, battle, trial, wedding, tea party, conflagration. |
Image | A visual representation other than text. Examples include images and photographs of physical objects, paintings, prints, drawings, other images and graphics, animations and moving pictures, film, diagrams, maps, musical notation. |
InteractiveResource | A resource requiring interaction from the user to be understood, executed, or experienced. Examples include forms on Web pages, applets, multimedia learning objects, chat services, or virtual reality environments. |
MovingImage | A series of visual representations imparting an impression of motion when shown in succession. Examples include animations, movies, television programs, videos, zoetropes, or visual output from a simulation. |
PhysicalObject | An inanimate, three-dimensional object or substance. Note that digital representations of, or surrogates for, these objects should use Image, Text or one of the other types. |
Service | A system that provides one or more functions. Examples include a photocopying service, a banking service, an authentication service, interlibrary loans, a Z39.50 or Web server. |
Software | A computer program in source or compiled form. |
Sound | A resource primarily intended to be heard. Examples include a music playback file format, an audio compact disc, and recorded speech or sounds. |
StillImage | A static visual representation. Examples include paintings, drawings, graphic designs, plans and maps. Recommended best practice is to assign the type Text to images of textual materials. |
Text | A resource consisting primarily of words for reading. Examples include books, letters, dissertations, poems, newspapers, articles, archives of mailing lists. Note that facsimiles or images of texts are still of the genre Text. |
Source
When adding a select form field in the Form Builder there are two steps:
- Add the information about the element you are creating
- Add the terms that will display in the select list for users
1. When adding information about the element we will use the same method that we have used previously.
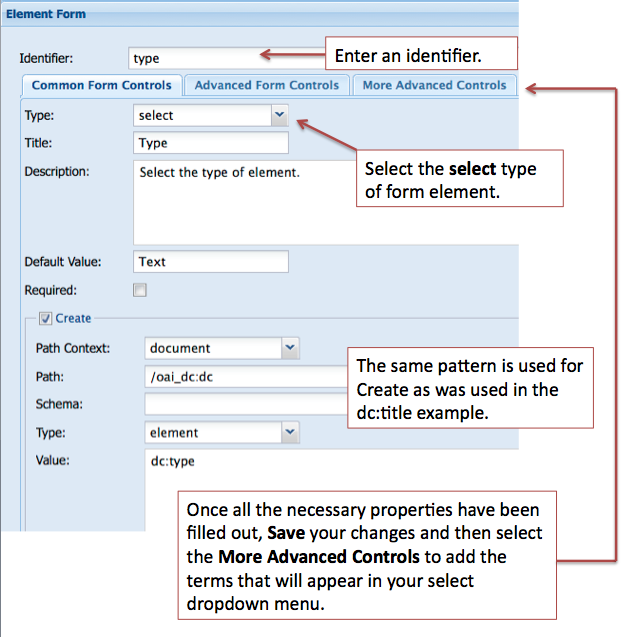
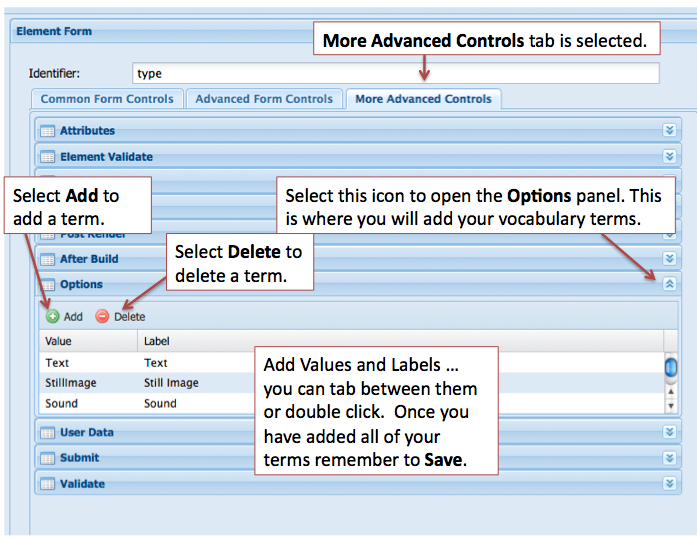
2. To add terms to your select form field, click on the "More Advanced Controls" tab in the "Element Form" pane. Review the image below and enter your terms in the Options panel.
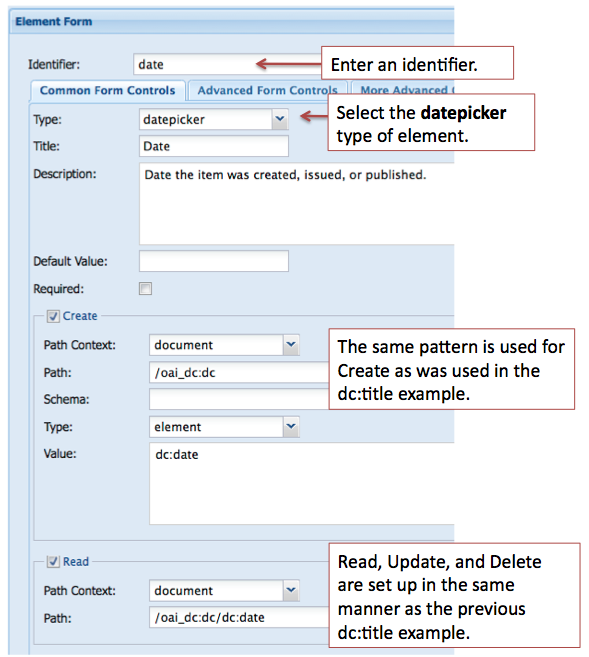
For this example we are using the datepicker type of form field. You will want to review your existing metadata as another type of form field may be more appropriate.
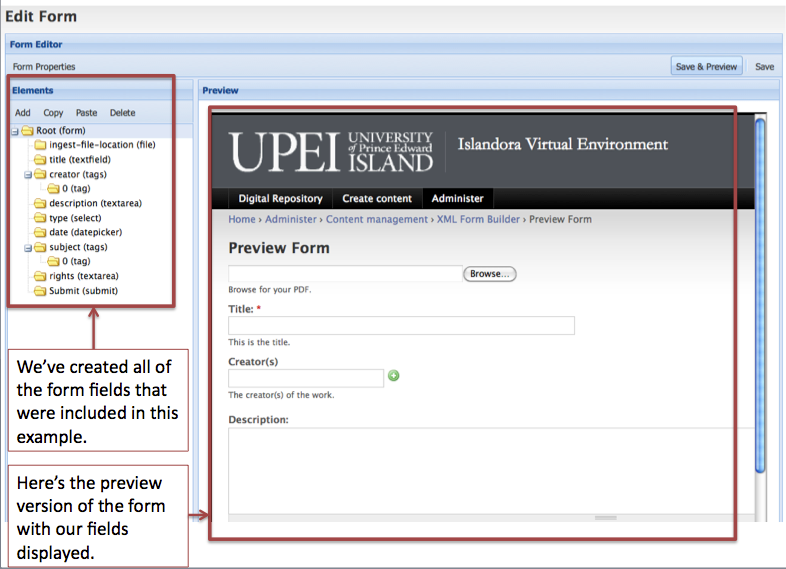
The remaining two elements for our sample OAI DC XML form, dc:subject (tags, tag) and dc:rights (textarea), can be built in the same manner as fields of a similar type that we have already created.
One additional element that can be added for convenience is a file upload type form field. This will allow you to browse for a PDF document on your local machine as part of the Islandora ingest process. The image below illustrates what properties need to be filled in.
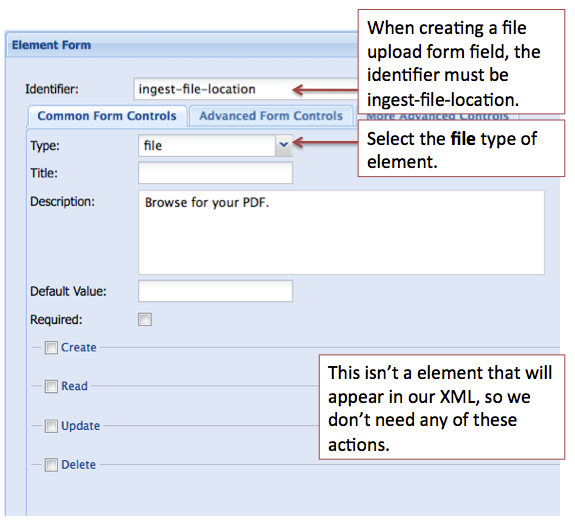
Connecting the Form to a Content Model
Once you’ve completed and tested the form you’ve created in the XML Form Builder module, you can connect that form to an existing content model using the Form Associations module. You can navigate to the module using this path:
Administer > Content management > Form Associations
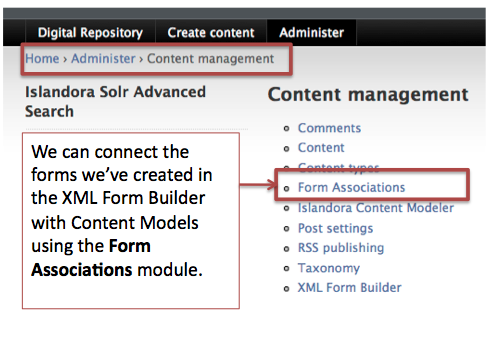
In this example we will associate the form we created - oai_dc_basic - with the islandora:sp_strict_pdf content model. Review the image below to fill out the Form Associations dialog.
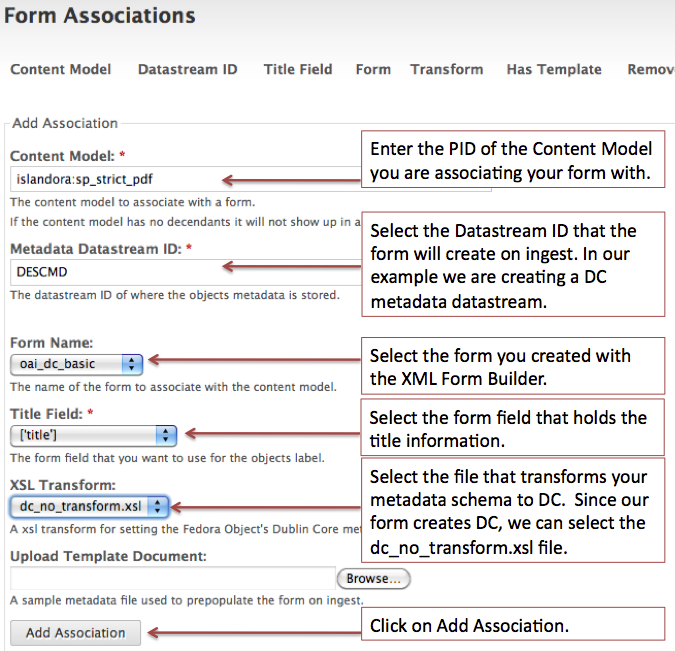
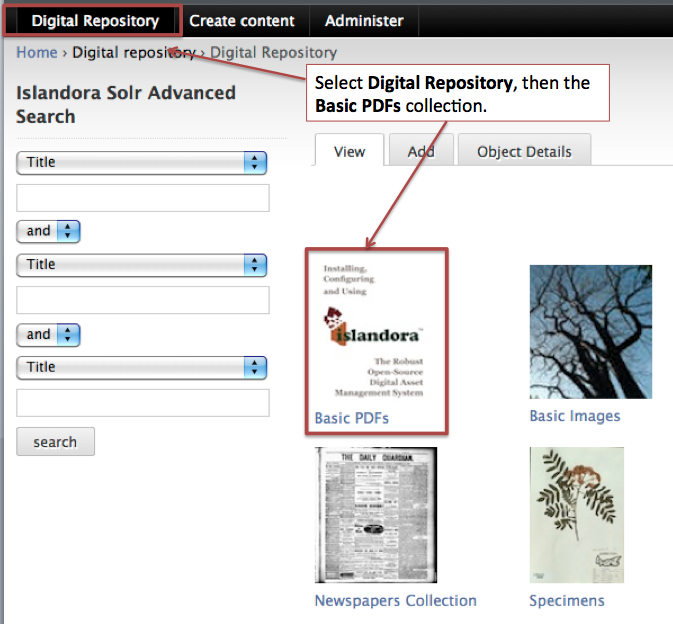
Once the association has been successfully created, you can try ingesting new objects into a collection that has the islandora:sp_strict_pdf content model associated with it. Alternatively, access the Islandora demo VM which has a PDF collection associated with the islandora:sp_strict_pdf content model. Navigate to the PDF collection using the image as a guide and try creating new PDF objects there.
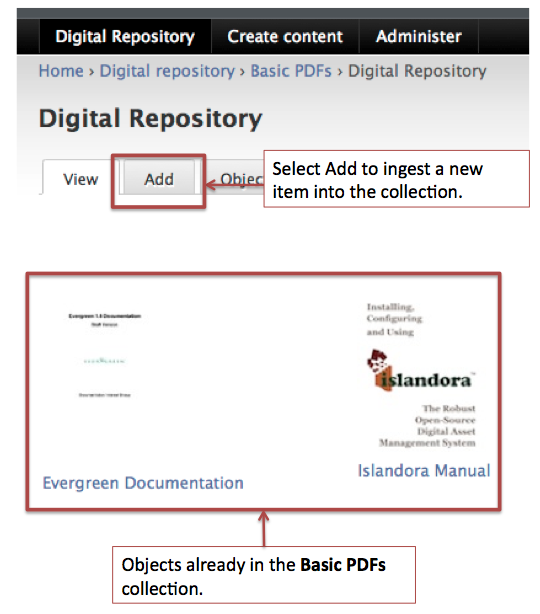
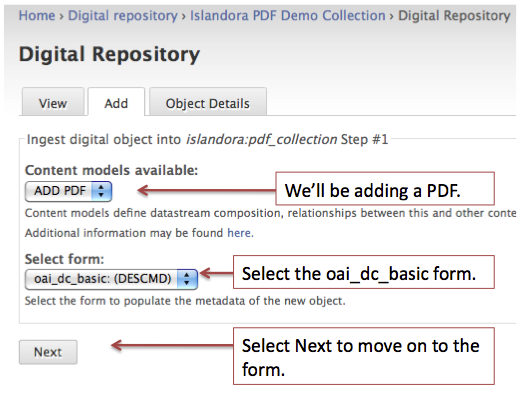
Once in the collection (you can tell where you are by the breadcrumb), select the Add tab to add a new PDF to the collection.
You will be presented with a dialog requesting two pieces of information: the content model and the form to use for ingest.
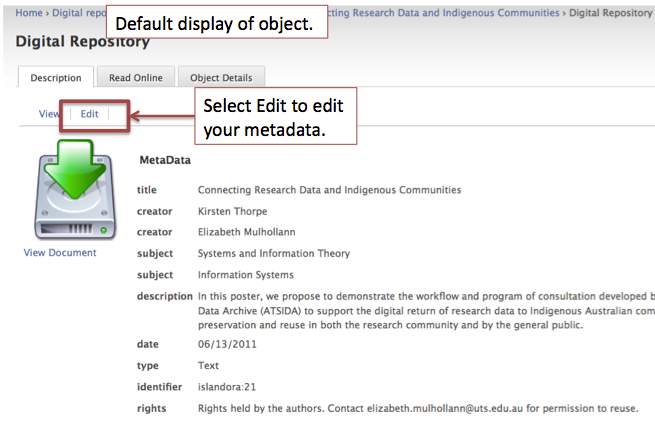
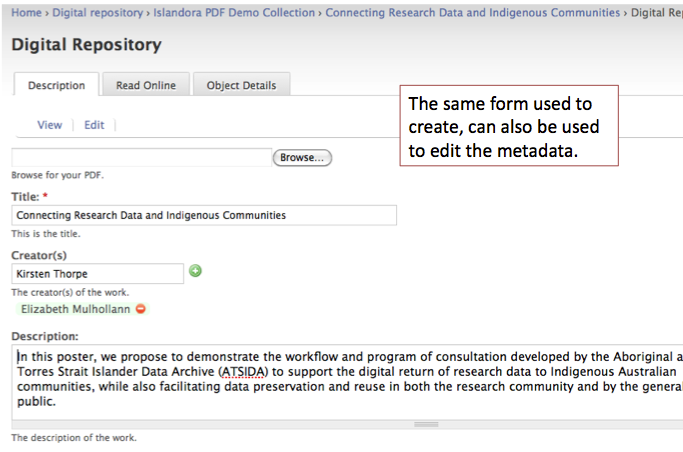
You will be presented with the form that we created during this tutorial. You’ll need to fill it in. Once you’ve completed your data entry, submit the form.


6 Comments
Peter MacDonald
Here is a suggested change in wording for image: Chapter7image7.png
Change "The type of element" help box message to "The type of form field."
Peter
Peter MacDonald
Here are two suggested changes in wording for image: Chapter7image8.png.
1. Change "This is the path were the element will be create... the parent of the element you are creating."
to
"This is the path were the element will be created or the parent of the element you are creating."
2. Change the word "Alternately" to "Alternatively" in one of the help boxes.
Peter
Peter MacDonald
A suggested change in wording for image: Chapter7image12.png.
Change "Select the textarea type of element." to "Select the textarea type of form field."
Peter
Peter MacDonald
A suggested change in wording for image: Chapter7image13.png
Change "Select the select type of form element." to "Select the select type of form field."
Peter
Peter MacDonald
A suggest change in wording for image: Chapter7image15.png
Change "Select the datepicker type of element." to "Select the datepicker type of form field."
Peter
Peter MacDonald
Two suggested changes in wording for image: Chapter7image16.png
1. Change "Select the file type of element." to "Select the file type of form field."
2. Change "This isn't a element that..." to "This isn't an element that..."
Peter