
(Jump to other KnowledgeBases)
DSpace Resources
DSpace Website![]()
DSpace Documentation
DSpace Wiki
DSpace Demo Site![]()
Contribute to KnowledgBase![]()
(Jump to other KnowledgeBases)
DSpace Website![]()
DSpace Documentation
DSpace Wiki
DSpace Demo Site![]()
Contribute to KnowledgBase![]()

![]()
![]() The KnowledgeBase is under development and has been made viewable to the user communities to allow for content contributions and feedback. Please post your content in the appropriate section and/or feedback in the comments section located at the bottom of each page.
The KnowledgeBase is under development and has been made viewable to the user communities to allow for content contributions and feedback. Please post your content in the appropriate section and/or feedback in the comments section located at the bottom of each page.
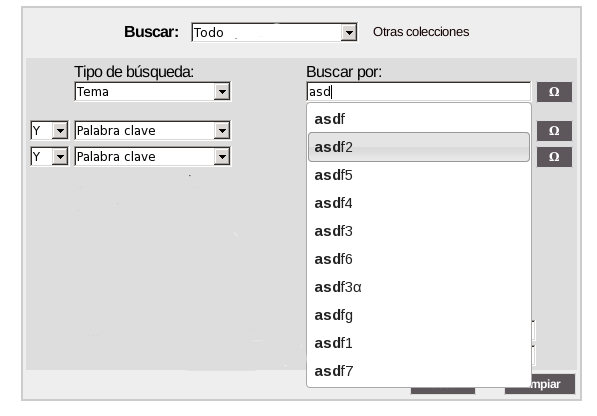
Using jquery and jquery-ui libraries we'll try to setup the autocomplete functionality on every textbox of advanced search page, we'll take advantage of Discovery Solr cores to add an additional search core for JSPUI. This tweaking has been done on a linux system using ln command, there's no grant that will work in Windows systems the same way. Check first on development server before moving this modifications to production.
Once finished our textboxes must work like this:
Administrators that use XMLUI interface will notice that Discovery functionality strongly increases searching and browsing by the use of layered navigation and textbox autocomplete among others. To achieve these goals an Apache Solr search server is deployed in [dspace-source]/dspace/solr to take care of all query-reponse handling.
JSPUI interface use an Apache Lucene Directory (located on [dspace]/search ) to search and browse by, but it leaks of previously mentioned functionalities.
First of all we'll add jquery and jquery-ui libraries to advanced search .jsp page. We can add them on head section of advanced search page [dspace-source]/dspace-jspui/dspace-jspui-webapp/src/main/webapp/search/advanced.jsp, or use a on/off switch approach to attach them as described on Adding jQuery (or other script library) support on JSPUI. In this manual we'll attach jquery libraries by appending them on head section.
First we must download jquery and jquery-ui script libraries from jQuery UI webpage, we'll download it's full version so we can use more functionalities on future improvements. All files are zipped inside a structure like this:
We'll use only js and css folders for our purposes. I'll describe selected folders content:
We'll create a new folder inside [dspace-source]/dspace-jspui/dspace-jspui-webapp/src/main/webapp/static/js/jqueryui and copy all previously described files inside it. Structure will look like this:
[dspace-source]/dspace-jspui/dspace-jspui-webapp/src/main/webapp/static/js/jqueryui/jquery-1.7.2.min.js
[dspace-source]/dspace-jspui/dspace-jspui-webapp/src/main/webapp/static/js/jqueryui/jquery-ui-1.8.21.custom.min.js
[dspace-source]/dspace-jspui/dspace-jspui-webapp/src/main/webapp/static/js/jqueryui/css/...
Now we must create a new SOLR core inside [dspace-source]/solr directory. To do so we'll use one of the existing cores and copy it's structure with this command:
bash$ cp -R [dspace-source]/dspace/solr/search [dspace-source]/dspace/solr/searchJSPUI
We'll edit [dspace-source]/dspace/solr/solr.xml and add one extra line with our new search core.
<cores adminPath="/admin/cores">
 <core name="search" instanceDir="search" />
 <core name="statistics" instanceDir="statistics" />
 <core name="searchJSPUI" instanceDir="searchJSPUI" />  <-- Add this line
 </cores>
Now we'll modify new solr core configuration file [dspace-source]/dspace/solr/searchJSPUI/conf/schema.xml
All content on the LYRASIS Wiki is licensed under the CC BY (Attribution) license![]() , unless otherwise noted.
, unless otherwise noted.