Scope: How to log in to the WinIBW client.
Created by: Minna Popkin (Harvard), Amy Armitage (Harvard)
For more information about using the WinIBW client, please see the WinIBW documentation posted under ISNI documentation
Database access
We have access to two databases via the WinIBW client:
- ACCEPT is the test database. Training and experimenting should be done here.
- PRODUCTION is the live ISNI database. Work performed here affects real records.
Logging in
Do not click on the link Start sessie (it will lead you to the cataloguing system of the Dutch libraries).
Press Alt-c or mouse-click to get the cursor on the WinIBW command line at the bottom of the screen

ISNI ACCEPT (test)
- Paste the following address into the command line to go to the ISNI ACCEPT system: see ISNI web links (restricted access)
- Press Enter
- Wait for Login screen
- Enter login and password
- It may take a few moments to connect; you may even see "Not Responding" but it will go away once connected
- The window background turns green when connected to the Accept database, and the top left corner shows you are logged into Accept:

ISNI PRODUCTION (live)
- Paste the following address into the command line to go to the ISNI PRODUCTION system: see ISNI web links (restricted access)
- Press Enter
- Wait for Login screen
- Enter login and password
- The window background turns light grey when connected to the Production database; the top left corner shows the following:

You can switch from ISNI ACCEPT to ISNI PRODUCTION and vice versa any time.
- To switch to between the databases, paste the appropriate address into the command line.
Passwords
Password assignment
July 28, 2017: Harvard requested two logins per institution as a first pass, just so that a manageable request would go into OCLC such that we could be assured of quick turnaround on the initial 30 logins. We’ll be back in touch with them shortly to supplement logins for institutions that will have many practitioners involved in the pilot.
Note that ISNI has not required or in our experience so far provided individualized logins. At Harvard, we have assigned individuals to specific logins so that we could troubleshoot any issues with ISNI activity while using the WinIBW client, but otherwise, sharing logins seems not to be a problem, other than potentially conflated searching histories.
Changing passwords
The initial passwords given to us by OCLC are the same for each user for PRODUCTION (live) and for ACCEPT (test). However, changing the password in one doesn't automatically change it in the other.
- Launch the web interface.
- Connect to the ISNI ACCEPT system: ISNI web links (restricted access).
- Log in.
- Once logged in, type edit password on the command line, then follow prompts to change the password.
- Write down new password.
- Repeat steps 2-5 on the ISNI PRODUCTION system: ISNI web links (restricted access).
The instructions say that the password must be 0-16 characters long and can only contain characters a-z, A-Z, 0-9.
Each institution's technical contact should implement and manage a change password schedule.
Documentation and How tos
See ISNI documentation, particularly these chapters from the British Library:
Specific scenarios/questions from PCC participants
Diacritics
Copy and paste can be used. However, on WinIBW diacritics can also be accessed using the following methods:
1. CTRL+D – Selecting CTRL+D on WinIBW brings up a list of diacritics at the top of the screen:
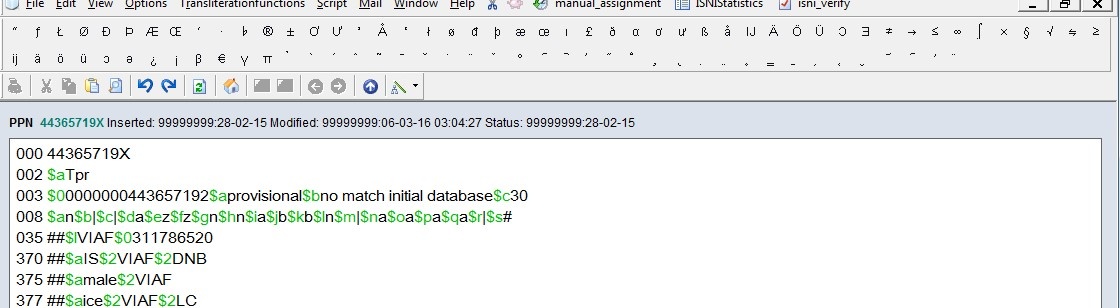
Just put the cursor in the appropriate place on the record and select the relevant diacritic to be inserted. The unicode character/name can also be viewed by hovering over each diacritic. Note that for diacritics to be inserted into a record you will need to select UPDATE and be in the editing screen.
To remove the list of diacritics from the top of the screen just select CTRL+D again.
2. VIEW-SPECIAL CHARACTERS – Alternatively, select VIEW and SPECIAL CHARACTERS to display the list of diacritics:
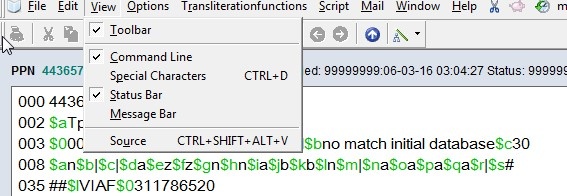
Selecting SPECIAL CHARACTERS will display the list of diacritics at the top of the screen. Follow the same procedure as above to insert diacritics into the record. To remove the list of diacritics, go to VIEW and de-select SPECIAL CHARACTERS from the list.
Version
As of April, 2017, we use version 3.7.1. We were specifically instructed by OCLC to install the Dutch version.
Settings
You can type eng into command line to switch language, but it may not be necessary because the interface language seems to change once you log in.